Google Cloud Platformで公開された Google Container Engineを触ってみたいと思います。
GKE is 何?
GKEはGoogle Compute Engine上にKubernetesのクラスタを作成し、Dockerコンテナを配置可能にしてくれます。
Kubernetes自体はDockerコンテナマネージャに近い役割で、Dockerコンテナの配備、ネットワーキング、死活監視&リスタートなどなどの機能を持っています。
どこまでGoogle側がめんどうみてくれるかはまだドキュメントの範囲では不明ですね...
元々GCEには Container Optimized Imageと呼ばれるKubernetesのコンポーネントの一つKubeletを持ったImageがあったので、それにちかしい物な気もします。
試してみる
Sign Up
GKEはまだAlphaリリースなのでSign Upが必要です。
Sign Upは以下から可能です。
よく読んでSign Upして下さい。
Kubernetesを立ち上げる
Container Engine APIを有効化
Sign Upをし、GKEが利用可能になったら
Cloud Consoleの適当なプロジェクトにログインします。
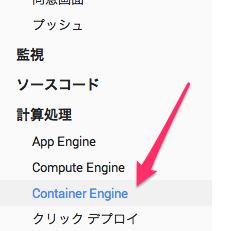
メニューの中から「Container Engine」を選択します。
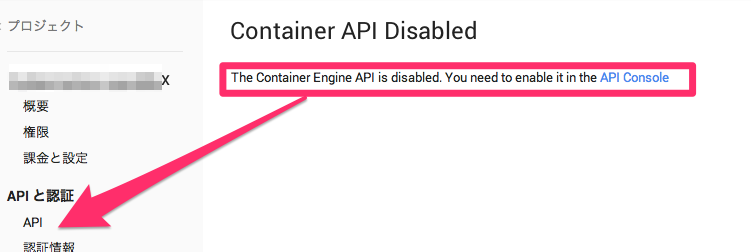
もし以下の様な表示が出た場合は同じくメニューの「API」からContainer Engine APIを有効にして下さい。
Clousterの設定(立ち上げ)
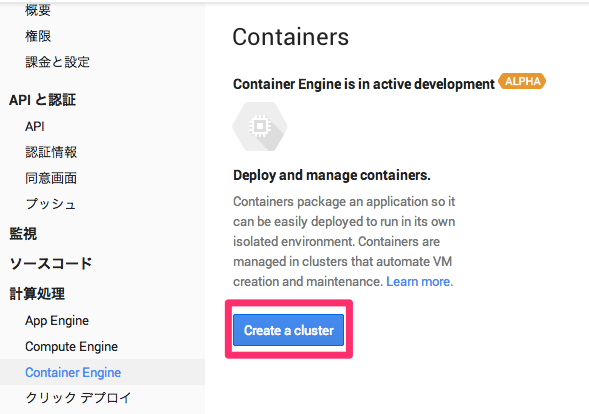
APIをONにし、再度「Container Engine」に戻ると以下の様な表示になるので「Create a Cluster」をクリックします。
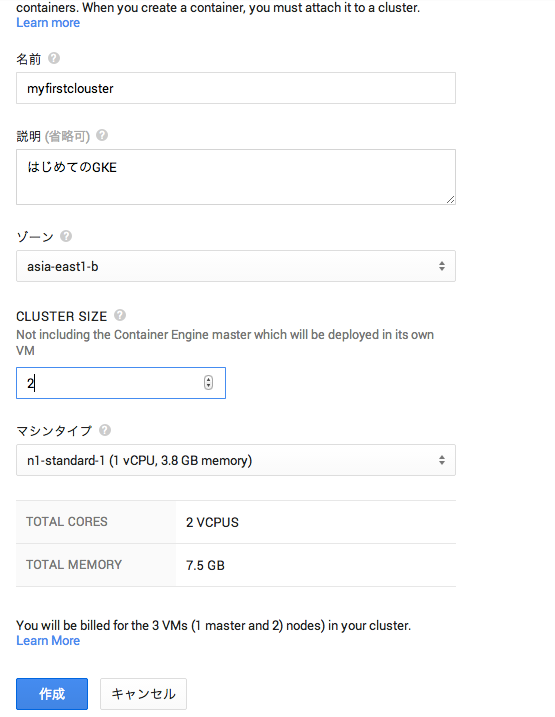
細々した設定を行います。
大体書いてあるとおりですね。
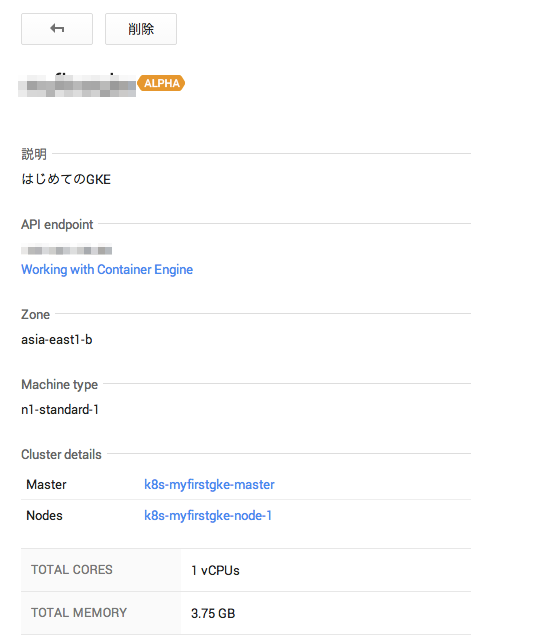
マシンタイプについては、Kubernetesの公式では、n1-standard-1がデフォルトになっています。
それ以上小さいマシンタイプだと正常に動作しない可能性もあるので注意して下さい。
また、Kubernetesは通常1マスタ、nノード構成で動きます。
最小構成(Cluster Sizeを1にしても)でも2VMインスタンス以上立ち上がりますので注意して下さい。
設定が完了したら、「作成」ボタンを押下して、Clusterを立ちあげます。
しばらく待つと以下のようにClusterが立ち上がります。
立ち上がっているGCEインスタンスも確認できますね。
gcloud preview container コマンドの設定
Clusterの立ち上がりを待っている間に、GKE上のDockerコンテナを操作するためのCLIを落としてきます。
Google Cloud SDKをインストールしていない方はぐぐってインストールして下さい。
インストールが完了したら以下のコマンドで gcloud previewコマンドをインストールします。
※インストール済みの方もupdateしたほうがよいでしょう。
$ gcloud components update preview
これでgcloud previewコマンドがインストールされます。
今回のGKEに関するコマンド群はgcloud preview containerコマンドになります。
KubernetesのWeb UIにログインする
余り知られていませんが、KubernetesにはWeb UI(ただし参照用)があるので、それにログインしてみたいと思います。
まずWeb UIにログインするためのID/PassをGoogle Cloud SDKのCLI経由で取得します。
$ gcloud preview container clusters list --zone asia-east1-b
clusters:
- clusterApiVersion: 0.4.2
  containerIpv4Cidr: xx.xxx.x.x/16
  creationTimestamp: zzzzzzzzzzzzzzzzzzzz
  description: "\u306F\u3058\u3081\u3066\u306EGKE"
  endpoint: xxx.xxx.xxxx.xx
  masterAuth:
    password: PASSWORDISHERE
    user: xxxx
  name: xxxxxxxxx
  nodeConfig:
    machineType: n1-standard-1
    sourceImage: https://www.googleapis.com/compute/v1/projects/debian-cloud/global/images/backports-debian-7-wheezy-v20141021
  nodeRoutingPrefixSize: 24
  numNodes: 1
  servicesIpv4Cidr: 10.0.0.0/16
  status: running
  zone: asia-east1-b
上のclusters/masterAuth/passwordとclusters/masterAuth/userを保存しておき、以下にアクセスします。
https://{上記clusters/endpoint}/static/index.html
すると以下の様なKubernetesのWeb UIが表示されます。
まだpods(≒Dockerコンテナ)を起動していないので何も表示されませんね。
Pods等を立ち上げてみる
次にPods等のkubernetesリソースを立ち上げてみます。
Kubernetesではjsonやyamlで各種設定ファイルを書き、kubernetesのmasterにAPI(CLI)経由でそれを渡します。
サンプルはKubernetesのRepositoryにあるのでそれを使いましょう。
今回はKubernetesのsampleの一つ、wakthroughのそれぞれのリソース、pods、service、replicationControllerを立ち上げています。
Pods
まずPodsです。
PodsはKubernetesで使われるリソースの一つで、1ホスト上で立ち上がるDocker Container群を表します。(例えば1nginx,1td-agentを1つのpodsとして定義するとか)
上記ディレクトリ内にあるpod-with-http-healthcheck.yamlを使ってみます。
kind: Pod
apiVersion: v1beta1
desiredState:
  manifest:
    version: v1beta1
    id: php
    containers:
      - name: nginx
        image: dockerfile/nginx
        ports:
          - containerPort: 80
        # defines the health checking
        livenessProbe:
          # turn on application health checking
          enabled: true
          type: http
          # length of time to wait for a pod to initialize
          # after pod startup, before applying health checking
          initialDelaySeconds: 30
          # an http probe
          httpGet:
            path: /_status/healthz
            port: 8080
上記を作成し以下のコマンドを実行します。
$ gcloud preview container pods --cluster-name myfirstcluster create myfirstpods --config-file ../kubernetes/examples/walkthrough/pod-with-http-healthcheck.yaml --zone asia-east1-b
ID                                     Image(s)            Host                Labels              Status
----------                             ----------          ----------          ----------          ----------
93b0b023-64a4-11e4-9844-42010af05eba   dockerfile/nginx    <unassigned>                            Waiting
しばらく待ってから、以下のコマンドでpodsができていることを確認します。
$ gcloud preview container pods --cluster-name myfirstcluster list --zone asia-east1-b
ID                                     Image(s)            Host                                                                      Labels              Status
----------                             ----------          ----------                                                                ----------          ----------
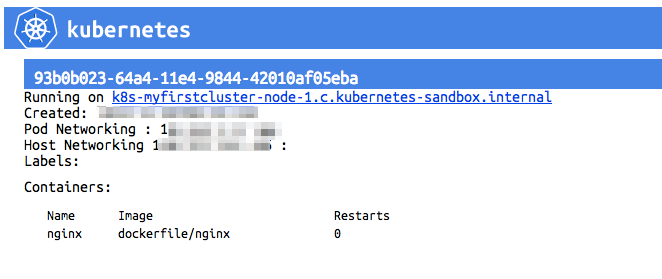
93b0b023-64a4-11e4-9844-42010af05eba   dockerfile/nginx    k8s-myfirstcluster-node-1.c.kubernetes-sandbox.internal/130.211.251.206                       Running
できてそうですね。
WebUIでも見てみましょう。※自動更新はされないのでF5とか押して画面を更新して下さい!
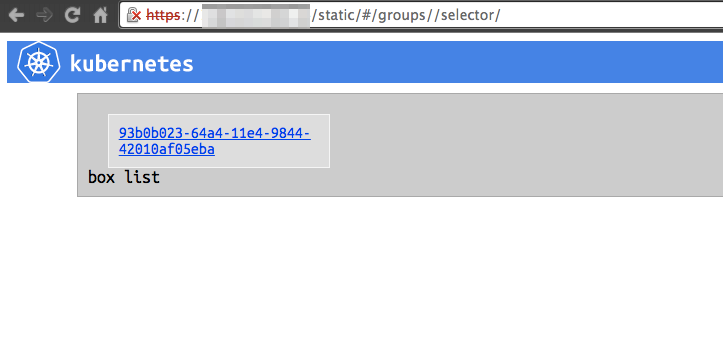
いい感じで出来てそうですね
Podsを削除する場合は以下のようにします。
$ gcloud preview container pods --cluster-name myfirstcluster delete 93b0b023-64a4-11e4-9844-42010af05eba --zone asia-east1-b
ReplicationController
ReplicatoinControllerはKubernetes Cluster全体でのPodsの数を管理するリソースです。
例えばWeb Pods(nginxコンテナ + applicationコンテナ + tg-agentコンテナ)をKubernetes全体でいくつ立ち上げるかを制御できたりします。
これもwalkthrough内のreplication-controller.yamlを使ってみます。
id: nginxController
apiVersion: v1beta1
kind: ReplicationController
desiredState:
  replicas: 2
  # replicaSelector identifies the set of Pods that this
  # replicaController is responsible for managing
  replicaSelector:
    name: nginx
  # podTemplate defines the 'cookie cutter' used for creating
  # new pods when necessary
  podTemplate:
    desiredState:
      manifest:
        version: v1beta1
        id: ngix
        containers:
          - name: nginx
            image: dockerfile/nginx
            ports:
              - containerPort: 80
    # Important: these labels need to match the selector above
    # The api server enforces this constraint.
    labels:
      name: nginx
※今(2014/11/05)現在のリポジトリに有るファイルだとエラーが出たので上のlabelsを若干修正しています。
これをGoogle Cloud SDK経由で食わせます。
$ gcloud preview container replicationcontrollers --cluster-name myfirstcluster create --config-file ./examples/walkthrough/replication-controller.yaml --zone asia-east1-b
ID                  Image(s)            Selector            Replicas
----------          ----------          ----------          ----------
nginxController     dockerfile/nginx    name=nginx          2
WebUIで確認してみましょう。
ReplicationControllerを作ったことにより、nginxControllerとnginxのpodsが2つ作成されていますね。
ちなみにKubernetesのCLIを利用するとこのpodsの数をCLIから変更したり、ローリングアップデートしたりできるのですが、どうもGoogle Cloud SDKのやり方は見つからないです...
無いかも??
削除する場合は以下のようにします。
※実際には後で使うので消しません。
gcloud preview container replicationcontrollers --cluster-name myfirstcluster delete nginxController --zone asia-east1-b
Service
ServiceはKubernetes内部で使うネットワークプロキシで、Kubernetes Cluster内のLBとしての役割にもなります。
コレも同じようにwalkthrough内のservice.yamlを使ってみます。
kind: Service
apiVersion: v1beta1
id: nginx-example
# the port that this service should serve on
port: 8000
# just like the selector in the replication controller,
# but this time it identifies the set of pods to load balance
# traffic to.
selector:
  name: nginx
# the container on each pod to connect to, can be a name
# (e.g. 'www') or a number (e.g. 80)
containerPort: 80
$ gcloud preview container services --cluster-name myfirstcluster create --config-file ./examples/walkthrough/service.yaml --zone asia-east1-b
ID                  Labels              Selector            Port
----------          ----------          ----------          ----------
nginx-example                           name=nginx          8000
ちなみにこれだけだとkubernes内部の通信でしか使えません。
感覚的にはdockerのlink機能などと同じで、それぞれのpodsに対して上記のポートやIP(今はまだ対応していなかった気がしますが)を環境変数として与えてくれます。
外向けのLBを作りたい場合はservice.yamlにてcreateExternalLoadBalancerオプションを使います。
kind: Service
apiVersion: v1beta1
id: nginx-example
port: 8000
selector:
  name: nginx
containerPort: 80
createExternalLoadBalancer: true
$ gcloud preview container services --cluster-name myfirstcluster create --config-file ./examples/walkthrough/service-external.yaml --zone asia-east1-b
ID                  Labels              Selector            Port
----------          ----------          ----------          ----------
nginx-example2                           name=nginx          8000
これで外部向けのLBが作成されました。
実際にはGCEのLoadBalancerが作成されています。
ターゲットグループにも対象のnodeが含まれている状態になります。
これでもろもろ完成です。
所感
Kubernetesを触ってた人からすると感覚としては、
GCEに対するKuberntesのOne-Click Deploy + Google Cloud SDKへのkubecfgの統合 + cluster周りのAPI
というイメージがわかりやすいです。
現状だとkubecfg --proxyやkubecfg run、kubecfg resize、kubecfg rollingupdateなどがCloud SDK側で未サポートっぽいので今後に期待ですね。
※kubecfg経由ではやれると思います。
何にせよ、Kubernetesがちゃんとしたサービス上でも使われてそれがKubernetes側にフィードバックされるのであれば非常に良いですね。
