Recently, I was approached by The Adventure Portal following a series of posts I had published on a Facebook page that I help run, called Overland Jeeps. The articles dealt with what I feel is the necessary safety, first-aid, recovery, and general preparedness gear for an overlanding adventure. Many of you have probably read loads of articles, looked at tons of pictures, and tried time and time again to come up with a solid list of necessary items to bring on a good overland trip. After quite a bit of due diligence and some trial and error, I took the info that I had read and put together a personalized load out pack. This article presents a taylored “conglomeration” of safety items that I carry on each adventure out into the wilderness in order to best prepare myself for the adversity, and obstacles that nature can throw at me. This article will cover the following topics: Recovery Gear, First Aid, Pioneer and Field Repair Tools. This is not a how to, for any of them, nor is it an end all, be all list of gear.
First, a bit of background info. I have done trips all over the United States from Pennsylvania, Colorado, and currently here in the Pacific Northwest, with countless cross-country trips in between. My current load out supports the area in which I live and do most of my current travels, the Pacific Northwest. Make sure to tailor your gear set to the area where you intend to take your rig.
It’s pretty commonly understood that a winch and it’s associated items are a must, so I’ll take some time to talk about some of the lesser mentioned items such as: chains, tow straps, and snatch straps. It is of the absolute utmost importance to know which is which, what they are made of, and how to apply each respectively.
- Chains are a great way to give you some additional length to use to get to an anchor point, to use in addition to a Hi-Lift Jack for a manual winch, or as a last effort in a vehicle recovery. There are dangers associated with each of these. So, before using chains in any of these ways, make sure that they are rated to handle the load that you intend to use them on.
- Tow straps are a great and quick way to pull a vehicle out of a sticky situation. They are simple to use and easy to deploy.
- Snatch straps are what I use as a last resort when a vehicle is bogged down in mud or snow and I can’t get any forward momentum with other types of recovery gear. Snatch straps employ a large amount of kinetic energy. If a pull engages too much force, it can lead to injuries and damage to your vehicle or other equipment. So, handle with care!
- Some other great tools to have are traction boards, traction ladders, or traction bags. Each have their own list of pros and cons, and if you intend to purchase them, do your research and choose what will suit your needs best.
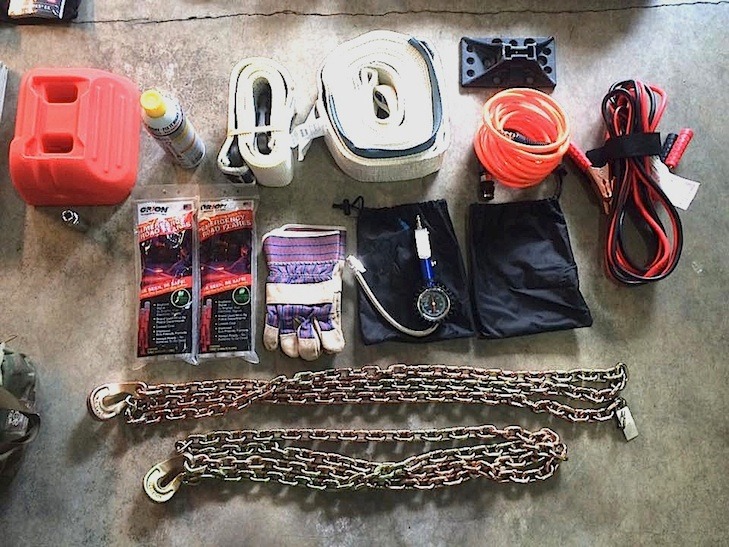
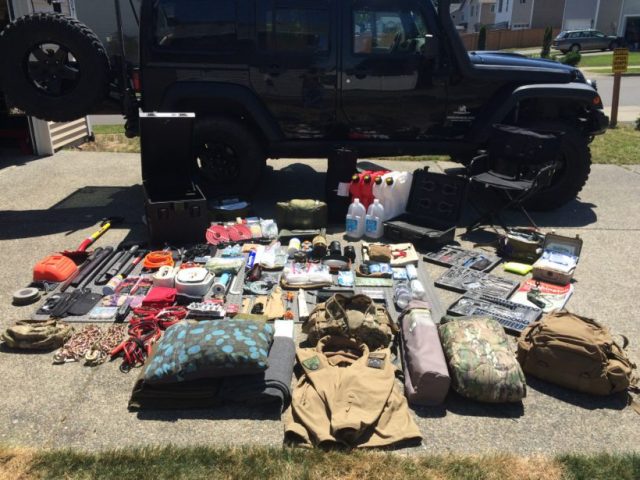
My recovery gear includes:
- 48″ Hi-Lift Jack Extreme
- Warn 9.5 cti Winch with Synthetic Rope Line
- AEV Hi-Lift Jack Base
- Warn Tree Saver Strap
- Warn Snatch Strap
- 2 x 6′ Chains
- 4 x Warn Screw Pin Shackles
- Warn Snatch Block
- ARB Single Air Compressor with inflators assembly
- ARB Tire Deflator
- PB Blaster (to use on an unhappy Hi-Lift Jack)
- Pair of Heavy Duty Leather Work Gloves
- 4 x Light Duty Ratchet Straps
Having all of this equipment is useless unless you have been trained on how to use it. Read owners manuals, take some classes, and work with trusted friends to better familiarize yourself with your recovery gear. I’ve seen people with plenty of gear, but no idea how to use it, resulting in injuries that made a bad situation exponentially worse. With that being said, if you come across a group out there that’s doing something unsafe, speak up. You just might save someone’s life.
My First-aid kits include:
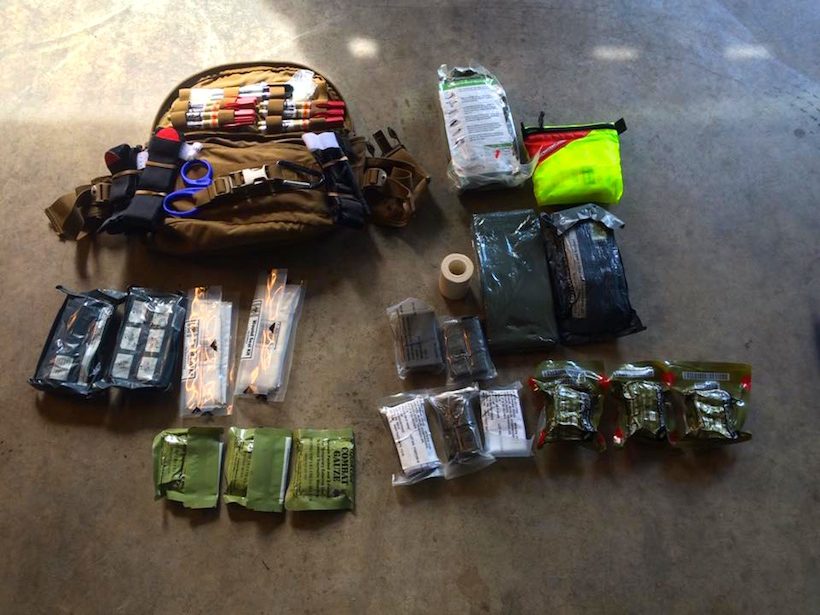
I carry a few types of First Aid kits in my Jeep at any given time. One is a medium size Trauma Kit that includes things like:
- tourniquets
- pressure dressings
- gauze
- splints
- tape
- combat gauze
- scissors
- a variety of other items to treat more serious life threatening injuries.
I also have a standard First Aid kit that includes but is not limited to:
- bandaids
- Neosporin
- a sting kit
- bite kit
- burn cream
- mole skin
- disposable non-latex gloves
- tweezers
- safety pin
- triangular bandage
- antiseptic solution and wipes
- cotton balls, swabs
This kit will more likely be your “go to” kit on the trail.
Then there’s one that I recently started put together, after my last trip, that consists of medications to treat:
- diarrhea
- headaches
- muscle aches
- nausea.
It wasn’t something I had really thought about until I was on the sick end. I wish in retrospect that I had applied more effort into having this ready to go before my last trip. It would have not only helped me, but a few other people in the group. Luckily someone else had some over the counter medications to help me out with until I kicked it.
Please Note* This is by no means a full list of all items in my first aid kits, just some of my “staples”.
The bottom line when it comes to first-aid is: GET TRAINED.
I cannot stress this enough. Take basic classes too , they are available all over the place and can even be available for free. Having a person that has medical experience and training in your group is paramount. Do not pass over this topic lightly. It can turn a rather mild situation into a life threatening one in no time. Having the skills needed to treat injuries can be the key for either making it to safety or dying in the wilderness.
My Field Repair Kit:
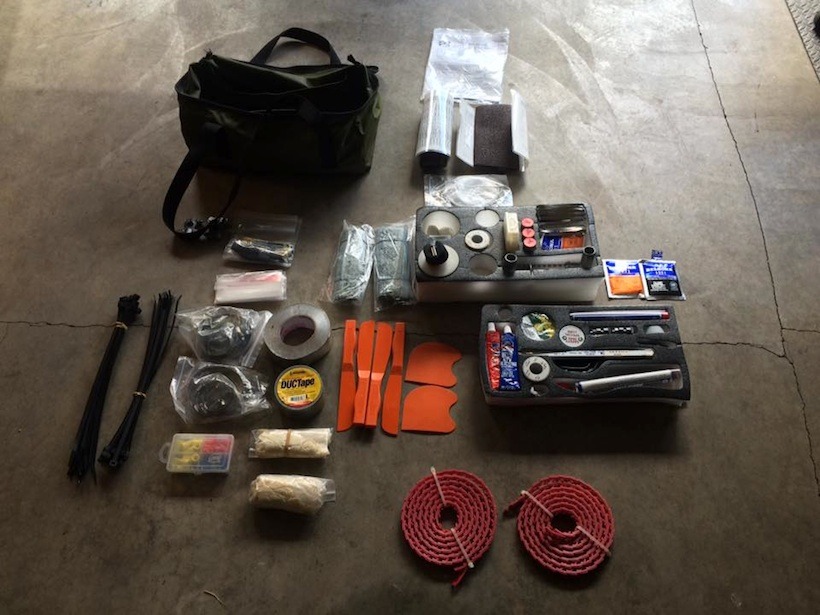
This kit contains:
- tire repair kit
- epoxies
- JB weld
- wire
- zip ties
- duc tape
- extra battery terminal connectors…and more.
It sits on my shelf until its time to head out. I have used almost all the components at one time or another and it’s something that has gotten me back home a couple of times. Seriously consider putting something like it together, if you haven’t already.
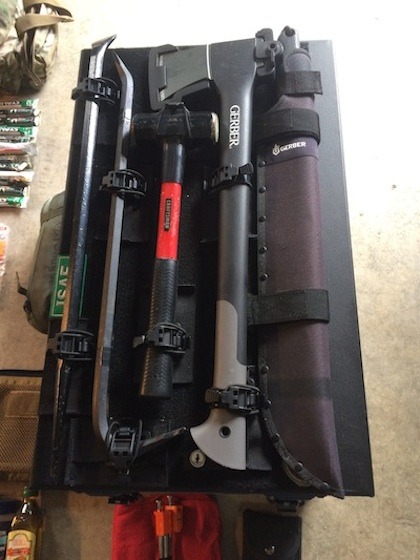
I keep these on hand at all times:
- Gerber Midsize Axe for clearing fallen trees from trails and splitting fire wood.
- Craftsman 2.5 lb Hammer for smashing just about everything including parts back into place.
- 26″ Crowbar for leverage to move rocks or trees and to slip in the pipe handle of a Hi-Lift Jack giving you some extra leverage against heavier loads
- 28″ Pinch Bar (one flat end, one point end)
- 24″ Gerber Gator Machete for clearing trail brush
- Gerber collapsible Saw for limbing trees so they don’t smash out windows.
- Krazy Beaver Shovel for fire pits, breaking ice, shoveling snow, and cutting roots.
Something I have added to my want list is a chain saw. Going out to Copper City wouldn’t have happened if a guy in our group hadn’t had a chainsaw. What an unbelievably valuable tool. It made clearing fallen trees from the trail a breeze. We cleared the trail for not only us, but for people who came after us. To do something that allowed other people, who may not be as well equipped, to get out and enjoy the beauty and historical sites in that area, was a great feeling.
Personal protection in the wilderness is an absolute must. There have been a few situations on the trail when I was glad this is a necessity to me. There is always the possibility of threats during an adventure. Questionable people, while not likely, may be encountered. Wildlife can also present a serious threat. I carry a Side-Arm (Pistol), because I live in a state that permits it. For those who do not, due to state law, or personal choice, there are options. Bear Spray, Mace, Pepper Spray, Tasers, the list goes on. As with anything discussed here, do the research, check your local laws and state regulations, and get trained. Wilderness classes are a great tool to help increase your situational awareness. They train you to be able to identify signs that there could be dangerous wildlife in your area.
Some of the other things that I didn’t discuss are a hygiene kit, my tools, wet weather jacket and pants, various layers of cold weather gear, wool blankets, fuses, 2x 2 gallon Roto Pax Fuel Cans, and the instruction manuals for everything that I have either installed or carry. I also keep AA, AAA, and CR123 Batteries on hand for my LED Lantern, Headlamp, and Flashlight. It’s a good idea to keep at least one set of extra batteries for devices that are used out on the trail.
I use the things in my load out pretty regularly and brush up on the use of items I don’t use as often. This helps ensure a safe overlanding venture. I hope that this was a good read for you, and I want to close by saying, please participate in training events. I really can’t stress this enough. My intent was to present an overview of some of the things I carry and why. My goal was to help. Thanks for reading, and thank you to The Adventure Portal for giving me the opportunity to give back to the overland community, who I have learned so much from! See you out on the trails!
Author and Photos: Andrew Halsing







This is a very useful article… Thank you!