This activity is adaptable for beginners to experts, ideally ages 5 and up. Younger artists may need help making tape loops. Great for individuals, groups, and families to work on together at home.
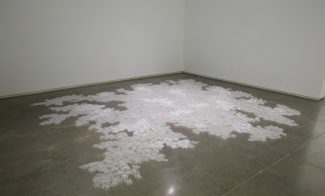
Inspired by Tara Donovan’s sculpture Nebulous made with Scotch tape, we invite you to play with everyday materials which are often found at home and not typically thought of as art supplies. By sticking, stacking, clipping, and positioning mundane objects in new ways, we can transform objects into exciting and unexpected sculptures. Experiment with building temporary sculptures using loops of tape, binder clips, or whatever else you have access to and have permission to use for artmaking. Be creative and share with the world what you make!
You will need:

Everyday objects in multiples. Some ideas:
- Any kind of tape, we used masking tape
- Clips, we used binder clips
- Toilet paper cardboard inserts
- Hardware
- Rubber bands
- Pencil (optional)
- Scissors (optional)
Check out the video demo for tips and a cat cameo!
- Find a flat surface to work on top of.
- Make tape loops. Tear roughly a 2” long piece of tape. Bring the short ends of the tape towards each other with the sticky side facing out to create a loop. Stand your loop up on your work surface. (You may want to use scissors to cut lengths of tape.)
- Keep looping! Continue making loops and sticking them to each other to create a beehive type formation. Experiment with the size of your loops, how you connect loops to each other, and where you place loops.
- Keep it growing! Ideas for furthering experimentation:
- Invite others in your household to add loops to your sculpture.
- Come back to your sculpture tomorrow, add more loops each day.
- Hold your sculpture up to a light to play with shadows.
- Explore how the sculpture looks in different environments, on the table, against a sunny window, outside…
Check out the video demo for tips and a cat cameo!
-
Clip one binder clip onto one silver wing of another binder clip.
- Continue the pattern until a semi-circle starts to form, then complete the circle.
- Explore new patterns and shapes that can be made by connecting binder clips together.
- Take photos or make drawings of your sculptures. Then take them apart and make new ones!

This lesson was developed by Brooke Scibelli, Family and Art Lab Programs Coordinator.