
-
-
-
Tomash-ghz
- 26 September, 2013 in Gear & Tools
Controllerism How To: Interactive Visuals with Processing
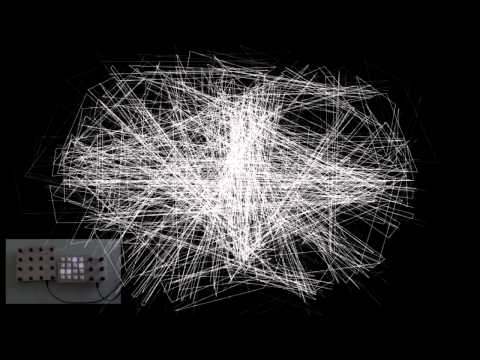
Today I will show you how to make super-awesome-real-time-rendered-visuals to accompany your controllerism set!
Of course there are many many many ways to do this, some may be easier ( take a look at vvvv or max msp with jitter) but we will be looking at Processing, which requires some very basic Java programming. But the same principles can be applied everywhere.
Setup
 First of all, we are going to need Processing, go and download the latest version, also we are going to use The MIDIBus library to make our sketch communicate with Ableton. You can install it by going to Sketch -> Import Library -> Add Library from within Processing.
Second, you will need a virtual MIDI port, if you are on windows, download loopMIDI and add a new port. If you are using OS X, you can do so from the Audio / MIDI Setup application built in to OS X. Then, inside Ableton make sure that in the MIDI Sync tab under Preferences, our virtual MIDI port is enabled ONLY for Output and Track is set to On.

Now go ahead and download my Ableton template and Processing sketch from here.
Ableton Template
 Open the freshly downloaded template, inside you will find 4 tracks. One of them is our 808 Drum Rack and the rest are the tracks that will send MIDI signals to our Processing sketch. The little trick here is that we have to set the Visuals Kick track to forward just the kick notes from our drum rack. To do so we have to select the Core 808 kit from the MIDI From drop down (if that doesn’t show up, click on the little I-O icon right next to your Master Track), and then the kick track below ( you can play just the kick clip to easily find it from the signal meters). Enable Monitor In and set the MIDI To to our created Virtual port. We do the same for the Snare track, but this time we select the snare of our 808 kit as the midi source. Our last track contains two midi clips, Â one that sends a low C-2 note that increments the visuals scene, and another with a C#-2 note that plays the previous visuals scene.
And the final thing, we have to use a Scale device to constrain our Kick note to a C and our Snare note to a D (or any other value you specify in the Processing code).
Processing Sketch
Now load the visuals_tutorial_130916c.pde file into Processing. You will see some code with A LOT of comments explaining every command. To make things even easier, meet your new best friend, the Processing reference page. There you will find a list of almost all commands used in Processing, together with a good description and examples that will further clarify their functionality.
Now, run the processing sketch and start the 808 clips, by launching the + clip, you will see that the visuals change, from a single random color background that changes with every kick, to different shapes dancing to the music. Experiment with the code, break things, fix things, but most of all have fun!
You can specify the MIDI notes that processing reacts to inside the noteOn function. The only complication here is that the actual midi note pitch is represented numerically. 60 is the note C1 our kick, and 62 is D1 our snare, 0 and 1 are C-2 and C#-2 that change the scenes. Add more scenes by continuing the switch (scene) block and add more shapes like in my video above ;)

If you have any suggestions, comments or troubles getting it to work leave me a line in the comments section.
-