How to Paint Stripes on Your Floor
Ready to update your wooden floor? Be inspired by this pretty floorboard makeover

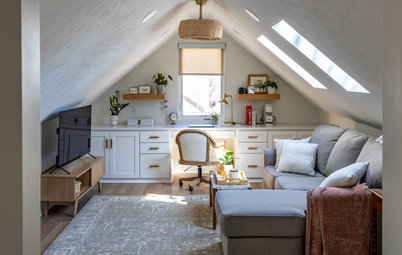
This porch is used only for about five months of the year at best, but I can see it from the kitchen sink, and it connects the kitchen with the garden, so I wanted it to be a calm, welcoming space for my family. During the colder months, I just wanted it to be pretty to look at.
The biggest change would come through the power of paint. Benjamin Moore’s Decorators White on the walls and Harbor Fog on the ceiling provided the bright, crisp look I was going for. But the walls and ceilings were just the finishing touches. The entire design of this room began with one idea: painting grey and white stripes on the floor.
The biggest change would come through the power of paint. Benjamin Moore’s Decorators White on the walls and Harbor Fog on the ceiling provided the bright, crisp look I was going for. But the walls and ceilings were just the finishing touches. The entire design of this room began with one idea: painting grey and white stripes on the floor.
Before The wood floor was a rather nauseating shade of green-brown with hints of red. Luckily, the wood was in good condition, with no water damage, so no repair work was needed. I began with some prep work, sanding a few areas and filling in some holes with wood filler.
I painted the ceiling first with two coats of Harbor Fog, then painted the walls Decorators White, which immediately brightened the porch.
After making sure the floor was free of any dust or build-up, I began work on the floor. Using roller brush and an extension pole, I applied one coat of Benjamin Moore’s Fresh Start Primer. I waited five hours before applying the second coat.
Tip: Start painting farthest from the door or exit so as not to box yourself in with paint.
Tip: Start painting farthest from the door or exit so as not to box yourself in with paint.
The next day I applied one coat of Benjamin Moore’s Floor and Patio paint in Decorators White. This paint is meant for all interior and exterior floors, decks, stairs and concrete as well as masonry surfaces.
My porch is enclosed, so I wasn’t really worried about rain or snow, just colder temperatures in winter. The porch is also a high-traffic area, so I wanted a weatherproof floor and patio paint to withstand what my family of three kids and a dog could throw at it.
My porch is enclosed, so I wasn’t really worried about rain or snow, just colder temperatures in winter. The porch is also a high-traffic area, so I wanted a weatherproof floor and patio paint to withstand what my family of three kids and a dog could throw at it.
I waited 24 hours before applying the second coat of floor and patio paint.
Tip: Paint your two separate coats in opposite directions. The floorboards run from left to right on my porch. I knew I wanted my second, visible layer to follow the direction of the floorboards, so I painted my first layer perpendicular to that. I’m very glad I did this, since I hadn't noticed how many little holes and gaps I had missed with the primer. There are no large gaps in between my boards, so I wanted a nice, even coat. If your floorboards have spaces, this may not be the case for you.
Tip: Paint your two separate coats in opposite directions. The floorboards run from left to right on my porch. I knew I wanted my second, visible layer to follow the direction of the floorboards, so I painted my first layer perpendicular to that. I’m very glad I did this, since I hadn't noticed how many little holes and gaps I had missed with the primer. There are no large gaps in between my boards, so I wanted a nice, even coat. If your floorboards have spaces, this may not be the case for you.
I then began planning my stripes. I would be using the floorboards as a guide to determine the width of each stripe. I did not plan to divide the room up equally in stripes, so I ended up having 11 stripes in total, six white and five grey. Each stripe is 13 inches wide. The last white stripe against the outside wall would be a couple of inches narrower, but this was not a problem, since it would be underneath furniture and out of sight.
I decided to have the white stripes nearest to the wall. This way the white seemed to be the dominant colour, with the second colour as the accent stripe. I would be using Benjamin Moore’s Coventry Grey for my stripe colour, a warm shade of grey that is beautiful with Decorators White.
I laid out painter’s tape following the lines of the floorboards, measuring every so often to make sure they were straight and even. These tape lines would be filled in with the grey.
I marked each area to stay white with an “x.” This came in handy later on when I was painting: I didn’t have to count out the stripes to make sure I was painting the right one; I just did a quick check to find my “x” and make sure I was not painting on it.
I marked each area to stay white with an “x.” This came in handy later on when I was painting: I didn’t have to count out the stripes to make sure I was painting the right one; I just did a quick check to find my “x” and make sure I was not painting on it.
I then sealed down the edges of the tape pieces by running my finger along the sides to make sure they were down securely, with no bubbles. Using a paintbrush, I cut along the wall with my grey paint. This way I avoided having to bring my roller brush close to my crisp white walls.
I filled two small containers with both paint colours and used separate 4-inch foam rollers for each colour.
Tip: Use one roller to paint over the area at the edge of the painter’s tape with the original floor colour, sealing the edges. Then paint the entire stripe with two coats of your colour (mine was Coventry Grey) and immediately pull off the painter’s tape, leaving a crisp and clean line.
Tip: Use one roller to paint over the area at the edge of the painter’s tape with the original floor colour, sealing the edges. Then paint the entire stripe with two coats of your colour (mine was Coventry Grey) and immediately pull off the painter’s tape, leaving a crisp and clean line.
If you first paint the edge of your tape with your base (nonstripe) colour, any paint that seeps under the tape will blend in with the background. Once you paint your stripe colour, it will be over the newly applied base colour as well as your painter’s tape, giving you a perfect, clean line.
Once the whole room was done, I let it dry for 24 hours.
The next morning I decided that my stripes needed a bit more coverage, so I did some touch-up painting. I stayed away from my edges but filled each stripe for a more opaque look.
I brought the furniture back in 24 hours after the last paint was applied. The room immediately felt much larger with the stripes running across.
The crisp white walls, serene blue ceiling, stripes and pillows have created the beach-inspired room I had hoped for.
It feels like we’ve gained a whole new room!
Like this idea but lack the time to make it happen? Find painters and decorators in your area.
Like this idea but lack the time to make it happen? Find painters and decorators in your area.
If you are not ready to paint over an entire floor, try a stencil. It can bring a fresh and modern look to an ordinary floor.
Painting a floor one solid colour, especially white, can make a small space feel larger.
Keep your walls neutral and have that pop of colour on your floor instead.
If you aren’t ready to commit to paint, you can stain a pattern on your floor instead – much subtler but just as impressive.
Tell us…
Have you painted your floors recently? We’d love to read your tips in the Comments section.
Tell us…
Have you painted your floors recently? We’d love to read your tips in the Comments section.