Note that around the exact time of this article’s publication, FusionInvoice 2 was released as commercial software, and is based on Laravel instead of CodeIgniter like previous versions. It is, for all intents and purposes, a completely different application. This article focuses on the older but still fully functional version 1.3.4.
As a freelancer or a small business your time is better spent creating that next big project or meeting the client’s requirements than keeping track of invoices.
FusionInvoice is an open-source, self-hosted invoicing web application built for freelancers and small businesses. Although there are quite a few free online invoicing applications, none of them give you the privacy or the flexibility which FusionInvoice provides. Client management, dashboard and reports, recurring invoicing and invoice history are just few of its features.
FusionInvoice being an Open-Source project means that you can always change or add to its functionality as you need it or even install it on a private system, thus limiting the number of users who have access to your sensitive data.
Although the application is Open-Source, the developers considered that the community can better help the project by only providing their input and suggestions for features and enhancements they, as a community, would like to see in the project, but development should stay a closed team effort.
This may seem like a strange approach to open source a project, but it looks like it lets the team focus on keeping a constant pace in developing new features and bug fixing.
Software requirements
Since FusionInvoice version 1.3.4 is a CodeIgniter-based project, the basic requirements are quite simple:
– PHP 5.3 or newer
– MySQL 5.0 or newer
– Apache or Nginx server
Let’s check if your system meets these requirements.
Run the following command in your terminal to check the PHP version that is installed:
$ php -vIf PHP is properly installed you should receive an output similar to this one:
PHP 5.5.3-1ubuntu2.1 (cli) (built: Dec 12 2013 04:24:35)
Copyright (c) 1997-2013 The PHP Group
Zend Engine v2.5.0, Copyright (c) 1998-2013 Zend Technologies
    with Zend OPcache v7.0.3-dev, Copyright (c) 1999-2013, by Zend Technologies
    with Xdebug v2.2.3, Copyright (c) 2002-2013, by Derick Rethans
Now let’s check the MySQL version by running the command below in your MySQL prompt:
mysql> SHOW VARIABLES LIKE "%version%";If the MySQL server is properly installed and running, you should now see an output similar to the one below.
+-------------------------+-------------------------+
| Variable_name           | Value                   |
+-------------------------+-------------------------+
| innodb_version          | 5.5.34                  |
| protocol_version        | 10                      |
| slave_type_conversions  |                         |
| version                 | 5.5.34-0ubuntu0.13.10.1 |
| version_comment         | (Ubuntu)                |
| version_compile_machine | x86_64                  |
| version_compile_os      | debian-linux-gnu        |
+-------------------------+-------------------------+
Depending on your server setup the version numbers might be different but the output should be similar.
Ok, since the requirements on this VM are met let’s proceed to the next section.
Download the FusionInvoice application
First, let’s create the folder where we would like to install FusionInvoice, by running the command below:
$ cd /var/www/
$ sudo mkdir -m 755 fusioninvoice
Note: I am assuming that you are on a *nix platform (if on Windows, please use Vagrant to set up a working environment), and are using the default Apache/Nginx configuration and have /var/www as your base document root folder. Otherwise, change the path to the one you’re using.
Create the database
Now we need to create a database where FusionInvoice would store its data.
There are two ways to do this, command line or phpMyAdmin.
I personally recommend the command line if you are installing FusionInvoice on a production or world available server.
a) From the mysql prompt execute the following commands:
mysql> CREATE DATABASE `fusion_invoice`;
mysql> CREATE USER 'fusion_invoice'@'localhost' IDENTIFIED BY 'fusion_pass';
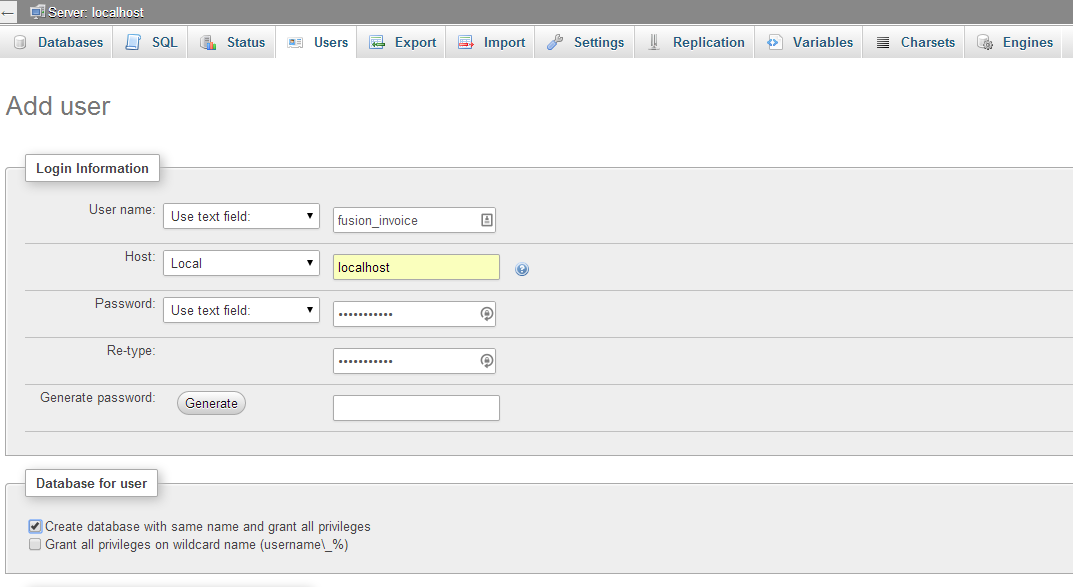
mysql> GRANT ALL PRIVILEGES ON `fusion_invoice`.* TO 'fusion_invoice'@'localhost' IDENTIFIED BY 'fusion_pass';b) Using phpMyAdmin, go to the USERS tab and select Add user. In the new user form fill-in all the fields and make sure you check the Create database with same name and grant all privileges checkbox and phpMyAdmin will create the database for you.
**Note: Please make sure to take ALL necessary security precautions and adjust the new user’s permissions accordingly if you are installing the FusionInvoice application on world available server.
That’s it! We are now ready to run the FusionInvoice setup module.
Initial configuration of FusionInvoice
To start the setup process we need to access the /setup module from your preferred browser:
http://[domain-name]/[fusioninvoice]/index.php/setup
**Note: Depending on your server configuration the URL might be a bit different. The idea is that you need to send all your requests that do not map to a physical file to index.php in order to start the FusionInvoice application. If you do not know how to create a virtual host or redirect your requests to index.php you can find an optional step at the end of the article that will guide through this exact process.
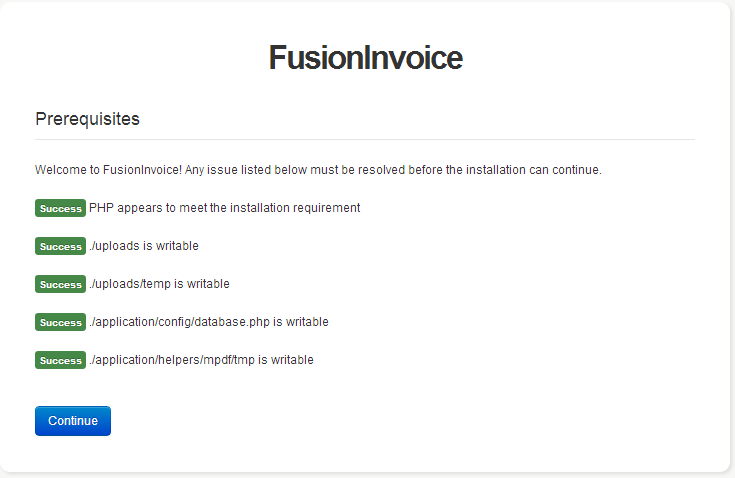
In step 2, the FusionInvoice setup system is providing us with a list of files and folders which are required to be writable.

Let’s fix this by running the following commands from the terminal:
$ cd /var/www/fusioninvoice
$ chmod 777 -R uploads/
$ chmod 777 application/config/database.php
$ chmod 777 -R application/helpers/mpdf/tmp/
If you refresh the page you should now see all the prerequisites to be properly set up.
In step 3 we have to provide FusionInvoice with the database server connection details.
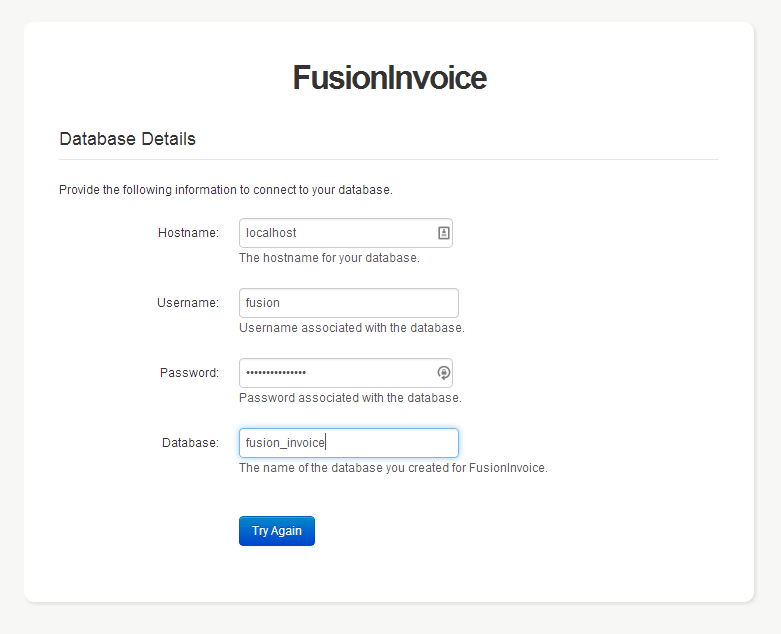
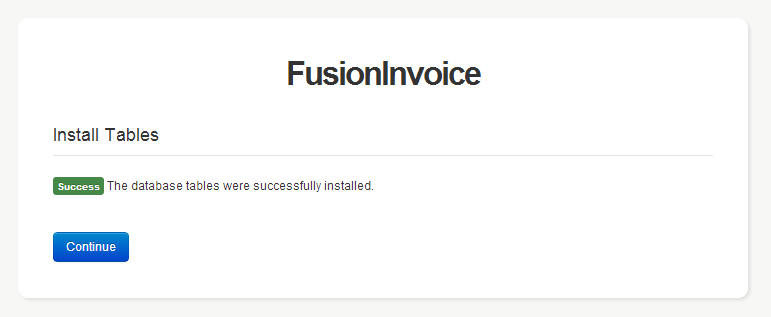
If the connection is successful in the next 2 pages FusionInvoice will let you know that the database tables have been properly installed and upgraded.
Arriving at the last step you will be asked to create a base user, an administrator account.
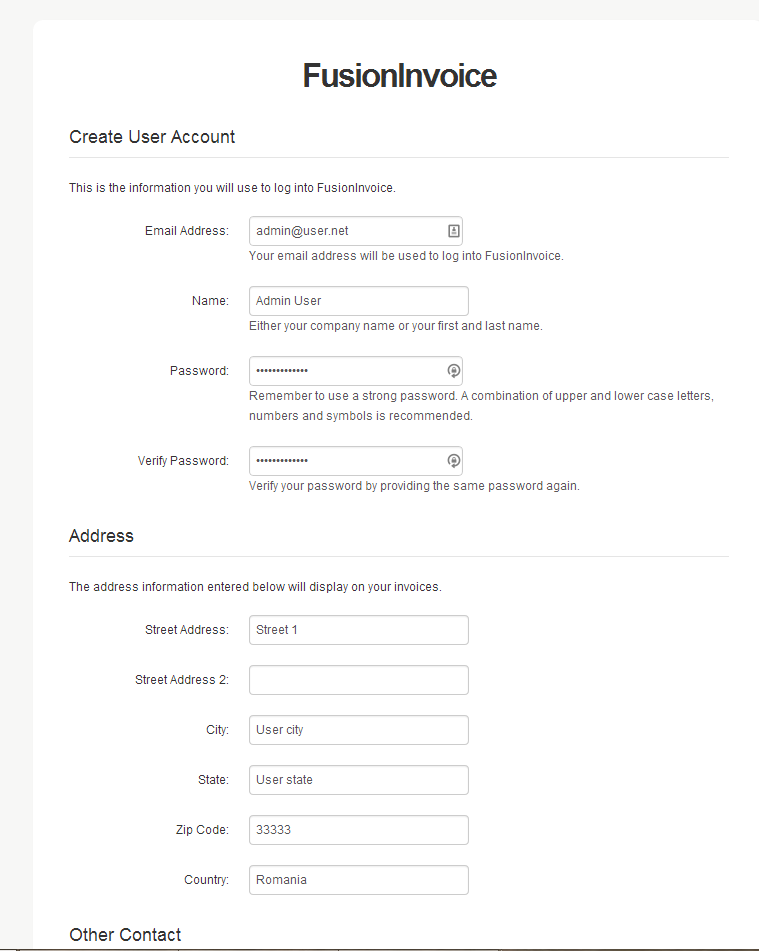
Once this step is finished you will have successfully installed FusionInvoice on your system.
Now, you can log in and start creating those invoices :)
Create a virtual-host on your server
This optional step will guide you through the process of creating a basic virtual host on Apache or Nginx.
**Important note: Although many of the virtual host settings that are presented in this article are used also in production they are only a starting point and in no way should they be considered sufficient, from a security perspective, for a production server. Please make sure you’ve taken all the necessary precautions to secure your server.
a) Setting up an Apache virtual-host
First, let’s make sure Apache has the mod_rewrite module active. You can check that by running the following command:
$ apache2ctl -t -MThe above command will list all the modules loaded by the Apache2 server. If the mod_rewrite module is loaded you should see an entry like the following:
rewrite_module (shared)
If the above line is not present run the next command in your terminal to enable the module:
$ sudo a2enmod rewriteNow that the mod_rewrite module is active we need to create a config file for our new host. You can do that by running the following command in your terminal:
$ sudo vim /etc/apache2/sites-available/fusion_invoice.dev.confNow copy the code below to your config file, and edit the paths to match yours:
    <VirtualHost *:80>
            ServerAdmin webmaster@localhost
            DocumentRoot /var/www/fusioninvoice

            ServerName fusion.invoice.dev #change this setting according to your domain name

            DirectoryIndex index.php

            <Directory /var/www/fusioninvoice>
                RewriteEngine On
                RewriteBase /

                RewriteCond %{REQUEST_FILENAME} !-f
                RewriteCond %{REQUEST_FILENAME} !-d
                RewriteRule ^(.*)$ index.php [QSA,L]
            </Directory>

            ErrorLog ${APACHE_LOG_DIR}/error.log
            CustomLog ${APACHE_LOG_DIR}/access.log combined
    </VirtualHost>
Now save and close your editor and run the following command in your terminal:
$ sudo a2ensite fusion_invoice.dev.conf
$ sudo service apache2 restart
That is all. You can now use your new URL, fusion.invoice.dev, instead of localhost or the VM’s IP address.
b) Setting up a Nginx virtual-host
Let’s create the config file for our new virtual-host by running the following command in your terminal:
$ sudo vim /etc/nginx/sites-available/fusion_invoice.dev.confNow copy the code below to your config file, and edit the paths to match yours:
server {
    listen        80;

    server_name   fusion.invoice.dev; #change this setting according to your domain name

    root          /var/www/fusioninvoice; # path to fusioninvoice's install directory

    error_log     /var/log/nginx/fusion.error.log debug;

    access_log    /var/log/nginx/fusion.access.log;

    index         index.php;

    location ~ ^(.+\.php)(.*)$ {
      fastcgi_split_path_info  ^(.+\.php)(.*)$;
      fastcgi_pass       unix:/var/run/php5-fpm.sock;
      include            fastcgi_params;
      fastcgi_param      HTTPS off; #this is required for development mode
      fastcgi_param      PATH_INFO $fastcgi_path_info;
      fastcgi_param      SCRIPT_FILENAME $document_root/$fastcgi_script_name;
    }

    location / {
      try_files          $uri $uri/ /index.php?$args;
    }
}
Now that we created the config, on *nix systems you need to create a symbolic link from the file’s current location into /etc/nginx/sites-enabled folder in order for Nginx to load the new virtual-host.
You can create the symlink by running the next command in your terminal:
$ sudo ln -s /etc/nginx/sites-available/fusion_invoice.dev.conf /etc/nginx/sites-enabled/fusion_invoice.dev.confAgain, alter all paths to match yours. Now, let’s restart the Nginx server to load our new virtual-host config.
$ sudo service nginx restartIf all went well you should now be able to access your new virtual host using the server name instead of the machine’s IP address or localhost.
Remove the ‘index.php’ entry from the URL
Now that we have created a virtual host let’s also remove the index.php from the URL and have some nice, easy to remember URLs.
For that, we just need to open the config.php file, located at /var/www/fusioninvoice/application/config/, and edit the following line:
$config['index_page'] = 'index.php';Now just delete the index.php value and save the file.
Conclusion
The abundance of features, the relatively low level of technical knowledge required to set up and manage the application along with an active community ready to help, make FusionInvoice a great tool for any freelancer or small-business owner who wants to spend the time on the project rather then on tracking invoices.
Frequently Asked Questions (FAQs) about FusionInvoice
What Makes FusionInvoice Different from Other Invoicing Apps?
FusionInvoice stands out from other invoicing apps due to its self-hosting feature. This means you have complete control over your data and can customize the software to suit your specific needs. It’s also free, making it an affordable option for small businesses and freelancers. Unlike other apps, FusionInvoice doesn’t limit the number of clients, invoices, or quotes you can create. It also supports multiple languages and currencies, making it a versatile choice for businesses operating internationally.
How Secure is FusionInvoice?
FusionInvoice is highly secure. As a self-hosted solution, you have complete control over your data and how it’s stored. You can choose to store your data on your own server or a cloud server of your choice. This means you’re not relying on a third-party provider to keep your data safe. However, it’s important to ensure your server is secure and regularly updated to prevent any potential security breaches.
Can I Customize FusionInvoice to Suit My Business Needs?
Yes, FusionInvoice is highly customizable. You can modify the look and feel of your invoices and quotes by changing the templates. You can also add custom fields to your invoices, quotes, and clients to capture additional information. If you have coding skills, you can even modify the source code to create a truly unique invoicing solution for your business.
Does FusionInvoice Support Recurring Invoices?
Yes, FusionInvoice supports recurring invoices. This feature allows you to automatically generate and send invoices at regular intervals. This can save you a lot of time if you have clients who are billed the same amount on a regular basis.
Can I Use FusionInvoice on My Mobile Device?
FusionInvoice is a web-based application, so you can access it from any device with a web browser. However, it doesn’t have a dedicated mobile app. This means the user experience may not be as smooth on a mobile device compared to a desktop. But you can still create, send, and manage your invoices on the go.
How Do I Install FusionInvoice?
Installing FusionInvoice requires some technical knowledge. You’ll need to download the software, upload it to your server, and then run the installation script. The FusionInvoice website provides detailed installation instructions to guide you through the process.
Can I Accept Online Payments with FusionInvoice?
Yes, FusionInvoice integrates with several popular payment gateways, including PayPal, Stripe, and Mollie. This allows your clients to pay their invoices online, making the payment process faster and more convenient for both parties.
Does FusionInvoice Offer Customer Support?
FusionInvoice offers email support to its users. If you encounter any issues or have questions about the software, you can reach out to the support team for assistance. There’s also a comprehensive user guide available on the FusionInvoice website that covers most aspects of using the software.
Can I Import Data from Another Invoicing App to FusionInvoice?
FusionInvoice doesn’t have a built-in import feature. However, you can import data using SQL scripts if you’re comfortable with coding. If not, you may need to manually enter your data or hire a developer to help with the import process.
Is FusionInvoice Suitable for Large Businesses?
FusionInvoice is a robust invoicing solution that can handle a large volume of invoices and clients. However, it lacks some features that large businesses may require, such as team collaboration tools and advanced reporting. It’s best suited to small businesses, freelancers, and solo entrepreneurs who need a simple, affordable invoicing solution.
 Denis Rendler
Denis is a Zend certified PHP Developer from Romania. He loves programming and playing with new technologies. In his spare time he likes to share his knowledge with other IT lovers and less tech-savvy people.