
So we’ve given you everything you need to know on how to make candles, including a basic candle making guide as well as how to scent and color them. However, I thought it might be a good idea to have a whole post about candle wicks and wicking your candles.
Wicks are important for candles, for obvious reasons. Putting it quite simply, it’s the bit of braided thread that, when lit, vaporizes the wax (along with any fragrance oils you’ve infused into your candle).
But what size wick do you actually need for your candle? That’s exactly what I’m going to talk about today. Besides this, I thought it’d be cool to show you how to make use of wooden wicks as well.
If that wasn’t enough, I’m also going to go through the method of multi wicking a candle for an interesting finish that will impress all your friends! This really is the essential guide to wicking.

How To Choose The Right Sized Wick
Right, let’s get down to business. I wanted to discuss how to choose the right wick for whatever candle you’re looking to make. This will depend on a couple of variables, namely the type of wax you’re planning to use and the size of your intended candle.

Pre-Waxed Wicks
But first, I thought I’d mention briefly why you might want to use a pre-waxed wick, as opposed to your standard wick. Pre-waxed wicks come in all sorts of sizes and are actually much easier to use than a standard wick.
They come already cut to size and attached to the stabilizer and can actually stand up on their own when you glue them down.
However, I find they’re only really ever useful for shallower candles, as in candles that aren’t very tall. When you pour the wax, the wax that your wicks are tipped with will melt and you’ll lose the stability of the wick. Stick to using them is votive and tea lights. They’re also completely useful for making candles with molds.
Wick Sizes
Now we have that out of the way, let’s talk about choosing the right sized wick for your candle. It’s important to get the wick size right, as otherwise your candle will not burn in the way you expect. If you over wick, your candle can burn through the wax like butter and before you know it your candle will be gone.
We don’t want this. We want to extend the life of the candle to an acceptable length, whilst still using up all the wax. This brings me neatly on to why you don’t want to under wick, either.
Under wicking has the opposite effect, and can result in the candle wax not being fully vaporized. This means you, your giftee or your customers won’t get the chance to reuse the jar (if you make use of them) and/or won’t fully benefit from the lovely aromas you can infuse into your wax.
Take a look at this picture below. The first I over wicked, the second I under wicked and the last I wicked properly. I burned them all over the course of a few hours. Notice how the candle I over wicked has used up a considerable amount of wax, especially compared with the other two.

Whereas the one I under wicked has done the opposite, and if I were to leave them to completely burn away, you’ll see a few layers of wax still clinging to the sides of the glass. You can already see this begin to happen if you look around the edges of the glass. The candle on the right (which I wicked properly), burnt as expected.
All in all, an over wicked or under wicked candle can still be used. They still burn, after all. The only thing I would say is that you’re looking for a product that will burn as expected, otherwise your friends, family or even customers might think you don’t know what you’re doing. Gasp!
Now, to get the right size candle wick, measure the diameter of your jar, container or mold. Then, compare this measurement to the lovely table I’ve drawn up for you below.
Feel free to bookmark this page or print it using the Print Icon to your left or under this post, you can then refer to it whenever you like! I’ve made columns for both paraffin and soy wax, as you’ll want to get the ECO wicks when working with soy and the LX wicks when working with paraffin.
| Diameter of Candle (mm) | Paraffin Candle Wax | Soy Candle Wax |
|---|---|---|
| 25-50 | LX 10 | ECO 1 |
| 50-65 | LX 12 | ECO 4 |
| 65-75 | LX 16 | ECO 6 |
| 75-90 | LX 20 | ECO 10 |
| 90-100 | LX 26 | ECO 14 |
| Where to buy candle wicks | LX Wicks from Amazon | ECO Wicks from Amazon |
| Where to buy candle wicks | Prewaxed Tealight Wicks | Prewaxed Tealight Wicks |
If your candle is larger than this, you might want to look into multi wicking. More information about this can be found further down this page.
How To Use Your Wicks
To learn how to make use of your wicks, have a look at some of the crafts in the homemade candles section of this site. If you’re using soy, take a look at how I wick a glass mason jar in my tutorial on how to make soy candles. This is also relevant if you’re using paraffin in jars or containers as well, but if you’re using molds instead then note how I wick the molds in my basics of candle making post.
Wooden Wicks

Wooden wicks are exactly what they say on the tin, wicks that are made from very thin pieces of wood. They’re usually about an inch wide and come in a variety of lengths. These work pretty much the same as your standard wick, with the addition of a lovely crackling sound they give off when they’re burning.
You can make use of wooden wicks in pretty much all wax, but they look the best in soy. Soy is a more luxurious wax to make use of in candle making, and so are wooden wicks for that matter. They’re an excellent combination for a gorgeous, luxury candle. Why not throw in a fragrance oil as well to make it that much more special?
When you are sourcing wood wicks be sure to buy the authentic Wooden Wicks as they are better quality and naturally processed. These can be purchased from the Wooden Wick Store on Amazon or direct from the Wooden Wick Company website.
How to use a wooden wick
Step 1: Melt your wax using the bain-marie method that I have discussed in my soy candle craft. Notice that in my pictures I’m using a metal jug to melt my wax. This is much easier than using a bowl if you’re making smaller candles.

Simply fill your saucepan with a few inches and when it’s hot enough to melt your wax, pop the jug in the water. This is more of a water bath method and works quite well.
Step 2: While your wax is melting, we’ll want to wick your jar or container. So you get the wick as central as possible, start off by marking the inside base of your jar/container with a felt tip pen. Try to be as central as possible, as this will be our guide when we come to glue the wick.

Gauge how long you’ll need your wood wick, and then trim it to size. You want it to stick out of the wax by no less than half an inch and no more than an inch. If you plan to pop a lid on, make sure you’ll be able to close it once it’s finished.
Then, with your wood wick attached to the sustainer, hot glue it to the base of your jar/container where you drew your marker. You should do this by putting some of the hot glue on the base of the sustainer and then affixing it to the inside base of the jar.
Step 3: Our wax should be nice and melted now and ready to pour. I’m not planning on scenting or coloring the candle at this point, as I’m just showing you how to make use of this interesting wick type.
However, you can get detailed instruction on how to color and scent soy wax on our Soy Wax Candle page, as well as how to color and scent paraffin on our scented candles page.

Make sure your wax is relatively hot (around 180-190F for paraffin and no more than about 170F for soy) and then pour your wax into your jar or containers slowly so not to introduce too many air bubbles.
Step 4: Like with all candles, we’ll need to fix cavities in the wax, as well as any sinkage on top. I call this the ‘sink hole’ issue. To do this, use a bamboo stick and puncture holes in wax (being careful not to disturb the wick) and stop when you’re about an inch from the bottom. This should be done about an hour or two after the initial pour.

You’ll then want to leave your wax for another hour and then top up with your remaining wax. This should make sure you get a lovely, smooth finish on top and any holes in your wax are filled.
Step 5: You’ll want to leave your candles for about 2 days before you burn or gift them, but otherwise you’ll have a gorgeous wood wick soy or paraffin candle that crackles as it burns.
Multi Wick Candles
So, we’ve come to the exciting crafts now! Have you ever seen the cool looking multi wick candles in your local department stores? So by now, you should know how to make a candle, but let’s take that extra step and learn how to multi wick as well!
There are a few reasons why we might want to multi wick. The chief of these is the size of the jar you’re planning on using. Very large jars ordinarily require very large wicks. The only problem with this is that large wicks have a tendency to produce black smoke and soot in relatively large quantities.
By making use of multiple smaller wicks, the risk of this is reduced to pretty much zero. Other than that, multi wicked candles are actually quite impressive looking, making you the envy of all your friends and family members!
Now, before we get on to the how to, let’s talk about what size wick to use. This is a bit difficult to answer, as it’s really a labor of trial and error. However, I would say for a triple wicked candle you’ll want a wick that is designed for a candle of roughly 2-2.5 inches in diameter.
Now using our table above, we can see that this is an Eco 4 if using soy wax and an LX 12 for paraffin.
When using jars of various sizes, just experiment with wick size. The size I’ve suggested above is excellent for a jar of around 5 inches. So, what I would do is to measure the diameter of my jar, and then half it. You’ll then want 3 wicks that are designed to sit in a candle of this size. These are rough estimates, though. You’ll want to give it a go and see what they’re like.
How to multi wick
Step 1: Melt your wax using the bain-marie method that I have discussed here in my soy candle craft. While it’s on to melt, you’ll want to use this time to wick your jar!
First, using a felt tip that you can rub out after, mark where you will sticking your wicks down. You’re looking for a triangle, with each wick roughly an inch apart.

This will vary depending on how large a jar and in turn how large your wicks are. As I’ve said, this is quite experimental. Practice makes perfect. You want the melt pools to be just touching each other.
When you feel like you can commit to your markers, stick your wicks down with a hot glue gun.
Step 2: Your wax should be nice a melted now and ready to pour. If you want, this is when you’d add your dye and your fragrance oil. Take a look at how to color and fragrance a candle. I’ve decided to make use of purple candle dye and lavender fragrance oil.
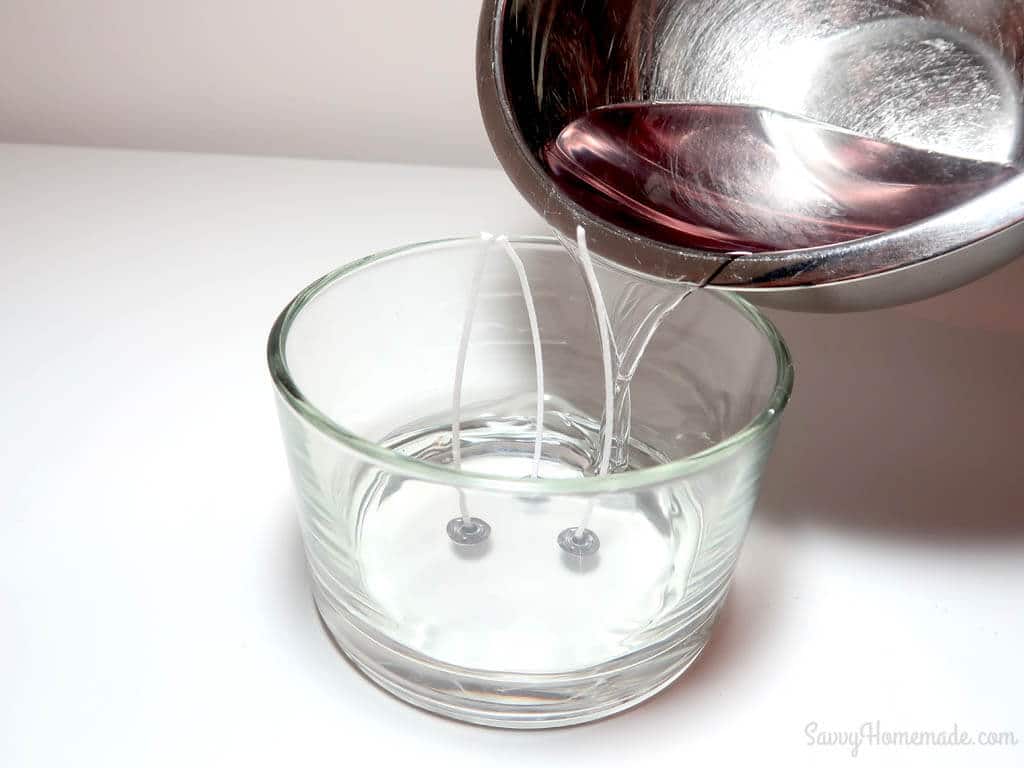
When you’re ready, slowly pour your wax into the wicked jar. Take note of how I’ve used pre-waxed wicks. Because of this, I don’t need to use a wick holder or pencil to keep it in place.
However, I have made use of a few broken up bamboo sticks to keep all the wicks in place. Ordinarily, this wouldn’t be a problem, but as we’re multi-wicking we can’t afford to allow the wicks to intersect.

Step 3: Leave your candle to cool for about 1-2 hours, then you’ll want to fix your sink holes. To learn how to do that, have a look at this page (basics of candle making).
Step 4: Once you’ve fixed your sink holes, you’ll want to leave your candle for about 2 days before you burn or gift it, but otherwise you’re all finished!
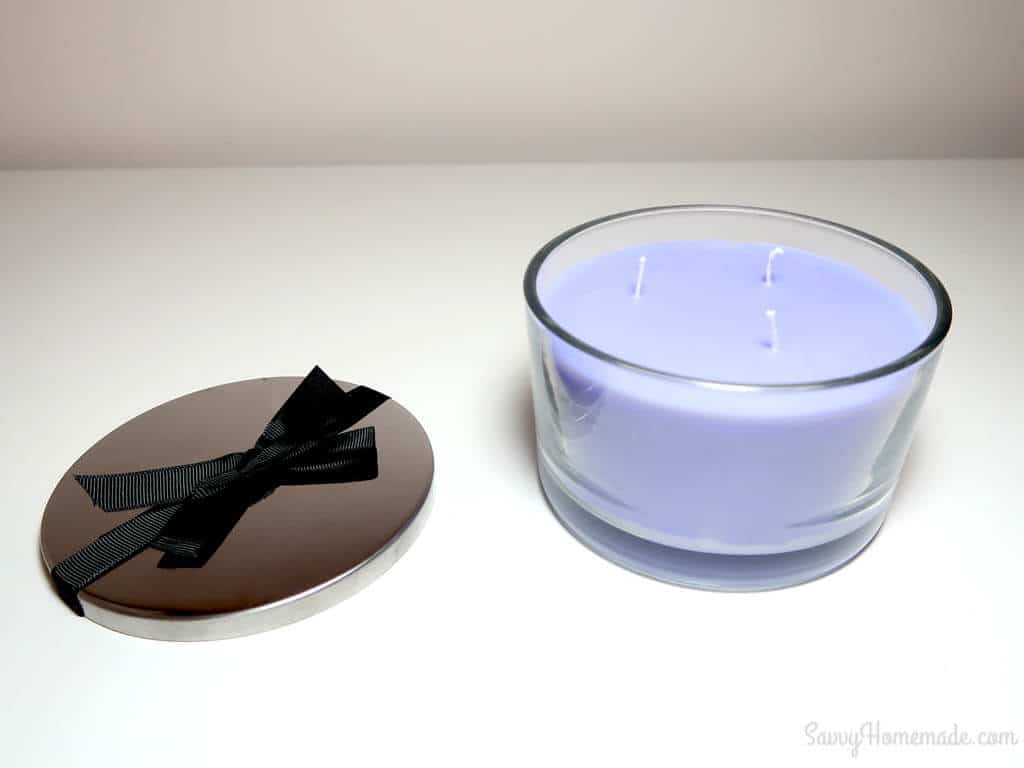
You can jazz up jar and lids with little decorations to make it that much more special. I’ve stuck a nice black ribbon to the lid of my jar. My wax is dyed purple, and I didn’t want to go over the top as I’m planning to give this to my mother (who has a very minimalist sense of style), so I thought a plain black ribbon would look nice.
There you have it, your essential guide to wicking candles!
Where To Buy Candle Wicks
Candle wicks are easy to buy on Amazon and today you’ve learned exactly what size and type of wick you’ll need for your candle, as well as why you might want to use pre-waxed candle wicks as well.
But we’ve gone a bit further, showing you how to use a wooden wick, but also making use of more advanced methods such multi wicking a candle. Sure, they take a bit more practice and experimentation to get right, but with a bit of effort, you’ll get there before long.
So get out there and create some candles! I’ll do my best to answer any questions in the comments section below. You can also use a comment to let us know all the exciting candle making experiences you’ve had, as well as any tips and tricks you’ve learned along the way.
Don’t forget to share this on all your social media so that you can let your friends and family know to expect your own wonderful candles as gifts for the next year!

Hi! Very much appreciated this guide – thank you!
Just wondering if there is a certain guideline for bamboo sticks? I have 3 different vessels, and wondering what sizes to get for my soy wax candles.
Thank you in advance!
It doesn’t have to be a bamboo stick exactly. You’re looking for something long and thin that will reach most of the way down your vessel. I’d have a look round the house to see if there’s anything suitable before you go looking to buy something for them.
I have a jar that I can’t seem to wick! Im ready to pull my hair out. I just love this jar, not ready to give up on it yet. The Exterior is 5.125in, Interior is 4.875in and the height is 3in. Would the LX 12 AND 14 be a starting point? I’ve tried everything but LX wicks. I’m using 6006 wax.
Hi Brittany,
Yeah with very large jars it can be a pain to wick. If you’re getting a lot of tunnelling, I would consider putting 2 or 3 wicks in there. Just small ones. Try two of the LX 12 first. They’re designed for jars around 2-2.3 inches. If that doesn’t work, try 3 of the LX 10.
Hope this helps
Thank you for vast amount of information. Just a beginner.
You’re very welcome Lillian, we love beginners around here! We were all one once.
Hi Angela,
Thanks for the tips. I am making tapered pillar candles and am using cotton braided thread. When I go to light the candle, the wick disintegrates. Can you please let me know how the wick should be prepared?
Thanks!
Lily
Hi Lily,
When you say cotton braided thread, do you mean a purpose made wick for candle making? If not, then you’ll want to stop using it. Wicks are made from materials that are specifically chosen for quality of burn. Amazon will sell everything you need, just search for ‘candle wicks’ and choose one that is of an appropriate thickness for your candles.
Hello I’m a beginner soy candle maker. I have learned a lot from reading though your pages I see where most of my mistakes were coming from I about to give up but not now. I’m really looking forward in being a candle maker. Will be letting you know how things go and asking questions. Thanks Life Saver
Hi Angela,
Sounds great! Happy candle making and I look forward to your updates! 😀
Hi Angela.
You’re amazing by the way.
My question is,where can I buy soy wax in bulks?
Hi there,
I would check on amazon, but if you don’t have much luck, eBay is a good place to look at as well. Hope this helps.
I make a lot of candles and I have never done a multi-wicking. Yet, they are my favorite ones to buy! Thanks for the advice.
What kind of wick do you use with Beeswax candles? Or how would the process differ?
Honestly, I haven’t found using a specific wick for a specific type of wax all that necessary. What’s far more important is finding one that fits/is the correct size.
Hope this helps!
Thank you for this information. I am just now venturing into my candle making experience and may have questions but I just wanted to drop a comment and say thank you for this guide. stand by for an update on progress 🙂
I am starting with soy and wood wicks. I want to use paraffin but and starting with soy since it is cheaper to start with.
ultimately I want a candle that burns evenly, with a clean self trimming wick and at the end is very easy to clean out of the jar to re-use if you want to.
Hi Katie,
There’s something about starting a new craft that’s just so satisfying. While it can be a bit frustrating when you first get going, when you start to master a craft it’s just so fulfilling! Good luck with your candle making endeavors, I’m looking forward to your update!
Hi there, I’ve read everything you have printed about candle making. I nearly have the courage to start. I’ve purchased everything required to begin. I’m using eco advanced soya was and I’m using jars which have 100mm inside diameter 3.9 inches. I wanted to double wicked or possibly use 3 wicks. I’ve bought the eco wicks in size 10/12/14. Although I’ve read everything I’m still a little confused as to which is the correct size. I plan on selling them so I wanted to be extra careful. Any advice would be so appreciated.
Many thanks
Yvonne
Hi Yvonne!
I can understand your trepidation, it can be a bit daunting trying something new! First and foremost, experimentation is the key. If you’re unsure, try making just the one and burn it yourself at home (with supervision to avoid nasty accidents). Good quality control and testing is especially important if you’re planning to sell them, which you’ve said you intend to. Nevertheless, I have a feeling you might need smaller wicks.
For the triple wick candle on this page, I’ve used 3 wicks that are an eco size 4 for a jar that is roughly 5 inches in diameter (127mm). Although I should have used an eco 1, it burnt just fine when tested. The sizes you’ve purchased would be excellent for single wicking, particularly the eco 14 for a jar of 100mm. Finding a good wick size for triple wicking can be difficult. I usually divide the diameter of the jar by however many wicks i’m using, and then use wicks designed for that size. So in your case, you could probably get away with using wicks that are designed for tealights and up to an eco 4. But again, always test before gifting or selling to make sure you’re getting a good melt pool and the glass isn’t getting excessively hot.
I hope this makes sense and helps you, Yvonne. I also hope you enjoy making your lovely candles, and good luck with starting something new!