PowerShell gives you a fine control over the management of Windows machines that is easy to achieve. However, until recently the process of installing, updating and uninstalling packages was always described vaguely as “writing some custom PowerShell scripts to obtain the desired result”. Since WMF 5.0, however, a package manager called “PackageManagement” has become available, and which gives us the facilities we’d expect, and allows you to use a wide range of package sources.
Why a package manager?
For those of you who have already used Linux, you will have seen how simple it is to install software on a Linux machine via the “apt-get” or “yum install” or “rpm –ivh” commands. A package manager keeps track of what software is installed on your computer, and allows you to easily install new software or remove software that you previously installed. This feature was not available on Microsoft platforms except using 3rd party tools such as Chocolatey that were not officially supported by Microsoft. Since WMF 5, Microsoft has filled the gap in Windows by integrating a package manager called “PackageManagement“.
Note: For those who have already started using this feature, you probably know it as “OneGet“. Since WMF 5.0 RTM, it was renamed to “PackageManagement“; but Microsoft does not systematically rename all of their components, so you will still encounter this term.
“PackageManagement” is a unified package management component that allows you to perform software discovery, installation and inventory for any type of software package that it supports through its extensible provider interface. But it goes beyond that, as there exists a PowerShell module to interact with packages and which will allow you to automate packages management not only locally, but also remotely! This is a real breakthrough in the management of Windows packages.
Architecture
To facilitate the understanding of this new concept, this article will be based on a diagram available on the TechNet website in order to analyse in detail the architecture of this new feature. “PackageManagement” is a Package Management Aggregator which is divided into four sections:
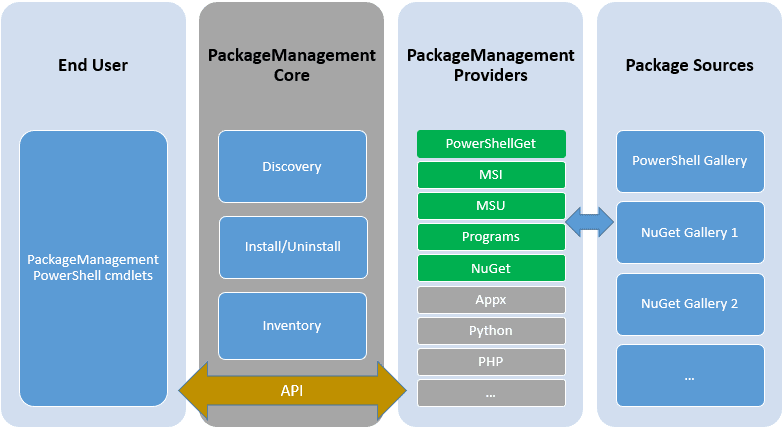
Figure 1 – PackageManagement Architecture
- EndUser: As a user or sysadmin, you are in the “EndUser” section: This gives you access to several PowerShell cmdlets that we will use in the next section of this article.
- PackageManagementCore: This corresponds to the actions that can be performed on your machine. Available actions are: discovery, install / uninstall and inventory.
- PackageManagementProviders: This section regroups the providers that can interconnect to PackageManagementCore. It can be an officially-supported “Microsoft” provider or a 3rd party provider to expand the possibilities.
- Package Sources: Also called “Repositories”. This is the place where the software packages are stored. These sources are managed by the providers themselves. Their location can be an online URL, a local folder or a network shared folder.
Basically, a normal user can install a package from a provider.
In practice, what happens?
We will use Windows PowerShell to manage our packages. We will begin by listing the cmdlets of the “PackageManagement” module using the following command:
PS > get-command -module packagemanagement | sort noun,verb

CommandType     Name                                               Version    Source
-----------     ----                                               -------    ------
Cmdlet          Find-Package                                       1.0.0.1    PackageManagement
Cmdlet          Get-Package                                        1.0.0.1    PackageManagement
Cmdlet          Install-Package                                    1.0.0.1    PackageManagement
Cmdlet          Save-Package                                       1.0.0.1    PackageManagement
Cmdlet          Uninstall-Package                                  1.0.0.1    PackageManagement
Cmdlet          Find-PackageProvider                               1.0.0.1    PackageManagement
Cmdlet          Get-PackageProvider                                1.0.0.1    PackageManagement
Cmdlet          Import-PackageProvider                             1.0.0.1    PackageManagement
Cmdlet          Install-PackageProvider                            1.0.0.1    PackageManagement
Cmdlet          Get-PackageSource                                  1.0.0.1    PackageManagement
Cmdlet          Register-PackageSource                             1.0.0.1    PackageManagement
Cmdlet          Set-PackageSource                                  1.0.0.1    PackageManagement
Cmdlet          Unregister-PackageSource                           1.0.0.1    PackageManagement
It is not the number of available cmdlets that is important to analyse in this result, but rather the usefulness of each cmdlet. We can group this result into three categories:
- Package (yellow)
- Provider (green)
- Package source (blue)
The first thing we want is the list of available providers on our machine. Let us relook at the initial diagram, we are in the following section:
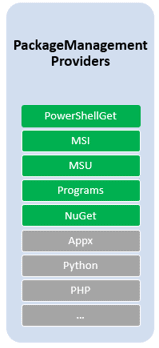
Let us use the Get-PackageProvider cmdlet (In my example, I use Windows 10 anniversary update):
|
1 2 3 4 5 6 7 8 |
PS > get-packageprovider Name Version DynamicOptions ---- ------- -------------- msi 3.0.0.0 AdditionalArguments msu 3.0.0.0 PowerShellGet 1.0.0.1 PackageManagementProvider, Type, Scope, InstallUpdate, … Programs 3.0.0.0 IncludeWindowsInstaller, IncludeSystemComponent |
Let us dwell a moment on the providers displayed for your machine:
- Msi: Allows you to manage .MSI files.
- Msu: Allows you to manage .MSU files (Microsoft Update Files).
- PowerShellGet: Allows you to manage PowerShell modules stored in an online gallery. The default package repository is www.PowerShellGallery.org.
- Programs: Allows the inventory of available programs via “Add and Remove Programs and Features“
After identifying the provider that you want to query, we can use the following command to get the list of available packages in the repositories (source):
|
1 2 3 4 5 6 7 |
PS > find-package -provider PowerShellGet PSReadline -allversions The provider 'nuget v2.8.5.206' is not installed. nuget may be manually downloaded from https://oneget.org/Microsoft.PackageManagement.NuGetProvider-2.8.5.206.dll and installed. Would you like PackageManagement to automatically download and install 'nuget' now? [Y] Yes [N] No [S] Suspend [?] Help (default is "Y"): |
Windows immediately searches for a provider named “Nuget”. When this provider is not installed, it offers to add it automatically for you. So you can press “Y” to continue. What is this provider?
- NuGet: It is a package provider to manage NuGet packages. NuGet is a free and open-source package manager designed for the Microsoft platform.
After installing this provider, the list of packages is displayed.
|
1 2 3 4 5 6 7 8 9 |
Name Version Source Summary ---- ------- ------ ------- PSReadline 1.2 PSGallery Great command line editing in the PowerShell console host PSReadline 1.0.0.13 PSGallery Great command line editing in the PowerShell console host PSReadline 1.0.0.12 PSGallery Great command line editing in the PowerShell console host PSReadline 1.0.0.11 PSGallery Great command line editing in the PowerShell console host PSReadline 1.0.0.10 PSGallery Great command line editing in the PowerShell console host PSReadline 1.0.0.9 PSGallery Great command line editing in the PowerShell console host PSReadline 1.0.0.8 PSGallery Great command line editing in the PowerShell console host |
In this result, we see that there are several versions of the package and they are available from the same source, namely the “PSGallery” repository. To install this package, nothing more simple, just use the “Install-Package” cmdlet:
|
1 2 3 4 5 |
PS > Install-Package PSReadline -MinimumVersion 1.2 The package(s) come from a package source that is not marked as trusted. Are you sure you want to install software from 'PSGallery'? [Y] Yes [A] Yes to All [N] No [L] No to All [S] Suspend [?] Help (default is "N"): Y |
What did we actually do? Let us take the previous diagram to identify the steps:
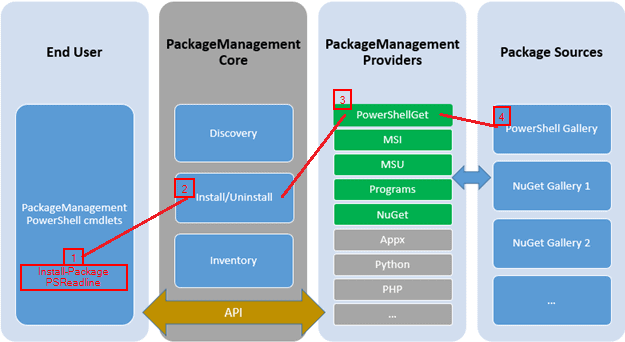
- Step 1 and step 2: Using the “Install-Package” cmdlet to install the PSReadline module.
- Step 3: Using the provider and making this module available. In our case it is the “PowerShellGet” module.
- Step 4: Install the package from the “PowerShell Gallery” repository which hosts this package.
The number of packages is constantly increasing. To prove this, we can use PowerShell:
|
1 2 3 |
PS > Find-Package | Measure-Object Count : 929 |
I recommend using the Out-GridView cmdlet to view the list of these packages:
|
1 |
PS > Find-Package | Sort-Object –Property Name | Out-GridView |
If you analyze the result, you will find that it only contains PowerShell modules. This is normal because we only have a single repository installed. Let’s see all the available registered package sources by using the “Get-PackageSource” cmdlet:
|
1 2 3 4 5 |
PS > Get-PackageSource Name ProviderName IsTrusted Location ---- ------------ --------- -------- PSGallery PowerShellGet False https://www.powershellgallery.com/api/v2/ |
You will soon find this rather too limited, so let’s immediately install a new provider that will allow us to use new repositories. But how to know which providers can be installed? Well it is simple, the “Find-PackageProvider” cmdlet displays them for you:
|
1 2 3 4 5 6 7 8 9 10 11 12 13 14 15 |
PS > Find-PackageProvider Name Version Source Summary ---- ------- ------ ------- nuget 2.8.5.206 https://onege... NuGet provider for the OneGet meta-package chocolatey 2.8.5.130 https://onege... ChocolateyPrototype provider for the ContainerImage 0.6.4.0 PSGallery This is a PackageManagement provider MyAlbum 0.1.2 PSGallery MyAlbum provider discovers the photos in GitHubProvider 0.5 PSGallery GitHub-as-a-Package - PackageManagement TSDProvider 0.2 PSGallery PowerShell PackageManager provider to GistProvider 0.6 PSGallery Gist-as-a-Package - PackageManagement NanoServerPackage 0.1.1.0 PSGallery A PackageManagement provider to discover, OfficeProvider 1.0.0.1 PSGallery OfficeProvider allows users to install GitLabProvider 1.2.0 PSGallery GitLab PackageManagement provider WSAProvider 1.0.0.4 PSGallery Provider to Discover, Install and |
Currently “Package Management” looks for the providers in the PowerShellGallery.com and in Azure blob store. So I install the “Chocolatey” provider, specifying the provider release.
|
1 2 3 4 5 6 7 8 9 10 11 12 13 14 15 16 17 18 19 20 |
PS > Find-PackageProvider -Name "Chocolatey" -AllVersions Name Version Source Summary ---- ------- ------ ------- chocolatey 2.8.5.130 https://onege... ChocolateyPrototype provider for the OneGet meta-package chocolatey 2.8.5.101 https://onege... chocolatey provider for the OneGet meta-package manager chocolatey 2.8.5.24 https://onege... chocolatey provider for the OneGet meta-package manager PS > Install-PackageProvider -Name "Nuget" -RequiredVersion "2.8.5.201" –Force PS > Get-PackageProvider Name Version DynamicOptions ---- ------- -------------- Chocolatey 2.8.5.130 SkipDependencies, Continu msi 3.0.0.0 AdditionalArguments msu 3.0.0.0 NuGet 2.8.5.206 Destination, ExcludeVersi PowerShellGet 1.0.0.1 PackageManagementProvider Programs 3.0.0.0 IncludeWindowsInstaller, |
Note: The RequiredVersion parameter is not mandatory, because by default, the latest version will be installed.
For those who want to do the installation manually, the following command will do what you want.
|
1 |
PS > Register-PackageSource -Name chocolatey -Location http://chocolatey.org/api/v2 -Provider PSModule -Trusted -Verbose |
The number of package available for installation is now 5001!
|
1 2 3 4 |
PS > Find-Package | Measure-Object Count : 5001 |
And we can now deploy as much software as we want. I will let you imagine the possibilities of automation that is available to you through this new feature.
|
1 2 3 4 5 |
PS > Install-Package –Name SqlServer2014Express PS > Install-Package –Name Nginx PS > Install-Package –Name Logmein.Client PS > Install-Package –Name VisualStudio2012Professional … |
I previously installed the “7Zip” package on my machine, and now I validate that the installation was successful:
|
1 2 3 4 5 6 |
PS > Get-Package -Name 7zip Name Version Source ProviderName ---- ------- ------ ------------ 7zip 16.02.0.20160811 C:\Chocolatey\lib\7zip.16.02.... Chocolatey 7zip.install 16.02.0.20160811 C:\Chocolatey\lib\7zip.instal... Chocolatey |
The cmdlets of the “PackageManagement” module are simple enough to understand, so I do not need to detail all of them. For more details on their use, I recommend the Microsoft documentation: https://docs.microsoft.com/en-us/powershell/module/packagemanagement/
If you are wondering how to update an installed package on your machine? Well, there is no way to perform this task. You must uninstall your package and reinstall it to get the latest version. It’s very frustrating but I did not find any official solution. You can create a custom function which will uninstall and then reinstall the package. Missing a cmdlet like “Update-Package”. If you have another option, please let me know in the comments section.
Note: You can come up with another provider named “APPX” which will be used with Windows Nano Server to deploy your packages on a “Nano Server” machine:
|
1 |
PS > Find-Package –Provider appx |
Several cmdlets are provided with this provider. For more information on using this provider, please refer to this TechNet article: https://blogs.technet.microsoft.com/nanoserver/2015/11/18/installing-windows-server-apps-on-nano-server/
To go further
As a sysadmin, you would probably want to use a trusted repository so as to deploy packages on your machines. Well, it is possible to create one’s own repository.
Not being an expert with the Visual Studio tool that you will need for this step, I suggest you to begin with this official guide: https://docs.nuget.org/create/hosting-your-own-nuget-feeds
You will subsequently record a repository and associate it with your provider. For this, the following command should be used:
|
1 |
PS > Register-PackageSource -Name "MyRepository" -Location "http://domain/psmodule/Features/api/v3" –ProviderName "MyProvider" –Trusted -Verbose |
For those of you who wish to continue to use the “public” repositories, I suggest that you mark them as “Trusted”. By default, the repositories are marked as “untrusted”, so the following command will trust them and you will have no warning message:
|
1 |
PS > Set-PackageSource -Name chocolatey –Trusted |
If you no longer want to use a repository, do not worry, you can remove it very simply:
|
1 |
PS > Unregister-PackageSource –name Chocolatey |
Conclusion
We have seen in this article a new way of managing packages on Windows Clients and Servers machines. This feature, called “PackageManagement“, provides a very adaptable way of administration for sysadmins. This feature allows you to automate the deployment of your applications on your workstations and servers. Users can also use this feature to independently install packages.
From purely a personal point of view, I prefer to use Desired State Configuration (DSC) to deploy packages via the DSC resource named “package”. This allows me to control exactly the versions used on my machines and also their origin. These repositories are certainly controlled but in a production environment, it is difficult to deploy software without being sure of their compliance and integrity. For more information about this, I refer you to the series on PowerShell DSC.
PackageManagement is a breakthrough in the automation process for deploying your packages on Windows platforms because it not only gives you a feature that has existed on Linux for a long time, but also allows you to use a wide range of existing galleries and repositories.
Load comments