- Configuration Items in Configuration Manager (SCCM, MECM) - Mon, Aug 22 2022
- Create and read SCVMM custom properties with PowerShell and the VMM Console - Mon, Apr 18 2022
- Prevent ransomware attacks on network shares with File Server Resource Manager (FSRM) - Mon, Mar 7 2022
Updating the BIOS on multiple laptops and desktops can be a tiresome task that may just seem easier to do without. However, securing the BIOS can prevent attackers from overwriting or tampering with the OS and ensures your data stays safe.
Please note that this guide only applies to Dell systems. I tested these steps on a Dell OptiPlex 780 SFF (Small Form Factor), Dell OptiPlex 790 SFF, and Dell OptiPlex 3040 MT (Mini-Tower). All systems were running Windows 7 Professional x64 and Windows 10 Pro x64. I cannot guarantee this guide will work with Windows Vista or Windows XP.
Before we get started, you are going to need the following tools installed on your workstation:
- System Center Configuration Manager 2012 R2 Admin Console
- Dell Command | Configure Toolkit (Download)
First, download the latest BIOS revisions for each of the models deployed throughout your organization from Dell's support website. Create a new folder in which you will place the downloaded revisions. For this guide, I will be saving all necessary files to the following location:
\\SCS-CFGMGR-MP\SWSTORE\BIOS

BIOS repository
I have created separate folders for each model. If you download multiple revisions for one model, I suggest you come up with a naming convention so you don't have multiple separate directories to hold one revision. For this guide, I will be using the following naming convention:
O780-A15 | O = OptiPlex (Family), 780 = (Model), - A15 = (BIOS Revision)
Next, launch the Dell Command | Configure Toolkit Wizard. Although you can configure separate packages for each model in your organization, I recommend creating a multiplatform package that will work with all models. I have never had any issues creating a multiplatform package that works with different Dell models, even those manufactured as late as 2010. With that in mind, select the Create Multiplatform Package tab and configure the package options.
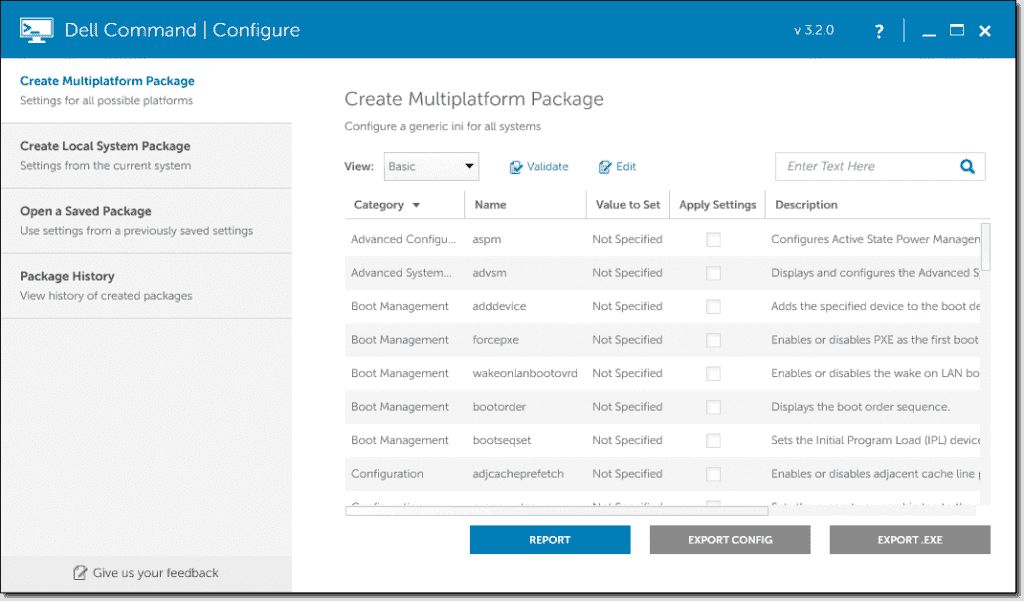
Dell Command | Configure Toolkit
For this guide, I have configured the following options:

My configuration
When you are satisfied with your configuration, export your package as a .CCTK (Client Configuration Toolkit) file using the EXPORT CONFIG button and save it to a location SCCM can access. For this guide, I will be saving my configuration to the following location:
\\SCS-CFGMGR-MP\SWSTORE\BIOS\Dell CCTK\~Configs
Once you save your configuration, navigate to "C:\Program Files (x86)\Dell\Command Configure" and copy the contents of the folder "X86_64" to a location SCCM can access. You will be importing the directory to which you copy these files as a package in SCCM. For this guide, I will be copying these files to the following location:
\\SCS-CFGMGR-MP\SWSTORE\BIOS\Dell CCTK
Note your configuration file and the contents from the "X86_64" folder must be accessible through the same package in SCCM. This is because you need Dell's CCTK executable to apply your configuration.

CCTK folder structure
Now we are ready to create the task sequence that will push the BIOS configuration. The toolkit will deploy this task sequence as a required advertisement and will also flash any BIOS updates needed using the revisions you downloaded earlier.
Open the Configuration Manager Admin Console and navigate to the Software Library applet. Expand the Application Management node and click on the Packages applet. Create a new package using the Dell CCTK folder you just created, but do not create a program or add any requirements.

Dell Command | Configure Toolkit package
When you are finished creating the package, distribute it to the necessary distribution points. Now we need to import the BIOS revisions downloaded earlier into SCCM. Create a package for each model you wish to deploy BIOS updates to, but do not create a program or add any requirements.

Dell OptiPlex 3040 BIOS revisions
After creating your packages, you can distribute them to the necessary distribution points. When you add a new revision to the source folder, you will need to update your distribution points to push the revision out to clients.

All BIOS revision packages
Finally, we are going to create the task sequence that will push your BIOS configuration and any needed updates.
Expand the Operating Systems node and click on the Task Sequences applet. Create a new custom task sequence, and specify a name and boot image to use.

Create task sequence wizard
When you are done, click Close to exit the New Custom Task Sequence Wizard. Open your newly created task sequence and create a new group called "Apply BIOS Updates." Add a new step to Run Command Line and configure the step as shown below:

Install HAPI driver properties
Install HAPI driver options
Note you do not need to specify the BIOS password to install the HAPI driver. The next step in the task sequence will clear the password before applying any updates or configurations. Add another step to Run Command Line and configure the step as shown below:

Clear BIOS password properties

Clear BIOS password options
Note that this is the only step where we will tell the task sequence to continue on error, as new machines will not have a password set in the BIOS. Make sure the value you set for "‑valsetuppwd" is your current administrator password and that you've typed it correctly, otherwise your task sequence will fail. Add another step to Run Command Line and configure the step as shown below:

Flash BIOS OptiPlex 780 properties
Take note of the following parameters:
- O780-A15.exe – Name of the executable located in the package source folder.
- /s – Switch to run the executable silently.
- /r – Switch to force a system restart. If this switch is not present, the flash with fail and generate error code 2.
- /l=C:\Temp\O780_A15.log – Switch to generate a log file from the executable.

Flash BIOS Dell OptiPlex 780 options
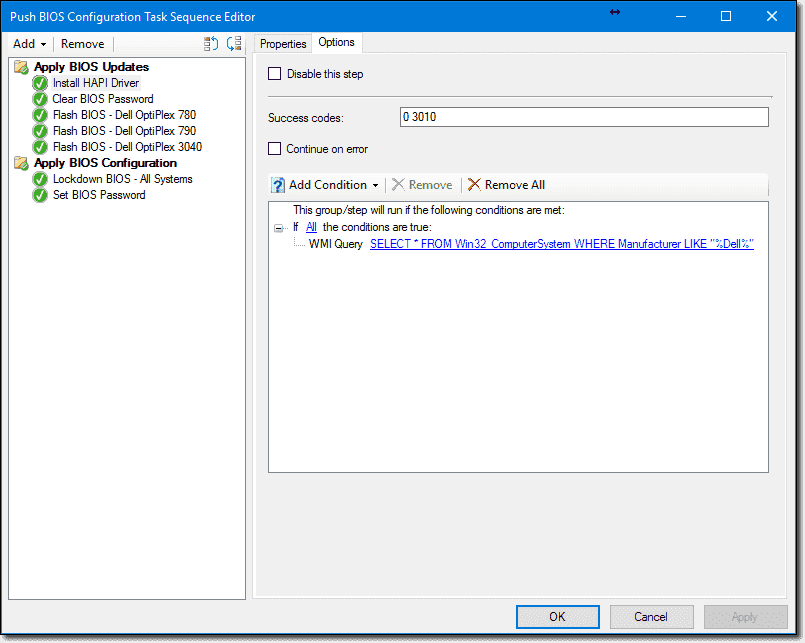
Make sure to point the step to the package that contains the executable you wish to run. Repeat this process for every model to which you wish to deploy BIOS updates. If you add a new revision, you will need to update the executable name and WMI queries as needed. It seems that newer Dell models such as the OptiPlex 3040 do not use A01, A02, etc. as their BIOS revisions but just numbers instead (1, 1.4.2, etc.). Pay close attention when entering your WMI query for the "SMBIOSBIOSVersion" property. When you are done, add a new group called "Apply BIOS Configuration" and add another step to Run Command Line. Configure the step as shown below:

Lockdown BIOS all systems properties

Lockdown BIOS all systems options
Unlike the previous steps in the task sequence, this step will run if any of the conditions are true. In this case, if any models match the model on which this task sequence is running, the step will apply the BIOS configuration. You will need to add a WMI query for each model in your organization. Finally, add one more step to Run Command Line and configure the step as shown below:

Set BIOS password properties

Set BIOS password options
Close the task sequence when you've finished configuring the last step. Finally, we are going to deploy the task sequence to a device collection. Right-click on the task sequence and click Deploy. Choose a collection to deploy the task sequence to and click Next. Choose Required as the purpose and make the advertisement available only to Configuration Manager clients. When specifying the deployment schedule, keep in mind the task sequence will force a reboot on the machine. For this reason, I have chosen to deploy the task sequence at 11:00 PM.

Run at 11:00 PM
Since we do not need to modify any other settings past this point, keep clicking Next until you finish the Deploy Software Wizard. Depending on the time at which you specified your deployment to become available, you will be able to see the task sequence start to run.

Install HAPI driver action

Flash BIOS Dell OptiPlex 780 action

Lockdown BIOS all systems
To confirm the task sequence successfully applied your BIOS configuration, check the directory you specified for the CCTK log file to see the changes that took place. If an option is not applicable to a certain model, the CCTK executable will flag it accordingly.
Subscribe to 4sysops newsletter!

CCTK log
IT Administration News
- Microsoft begins to phase out classic Teams Computerworld
- Whats new in macOS management: Platform SSO and more | Microsoft Intune blog
- RSA news: What’s new in Defender XDR?
- Microsoft releases an extensive list of changes in New Teams compared to Classic Teams – MSPoweruser
- New Microsoft AI model may challenge GPT-4 and Google Gemini | Ars Technica
Join our IT community and read articles without ads!
Do you want to write for 4sysops? We are looking for new authors.


-480x270.png)


Hi Dario,
Which point of the Task Sequence does the error occur? Does it get past the HAPI install?
You can check the SMSTS.log file to see if it has any more detailed error message.
If it happens during the BIOS update, then there is also the log file that was generated as part of the installation command in the instructions above:
/l=C:\Temp\O780_A15.log – Switch to generate a log file from the executable.
Lastly, there could also be some more information in the Windows Event logs (System or Application).
CMTrace is great for looking through logs. This site has a few other tools that might be useful in other areas too: http://aclouda.com/blog/ms/5-sccm-tools-every-sysadmin-should-know/
I’m sorry I can’t be much more help than that, as I’m in the same boat as you when things go wrong with SCCM. Sifting through so many different logs, and trying to find the right ones, is frustrating 🙁
Yes I am checking every single log at the moment. This is one of them:
… rtm\sms\framework\core\ccmcore\commandline.cpp,1019)
clCommandLine.Execute( uOptions, pszWorkingDir, lpDesktop ), HRESULT=800700d8 (e:\nts_sccm_release\sms\client\osdeployment\installsoftware\runcommandline.cpp,565)
ReleaseSource() for C:\_SMSTaskSequence\Packages\MPC0011F.
reference count 1 for the source C:\_SMSTaskSequence\Packages\MPC0011F before releasing
Released the resolved source C:\_SMSTaskSequence\Packages\MPC0011F
cmd.Execute(pszPkgID, sProgramName, dwCmdLineExitCode), HRESULT=800700d8 (e:\nts_sccm_release\sms\client\osdeployment\installsoftware\main.cpp,372)
CreateProcess failed. Code(0x800700D8)
Command line execution failed (800700D8)
Failed to execute command line ‘”C:\_SMSTaskSequence\Packages\MPC0011F\E7450A17.exe” /s /r’ .
his version of is not compatible with the version of Windows you’re running. Check your computer’s system information and then contact the software publisher. (Error: 800700D8; Source: Windows)
Install Software failed to run command line, hr=0x800700d8
Hi Dario,
Sorry for delay, but I’ve been busy with some other stuff.
Not sure if I can help much with this one. Might need to hit the TechNet forums, though my experience there is they will send you to Dell, and Dell will send you back.
I have run into a similar error when trying to upgrade on a BIOS that was too old, and needed another version installed first. Though, you mentioned that you already tried that.
I noticed in your command above that it does not include creating the log file. If you add
/l=C:\Temp\E7450A17.log
to the end of the command, the BIOS file itself will create a log file, which may include more information than the SCCM log file.
If this doesn’t help, then I’ll have to leave it for others to comment, as I’m out of ideas. 🙁
IF I want to add this to an OSD upgrade from Win7 to Win10 is there anything I need to change or can I just copy the commands into the OSD upgrade TS?
Thanks for the post!
I keep getting an error when running this task on a 32bit machine. is there a different setup for 32bit machines?
I can’t seem to get past running HAPIInstall.bat.
Failed to run the last action: Install HAPI Driver. Execution of task sequence failed.
The system cannot find the file specified. (Error: 80070002; Source: Windows)
I get this error regardless of providing UNC to the installer. I’ve verified the file path in my CaptureTool path and it checks out.
Does anyone have suggestions on what to do from here?
Is there a way to verify that the desktop is not locked before running the task sequence? My fear is that users have documents opened and then the BIOS update hits which restarts the computer. I have a global condition that I use for application deployment but can’t figure out how to use it in a task sequence. The global condition is a PowerShell script “[bool] (Get-Process logonui -ea 0)” with value False meaning desktop is not locked.
This info helped me with correcting the commands for setting the admin password.
You can Enable/Set ADMIN Password using below command:
For Set : cctk –setuppwd=PASSWORD
For Clear : cctk –setuppwd= –valsetuppwd=PASSWORD
You can Enable/Set SYSTEM Password using below command:
For Set : cctk –syspwd=PASSWORD
For Clear : cctk –syspwd= –valsyspwd=PASSWORD
You can Enable/Set HDD Password using below command:
For Set : cctk –hddpwd=PASSWORD
For Clear : cctk –hddpwd= –valhddpwd=PASSWORD
I know this a pretty old post but I’m hoping I can find some help. My issue is that I can’t get the config file to apply to my workstations. The BIOS update works just fine but the config file never gets applied. Also the log for cctk.exe does not get created either, but I have it setup to create the cctk.log file in C:\Windows\CCM\Logs\CCTK.Log. I’ve checked and triple checked. Not sure what I’m missing. Please help!
(If you are willing to help, comment and I’ll send you logs and screenshots directly)
Thanks!!!
Hi Alex,
I just try your method. It does successfully update the BIOS.
However the task sequence deployment still report this as failed.
Guess it's because machine is rebooted and had not continue with the next step after "FLASH BIOS"
any idea on this?
@itsarapong
try this – Create a new group for each model of the computer. add the options for WMI query on the Flash step and do it for the group you just created. Add the flash step to each group according to the model, this makes sure that each group of tasks will only run if they match the WMI queries, rather than just the ONE step. On each "Flash BIOS" step for each model, remove the /r from the command lines, and add /f. We will have it complete the reboot at the end.
Next – in the first group, add a General step – Set Task Sequence Variable.
Task Sequence Variable is "SMSTS_BiosUpdateRebootRequired" (without quotations)
Value is "True" without quotations.
Copy and paste this set task sequence variable to each group for the models after the flash bios setup.
At the end of your task sequences, after Apply BIOS configuration, create a new group and name it "If reboot required". In the options tab for this group, add a condition that if the Task Sequence variable SMSTS_BiosUpdateRebootRequired equals True. In the reboot required group, add a general step to restart the computer.
I read that it is advised to control reboots using the task sequence rather than command lines. it will reboot before it even applies the BIOS configuration. I set the restart step to be performed after the apply configuration just so it sets everything and reboots, which seems like a good practice for something like BIOS configuration.
!ALSO! Once the numerical BIOS versions hit 1.10.x the > "version number" query does not work. once you hit 1.10.x you must use "SELECT * FROM Win32_BIOS WHERE NOT SMBIOSBIOSVersion = "1.22.8"" as your WMI query, as 1.9.3 is considered a higher integer than 1.13.3 to sccm – if that makes sense.
quick edit – I was able to test this and was successful in updating the BIOS for a few machines. they show as success in SCCM under monitoring and if they do not install a BIOS it will still finish as successful on the PC and still show in SCCM as successful.
Thank you for your reply but I just use another setup and it's also working fine. I just remove the restart switch of FLASH BIOS step and use task sequence 'restart computer' instead of that. I also add return code 2 as a success code of FLASH BIOS step.