There are two kinds of VPNs. The first is the kind that you use to mask your activity on the internet as a way to increase your security and privacy. The other kind is what you'd use to connect to your home network from a remote location.
In this article, we're going to show you how to set up the second kind of VPN using nothing more than your own router and something called DD-WRT.
DD-WRT is an open source router firmware that grants you more control than most stock routers. The process of setting up your own VPN server isn't trivial, but it isn't overly complex either. Here's what you need to do in a step-by-step format.
Note: You don't specifically need DD-WRT. If your router has VPN and DDNS support, that should be enough -- you'll just have to adjust and approximate some of the upcoming steps.
1. Installing DD-WRT
Before we can set up the VPN, we'll need to get your router running DD-WRT. If your router already has DD-WRT, feel free to skip ahead. We're going to be a bit vague here as the set up does vary by the exact router model you might have.
Easy Mode: You can pick up a Buffalo Router with DD-WRT pre-installed. They make some pretty great routers and the model below has gigabit Wi-Fi.
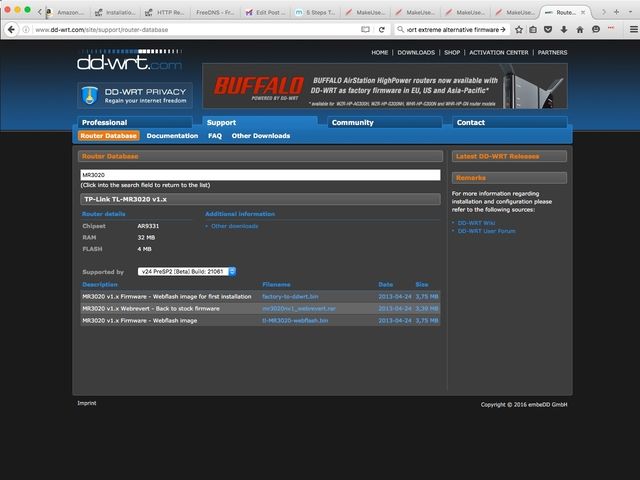
The first step is to get the firmware we'll need to update your router. Go to this page and enter your router's model number. If your router is compatible, you'll get a firmware page that details what you need to download.
Everything should be clearly labeled. In the screenshot above, the binary to upgrade from the factory firmware is factory-to-binary.bin.
Though the router page may have most of the info you need to get up and running, make sure that you follow this page as well. That covers some of the problems you may run into if your router's hardware support is spotty.
The initial update is done via your router's built-in firmware updater. You'll select the DD-WRT binary from your local computer just as you would an actual firmware update. (Some routers may need a prep file before loading the actual firmware, so double check your instructions.)
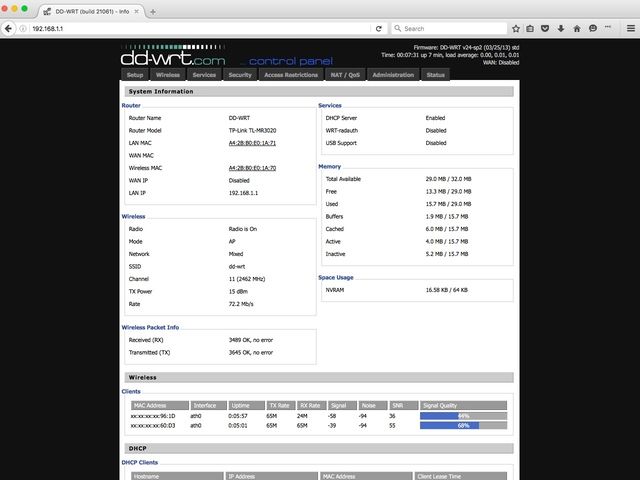
Once your router reboots, navigate to http://192.168.1.1 to set up your router. On this screen, you'll set up a username and password for your router. After you create these, you'll redirect to the status page.
Click Setup and enter your username and password you've created.
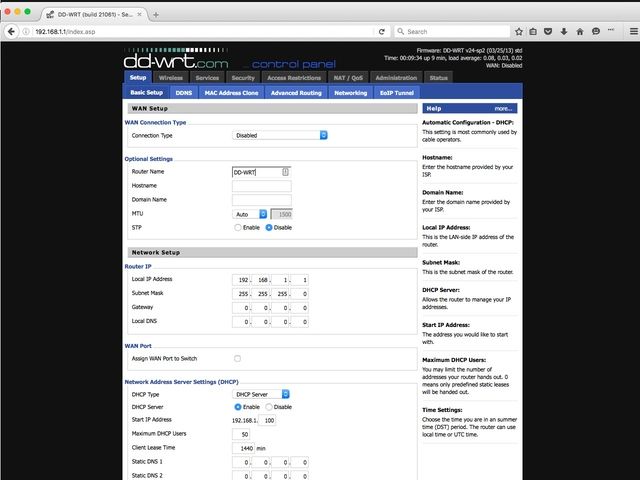
On this next page, you'll set up the basics of your router: Name, IP, and DHCP settings. Set the connection drop-down to Automatic Configuration - DHCP. Leave the DHCP settings to the default. And update the time settings to match your time zone.
If you want to set up a custom DNS such as OpenDNS or Google Public DNS, you'll set them up on this page as well. Once you have everything set to your liking, click Apply Settings.
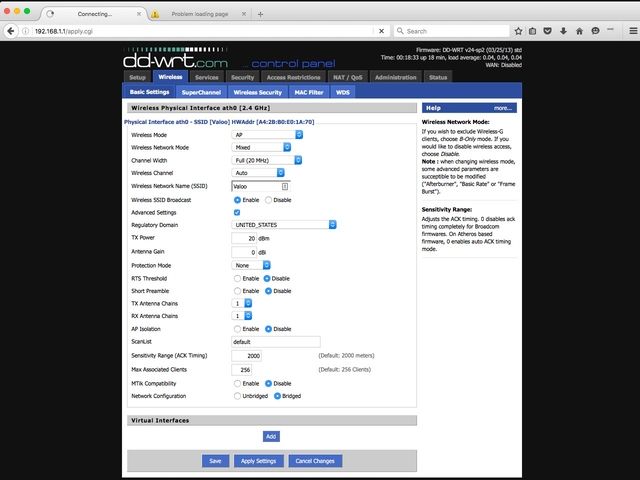
Once this is set up, click on the Wireless tab and configure your Wireless network according to your preferences. Whatever you do, make sure you don't make these network setup mistakes!
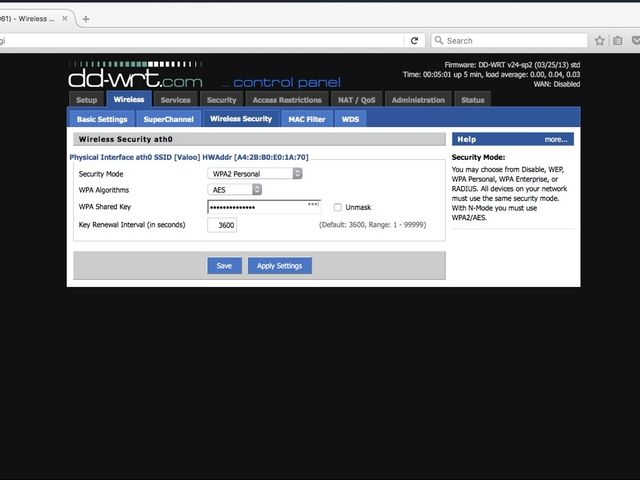
Once you have your basics set, click on Wireless Security and set up encryption on your network.
2. Setting Up Dynamic DNS
Our next step is to set up a DNS forwarder for your dynamic WAN IP. Unless you pay for a static IP, your ISP can change your IP when it wants -- it's up to your ISP how often it changes -- and you will need to change your VPN configuration each time it's updated.
To get around this, we're going to use a dynamic DNS service. These services allow you to create a URL that points at whatever IP your ISP gives you. DD-WRT has support for a variety of services, for the sake of this tutorial we're going to use the free afraid.org service.
Sadly, there is no easy way to set this up. What you could do is check your router page before you leave your house, and update your VPN settings with the current WAN IP. It depends on your ISP how often it will change. This method should be sufficient for short vacations or a trip to the coffee shop.
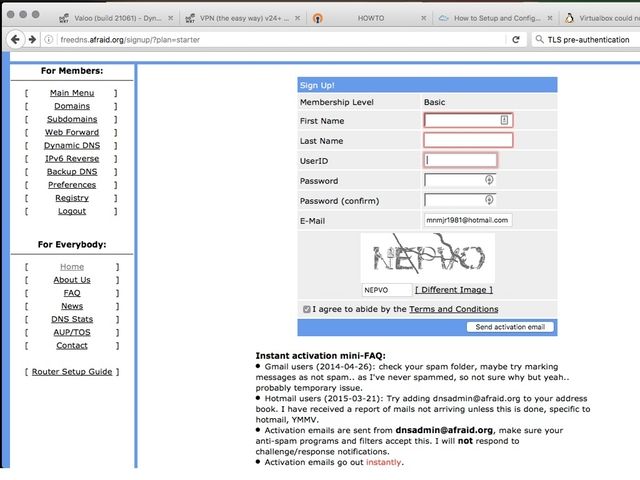
You're only going to need a free account, which will get you a subdomain from a selection of addresses.
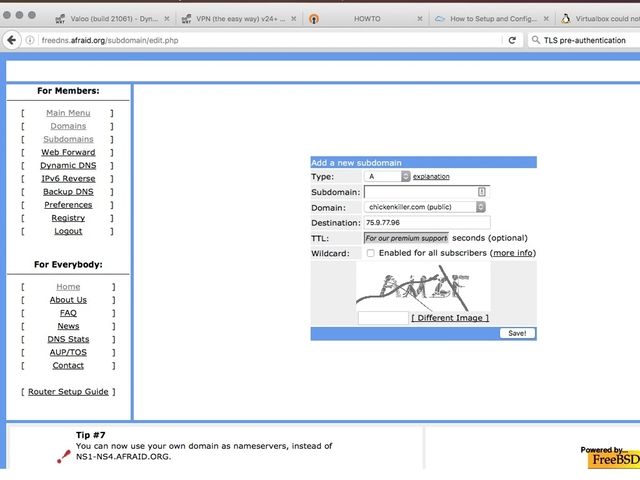
Once you have your account created, log in and go to the subdomain menu. We want to create an A record, which should be the default. Enter the subdomain of your choice in the next field, then pick the domain you want from the drop-down.
Enter your router's WAN IP; you can get this in the upper right corner of your DD-WRT page. Click Save and then click on DDNS. On this page copy the Direct URL link next to your new subdomain entry.
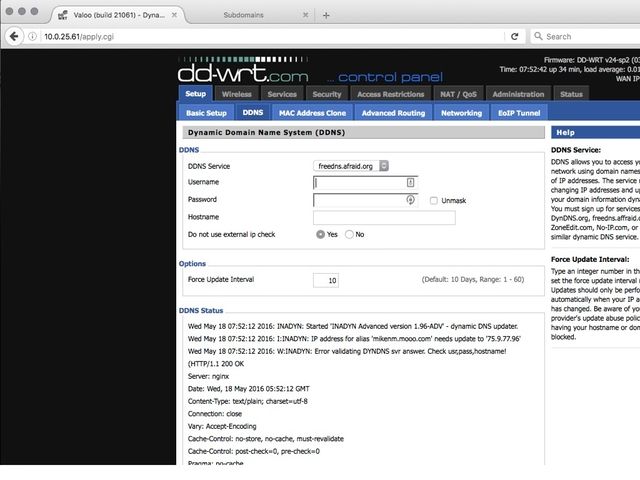
Once you have your account and subdomain created, switch back to the router page. Under Setup, click the DDNS tab. In the drop-down menu, select freedns.afraid.org and enter your username and password.
In the hostname paste the URL, you copied in the step above. Leave the external IP check as Yes. The Force Update Interval defaults to 10 days, but you may need to adjust this later if your IP updates more often.
3. Configuring PPTP
For the rest of this tutorial we're going to stick with easy mode by configuring the PPTP (Point to Point Tunneling Protocol) VPN option on DD-WRT. If you have an older router with a smaller amount of storage, this might be the only option you see.
This is an older VPN technology developed by Microsoft. It uses a tunnel between your device and your home network using Generic Routing Encapsulation. This means that your remote web traffic is wrapped up in another packet and sent to your home router. It then processes your request and returns the data wrapped in another packet as well.
Though we're doing easy mode here, it should be noted that PPTP has some pretty serious security flaws. DD-WRT lets you enable MPPE for encryption, but this is a weak protocol. You're getting access to your local resources, but without nearly as much security as you would with OpenVPN.
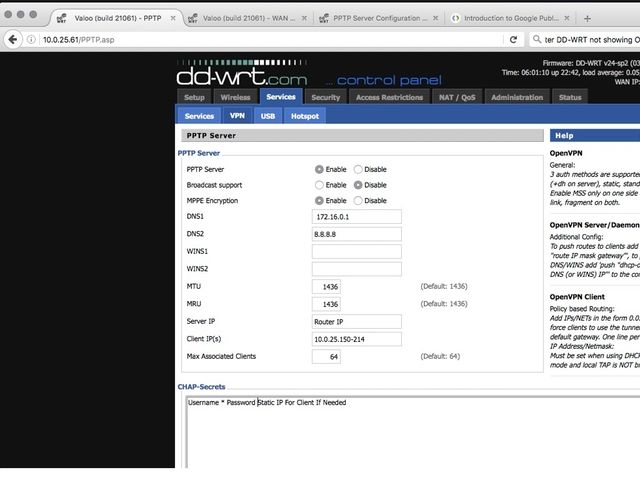
To set up PPTP, click on the Services tab. Then click on VPN and in the PPTP Server area, click the Enable Option to expand the configuration. Leave Broadcast Support disabled, but enable MPPE Encryption. Re-enter your DNS configuration again, but you can probably skip the WINS servers.
Leave the MTU and MRU settings at the default. For Server IP, you'll want to use the router's address--192.168.1.1 is the default.
You'll also want to set the IP range for your clients. This needs to be in a specific format: xx.xx.xx.xx-xx. For example, if you wanted to do 10.0.25.150-10.0.25.214, you would input that as 10.0.25.150-214. You can leave the Max Associated Clients as the default of 64.
The next section is CHAP-Secrets. These are the usernames and passwords you'll use for each client. These are set up as: Username * Passwords * (note the spaces between the text and asterisks). If you want your clients to have a specific IP when connecting to the VPN replace that second asterisks with the IP: Laptop * Password 10.0.25.51.
Once you have all these fields complete, click Apply Settings, and we'll move on to setting up your client.
4. Configuring Your Devices
Now that you have your VPN set up and open to the Internet, let's go over setting up your laptop and phone. This tutorial covers setting up PPTP on Windows, OS X, and iOS. We have a guide for Android VPN here.
You will still use the same basic information on other operating systems, but remember that your router will need a username and password set up for each client that you want to connect.
Windows 10
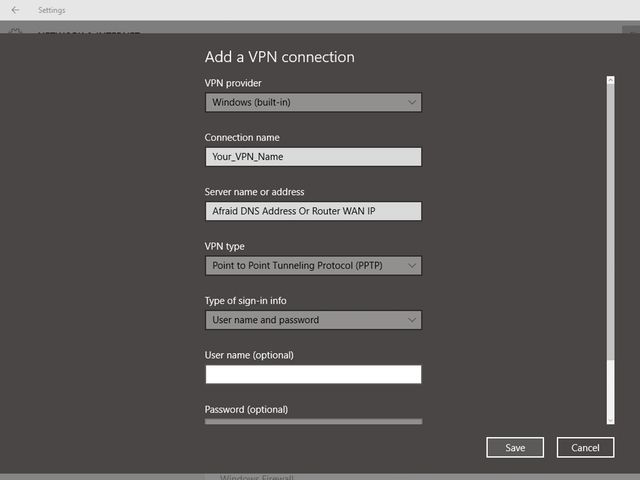
Open the Start Menu and click Settings. Then click on Network and Internet, and on the screen that pops up click VPN. Open the Add a VPN Connection screen and fill out the form. The VPN provider should be Windows. You can pick what you want for the Connection Name.
In the Server name or address field, enter your afraid.org DNS address or the WAN IP of your router. In the VPN Type drop-down, select PPTP. Leave Type of Sign on as Username and Password. Then enter the username and password your created when configuring your router.
When you're not on your local network, you'll connect from the VPN menu. Your new VPN configuration will be there. Highlight it and click Connect.
OS X
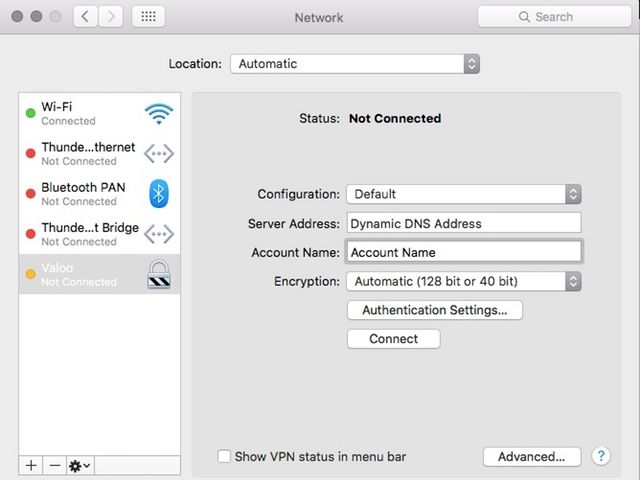
Open System Preferences and click Network. If you aren't running an admin account, you'll need to click the lock and enter an admin password. Then click the plus sign to add a new interface. In the pop up select VPN for the interface. For VPN type, select PPTP.
You can set what you would like for the name and click Create.
For the Server Address, you'll enter your afraid.org DNS, and the account name is the username you set up on your router. Set your desired encryption level; 128-bit only is more secure. Then click Authentication Settings and enter your password.
When you're not on your local network, return to the Network panel and click on the VPN you set up. Click on Connect.
iOS
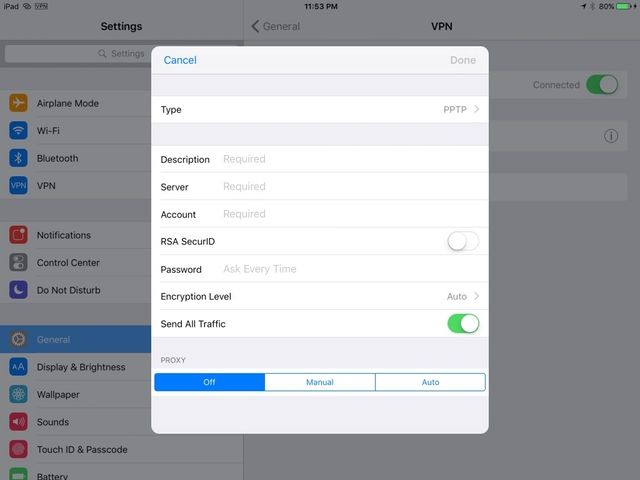
Open the Settings app. Then tap General; scroll down and Tap VPN. Tap Add VPN Configuration. Tap type and select PTPP, then tap the back arrow. Set what you would like for Description.
In Server enter your afraid.org DNS address or your router's WAN IP. The Account field is the username you set up on the router. Leave the RSA SecurID set to off. You can set your password, or leave it blank to enter the password every time you connect.
The encryption level is set to Auto, but you can click through and set it to Maximum. This is equivalent to OS X's 40 or 128-bit or strict 128-bit encryption levels, but it's iOS so the menus are "friendlier". Leave Send All Traffic set to on.
This will add a menu item on the main Settings screen, VPN. When you're not on your local network, you can connect to your VPN by flipping the switch next to this option.
You're Done! What's Next?
Now you've got a basic VPN set up. You've also got a more powerful router with a lot of options. Dig around those settings to find out things you can do with DD-WRT that you can't do with most router firmware.
You'll also want to look into configuring OpenVPN on DD-WRT, which is a more involved process. This will increase the security of your VPN process, but involves setting up a Certificate Authority and installing clients on all of your devices.
What is your home DIY IT project that your most proud of? Let us know in the comments.
Image Credit: Engineers repairing LAN by gcpics via Shutterstock


