Heading out the door? Read this article on the new Outside+ app available now on iOS devices for members! Download the app.
Dear Lennard,
I have a SRAM GX 1X MTB setup with a 32t chainring and a big 42t in the back.
Everything’s fine when I’m pedaling in the 42t cog, but when I backpedal, the chain drops a few gears down.
This doesn’t happen when I’m in any other gear. Everything seems to be very smooth!
I fiddled with the b-screw to get more space between the pulley and the 42t, but that doesn’t appear to do much.
I’ve seen this a TON on forums, but with no solution. It was working, so I know it’s possible!
— Ethan
Dear Ethan,
The issue is the chainline with that huge cog. When pedaling forward, the chain tension keeps the top, taut section of chain from falling off, despite the chain exiting the top of the cog at a sharp angle to go over to the chainring. The bottom section of chain doesn’t jump off because the derailleur guide pulleys are lined up right below the cog and keep the chain on.
However, when you pedal backward, the top section of chain is not taut, and the fact that it enters the chain at an angle means that it will want to straighten out and drop onto a cog that is more straight in line with the chainring. This is a fundamental issue with 1 x 11 and 1 x 12 drivetrains because there is no way to get around having a chainline far to the right of the innermost cog. Avoid pedaling backward when in low gear.
― Lennard
Dear Lennard,
“Refurnish my worn cassettes as well ” from a letter-writer in your column … Are they talking about old audio tapes? How can you get an old worn out cassette back to life? Do you know? Never heard and doesn’t even make sense to me as the spacing will diminish as the metal wears down (even if you could get the teeth filed back to original shape). A mind-bender.
— Brian
Dear Brian,
Kai is talking about grinding the trailing edge of each cog with a carbide bit in a Dremel tool. The idea is to make the shape of the section of the tooth where the chain roller is loading it so that it is again shaped like it originally was, as well as to make the spacing from tooth to tooth at exactly ½ inch from the trailing edge of one tooth to the trailing edge of the next tooth (since chains are made on an inch standard). The width of the valley between teeth of course increases, which could affect shifting but won’t affect the chain running on the cog.
The trailing edges of the teeth on a worn cog are hook-shaped. This is due to a worn, elongated chain running on it; the longer chain links cause the chain to be loose behind the top roller so the only chain roller bearing on a tooth is the one against the top tooth. A new chain will then skip on these teeth. Kai is attempting to eliminate that hook shape.
Here is a description of the process in Kai’s own words:
“Well I have been doing it for years and it works. Maybe, however, you should try this on a cheap cassette first, not your dearest one. But it will not be hard for a guy with your mechanical skills.
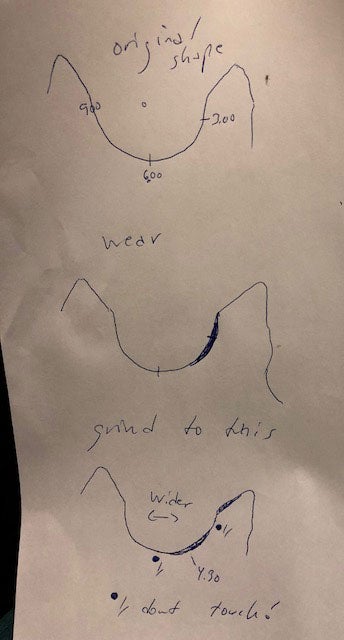
The clock direction refers to the center of the chain roller position when engaging the cog, or round valley between each tooth.
Drawing is not my best ability, but I tried to make a sketch. I hope it’s understandable. The top sketch shows the clock directions I’m describing. The middle sketch shows where the wear is. On the last sketch, I have marked the parts you grind away, just so the curve where the chain roller attacks the cog is restored.
Wear is usually in the 3:45 direction. I grind with max in the 4:30 -5:15 direction and with caution, to thus obtain the original curve in the drive direction only, and of each and every tooth. Most of the wear for me is in the middle of the cassette. If wear is great, you also have to take a bit off the tip of tooth. The procedure widens the gap somewhat, but that absolutely doesn’t matter.
It is best not to augment the wear at about 3 o’clock, and absolutely not to deepen the curve in the 6:00 direction, towards the center of the hub. That’s a big no-no; that part of the curve must be left untouched. After a few reconditions this part of the curve will be slightly flat or wide if you like, but the chain does not really cause any wear in this direction.
Some teeth may be hidden behind the teeth of neighboring riveted cogs; then you may use a smaller round diamond-head on your Dremel. Needless to say, the cassette should be off the wheel so as not to risk any debris reaching the bearings.
It takes maybe 20-30 minutes, so hourly pay for this can be substantial. Apart from the satisfaction to make things work again! It can be repeated 2-3 times and augments life of the cassette just as much. A new chain is fitted, and no skipping occurs.
— Kai”
I have never tried this, but I just had to take a very pricey Campy Record cassette off of my road bike due to it skipping on about half of the cogs when I recently replaced the chain. I could not bring myself to throw it out; I plan on giving this a try to see if I can breathe some more life into it.
― Lennard