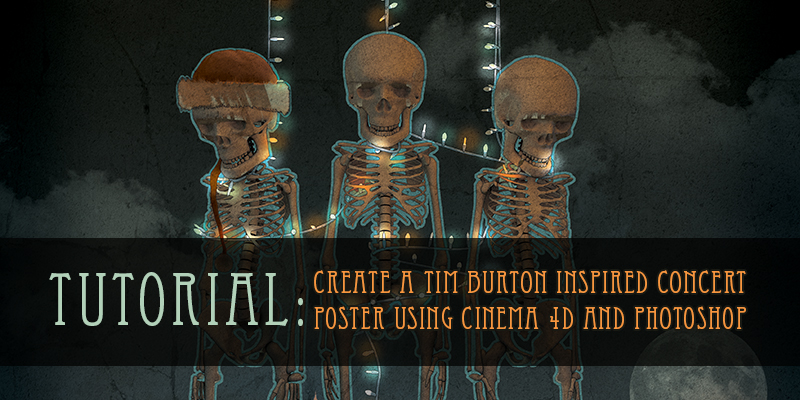
Tutorial: Create a Tim Burton Inspired Concert Poster Using Cinema 4D and Photoshop
In this tutorial I’ll guide you through the process I used to create a concert poster using Cinema 4D and Photoshop. The topics that will be covered are concept development, 3D modeling, lighting, rendering, and post-production.
I had the pleasure of creating this design for my friend Kris ‘skinnyk’ Morron and Sombrero Brothers Productions whose mission is to produce high-quality music, music events, and recordings by bringing together professionals from every corner of the Cleveland music scene. Kris is organizing a really great event at the Beachland Ballroom on October 26th, 2013. The concert will feature an orchestra playing the music from Tim Burton’s movie The Nightmare Before Christmas, a DJ, and a group of local Cleveland musicians performing the music of Oingo Boingo. Mark October 26th on your calendars, this is sure to be an awesome concert! To learn more about Kris ‘skinnyk’ Morron and Sombrero Brothers productions, check out this site, http://www.skinnykmusic.com/.
01: Concept Development
Spend some time doing rough concepts for your poster. Try to do at least 3-4 rough sketches before jumping in to create your final design. Creating rough sketches is a good way to keep your clients up to date with the progress of the design. The last thing you want to do is show your client a finished piece up front. Rough sketches create dialog between you and your client and allow you to brainstorm ideas before jumping into the final details. Even if you are creating a poster as a practice piece or self-commissioned art, doing more than one rough idea will give you options from which to choose.

Step 01: Concept Development
02: Set Up Your Workspace
Determine the finish size of the poster and use a template from your printer to layout your design. Here is a link to the design template I used for this poster: http://www.jakprints.com/poster-printing/.
Open the poster template in Photoshop and import your rough sketch on the bottom of the layer stack. Use the rectangular marquee tool to select elements of your sketch and reconfigure as necessary to layout your design.

Step 02: Set up your workspace
03: Establish a Color Scheme
Check out https://kuler.adobe.com/ and find a color scheme that works for your poster. I used the scheme ‘Cold Nightmare’ by riesjart as the basis for my design. I added an additional complementary orange color for an accent.

Step 03: Establish a Color Sch
04: Select Fonts
In Photoshop, start playing around with a few different fonts for the heading and content of your poster. I used DK Mothman (by David Kerkhoff) and Eccentric Std Regular fonts. There are plenty of ‘Nightmare before Christmas’ fonts available online. I decided to use fonts that were different from those used in The Nightmare Before Christmas. I wanted my poster to be ‘inspired’ by Tim Burton’s movie, yet not be a copy of his fonts or graphic elements. Here are links to the fonts I used:
http://www.dafont.com/dk-mothman.font

Step 04: Select Fonts
05: Import Layout into Cinema 4D
In Cinema 4D create a new material node by double clicking in the material manager. Double click the new material to open the material editor and import your layout in the color channel’s texture. Uncheck the specular option in your material.
Create a background object and drag your material onto this. Open the render settings. In the output tab, specify the width and height resolution of your poster. The resolution of your poster can be found in the material editor, underneath the color channel’s texture tab.

Step 05: Import Layout into Cinema 4D
06: Pose Skeletons
Open the content browser in Cinema 4D. Locate the CA Builder (biped – Rigged Skeleton) in the Studio > Character folder and double click to open the model.
Select the Arm_IK Controller, drag the arms down, and rotate the wrists. Use the Head Controller to rotate the head down. Use the Leg Controller to bring the legs in towards each other and rotate the feet down. Try to make the skeleton pose look like it is hanging from a noose.

Step 06: Pose Skeletons
07: Import Posed Skeleton to Your Cinema 4D Scene
Once you have your skeleton posed, select the ‘Character’ and ‘Human Skeleton’ null objects in the objects manager, right click, and ‘group objects’. Rename this new null object to ‘Skeleton’. With the ‘Skeleton’ null object selected in the objects manager, choose Edit > Copy. Click the ‘Window’ tab in Cinema 4D’s main menu and select your scene at the bottom of the menu.
With your original scene open, go into the object manager Edit > Paste. Now you will have one posed skeleton inside of your Cinema 4D scene. Use your background image (that we set up in step 5) as a guide to position the skeleton within your scene.
Duplicate your first skeleton (Command C, Command V on the keyboard), move scale and rotate it until it matches your sketch. Repeat for the third skeleton.

Step 07: Import Posed Skeleton to Your Cinema 4D Scene
08: Create the Wire For the Light Bulbs
In the front viewport, use the Bezier spline tool to create the noose around the skeletons necks. Once you have a rough spline created, go into point mode. In the perspective view, use the live selection tool to select individual points of the spline. Move each point until your spline wraps around the skeleton’s necks and bodies realistically.
Create a circle spline and specify a .125inch radius. Drag the Bezier spline and circle spline into a sweep NURBS object to create the wire.

Step 08: Create the Wire For the Light Bulbs
09: Model the Christmas Lights
Import a light bulb reference image in the front viewport in Cinema 4D by choosing Options > Configure in the viewport. In the attributes manager, select the ‘back’ tab and add a photograph of a light bulb in the ‘image’ area. Once your photo is visible in the front viewport, use the Size X and Size Y functions to scale your photo to the correct height of a light bulb. Use the Offset X and Offset Y functions to align your photo to the center on the 3D environment.
Use a Bezier spline to draw out half of the base of the light bulb. Create a lathe NURBS object and make your spline a child of the lathe NURBS. Repeat this process for the light bulb.
Create new materials for the base and light bulb and drag them onto the geometry. Make both of your lathe NURBS objects editable by selecting the objects in the objects manager > right click > ‘connect objects and delete’.

Step 09: Model the Christmas Lights
10: Distribute the Christmas Lights Along the Wire
Copy and paste both of your light bulbs into the main Cinema 4D scene. Create a Mograph Cloner object and make both your lights children of the cloner. Use the cloners ‘object’ mode and drag the Bezier spline from your wire into the object field within the cloner. Uncheck ‘fix clone’, check ‘render instances’ and for distribution use ‘even’. Increase the count to 150.
In the cloner objects transform tab, specify 10 degrees for R.P rotation and -26 degrees for R.B.

Step 10: Distribute the Christmas Lights Along the Wire
11: Model the Tombstones
For the cross tombstone, create a cube and specify 3 segments in the X and Z axis. Resize the cube to create the base of the tombstone and make it editable. Select the top middle polygon and use the extrude and extrude inner functions to create the cross.
For the tombstone with the round top, start by using a cube to model the base. Create rectangle and circle splines for the top of the tombstone. Create a spline mask object and make the splines children of the spline mask. Use the ‘A Union B’ mode to connect the splines. Drop the spline mask into an extrude NURBS object and specify a depth dimension.

Step 11: Model the Tombstones
12: Create a Graveyard
Copy and paste your tombstones into the main Cinema 4D scene. Create a landscape object and line it up to match the perspective of the sketch. Create a MoGraph Cloner and make the tombstones children of the cloner. Set the cloners mode to ‘object’ and drag the landscape into the object field. Check ‘fix clone’, ‘render instances’ and use ‘vertex’ for the distribution. Uncheck ‘align clone’.

Step 12: Create a Graveyard
13: Light Your Scene
Start by creating mood lighting for the scene. Create an omni light and place it above the skeletons, to the left. For the lights color, use the lightest blue from the color scheme. Set the intensity to 100% and enable raytraced shadows. Duplicate this light, place it to the right of the skeletons, use an orange color, reduce the intensity to 25% and turn off shadows. In the lights project tab, use the mode ‘exclude’ and drag all of the skeleton models into the objects field.
Next set, use a 3-point set-up; main light, fill light, and rim light. Create the main light source using an omni light and place it above the skeletons heads, slightly to the right. For the color, use the accent orange, and reduce the intensity to 65%. In the details tab, use the ‘Inverse Square Clamped’ falloff. In the lights project tab, use the mode ‘exclude’ and drag the landscape and tombstone cloner into the objects field.
For the fill light, duplicate the main light, change the color to a light blue, reduce the intensity to 40%, and place it to the left of the skeletons. For the rim light, duplicate the fill light, place it behind the skeletons and reduce the intensity to 25%.

Step 13: Light Your Scene
14: Object Buffers
Group your skeletons, lights, and landscape models into three separate null objects. Right click on each group and add a compositing tag. Specify a unique number object buffer in the compositing tag for each group.
Enable multi-pass rendering in the render settings. Add three object buffer layers, and assign the numbers 1,2, or 3 to each object buffer’s Group ID.

Step 14: Object Buffers
15: Dial in the Render Settings
For this image, we will render out two separate images; one multi-pass image and a cel render.
In the output tab, specify 3379 for the width and 5179 pixels for the height. Check Multi-Pass > click the multi-pass tab > add image layers. Check save and enable multi-pass image. Specify a save path > format, PSD > check ‘multi-layer file’. Set the anti-aliasing to ‘best’. Add Global Illumination and Ambient Occlusion effects.
For the cel render, uncheck multi-pass, global illumination, and ambient occlusion. Add a cel render effect, and check ‘outline’. In the save tab, specify a save path for a regular image, uncheck multi-pass image.
Render the multi-pass image and cel render.

Step 15: Dial in the Render Settings
16: Channels and Multi-Pass Layers in Photoshop
Open the multi-pass render in Photoshop and go to the channels palette. Command + click the skeleton alpha channel, then shift + command click the ground and lights alpha channels. With all three of your alpha channels selected, go to the main menu selection > save selection. Rename this alpha channel ‘overall’.
Double click the diffuse layer to unlock it from being a background image > hit ok. Reduce the opacity on the specular layer to 28% and mask out the top of the layer. Duplicate the ‘ambient’ layer and reduced the opacity to 63%. Reduce the opacity of the global illumination layer to 36%. Add a layer mask to the ambient occlusion layer > command click the ‘lights’ alpha channel to activate the selection > paint with black on the mask.
Create a new layer group, drag all of your layers into the group and rename it to ‘multi-pass’.

Step 16: Channels and Multi-Pass Layers in Phot
17: Background Gradient
Create a new layer and drag it to the bottom of the layer stack, underneath diffuse. Select the two darkest colors from the color scheme for the foreground and background colors. Use the gradient tool in radial mode to create the background gradient.
Add a layer mask to the diffuse layer. Command click the ‘overall’ alpha channel > Selection > Inverse. Paint with black on the diffuse layers mask to reveal the skeletons, lights, and graveyard.

Step 17: Background Gradient
18: Headline
Add ‘The Nightmare Before Christmas’ text to the top of the poster using DK Mothman font. Make sure the Christmas lights line up with the text. Add an outer glow to this layer, reduce the opacity to 34%, use the orange accent color, and increase the size to 11.
Create a new layer and paint spider webs coming off of the letters with a middle blue color. Reduce the opacity to 63%.

Step 18: Headline
19: Add the City
Import an image of the Cleveland skyline > place behind the graveyard > and mask out the areas that overlap the skeletons. Create a new layer on top of the city > paint with orange > change the blending mode to linear light > reduce the opacity to 68%.

Step 19: Add the City
20: Add Trees
Create a new layer and name it ‘trees’. Using a tree bush in Photoshop, enable scattering in the brush presets, and paint a row of trees in front of the city. Add a layer mask > command click the ‘overall’ alpha channel > paint away unwanted areas of the trees.

Step 20: Add Trees
21: Create Fog, Moon, and Clouds
Create a new layer and name it ‘fog’. Use a custom brush in Photoshop > pick a light blue color from the color scheme > paint in an area of fog above the graveyard. Reduce the opacity to 22%.
Create a new layer and paint in a moon using the same color as the fog. Reduce the opacity to 64%.
Create a new layer and paint in some clouds using the same color as the fog. Reduce the opacity to 37%.

Step 21: Create Fog, Moon, and Clouds
22: Emphasize the Skeletons
Add a stroke around the skeletons. Pick a middle blue color from the color scheme and create a new layer. Command click the skeleton alpha channel > Edit > Stroke > 10px > Outside > OK.
Pick the orange color from the color scheme and create a new layer. Command click the skeleton alpha channel > paint with orange to fill the skeletons > use the screen blending mode > reduce opacity to 24%.
Duplicate the ambient occlusion layer and place at the top of the layer stack. Use the multiply blend mode.
Add a curves adjustment layer and brighten up the image by dragging the middle of the curve up.

Step 23: Create a Border
23: Create a Border
Create a new layer and fill it with a middle blue color. Change the blending mode to multiply. Add a layer mask and paint away the middle of the layer with a soft brush.
Step 23: Create a Border
24: Finishing Touches
Import two concrete textures into your scene. You can find textures on www.cgtextures.com. Use the multiply blending mode for both textures and play with the opacity until you achieve an effect you are happy with.
Light glows: Create a new layer group. Create a layer within this group and name it white. Use a soft round brush and paint with a white color a small amount of light over one of the light bulbs. Change the layer blending mode to overlay. Option + click + drag to duplicate the light glow and place over the other light bulbs. Repeat this process for the orange and blue light glows.
Open the Cinema 4D cel render > place it on top of the layer stack > set the blending mode to multiply.
Create the rest of the content for the poster using the type tool; date, venue, pricing, etc.

Step 24: Finishing Touches
Thank You
I hope you enjoyed this tutorial, learned a lot, and added a few tips and tricks to your skill set. To receive updates when a new blog post is published, make sure to subscribe. Feel free to leave a comment.
Contact Info
Payments Accepted

Get Social
There are no comments so far