Heading out the door? Read this article on the new Outside+ app available now on iOS devices for members! Download the app.
This story originally appeared in the October 2015 issue of our print edition.

The relationship between you and your belayer is obviously very important, but that special someone isn’t always around when you want to crush lap after lap. Enter the auto-belay, a specialized device common in many gyms that takes the place of a real live person on the other end of the rope. Set up above a particular route, the auto-belay automatically takes in slack as you move up. Then, when you reach the top (or fall), it gently lowers you to the ground. These devices were a topic of debate a few years ago after some incidents of failure, and many were recalled. Today’s auto-belays have been re-engineered to include backup braking systems and mandatory regular servicing. Working with the product developers at Perfect Descent, we’ve outlined how these unbeatable training gadgets work so you can understand, trust, and use them more.
How It Works
On the outside is a metal housing for durability and an installation handle to anchor it to the wall. On the inside is a long lanyard (this is the part you clip into that replaces the climbing rope) coiled tightly around a spring-loaded center spool. The retraction spring winds the lanyard into the device as you climb. This is the most common setup on auto-belays for ascending, but there are two types of braking systems for a controlled descent: magnets and centrifugal force.
Magnets
The TRUBLUE auto-belay system uses magnetic braking. When you move non-magnetic metals through a magnetic field, electromagnetic induction creates a force, called an eddy current, that opposes the initial motion between the two objects. This opposing force doesn’t travel in a straight line; instead it’s circular. When you fall, the lanyard pulls through the device, which extends aluminum (non-magnetic) rotor arms into a magnetic field, creating a force that opposes that field, thus creating drag, which provides the resistance for braking. Clear as mud? “Magnets, dude!” is the most basic explanation.
Centrifugal Force
The Perfect Descent braking system has a circular housing around the lanyard and uses centrifugal force, which is a type of inertia that creates an outward push when an object spins in a circle. (Think about your laundry staying to the outside walls of the machine during the spin cycle.) When you engage the center spinning wheel in the opposite direction during a fall, your weight helps create centrifugal force, which pushes internal brake pads out against a braking drum. The friction created slows your descent to a comfortable, controlled speed.
Backup Break
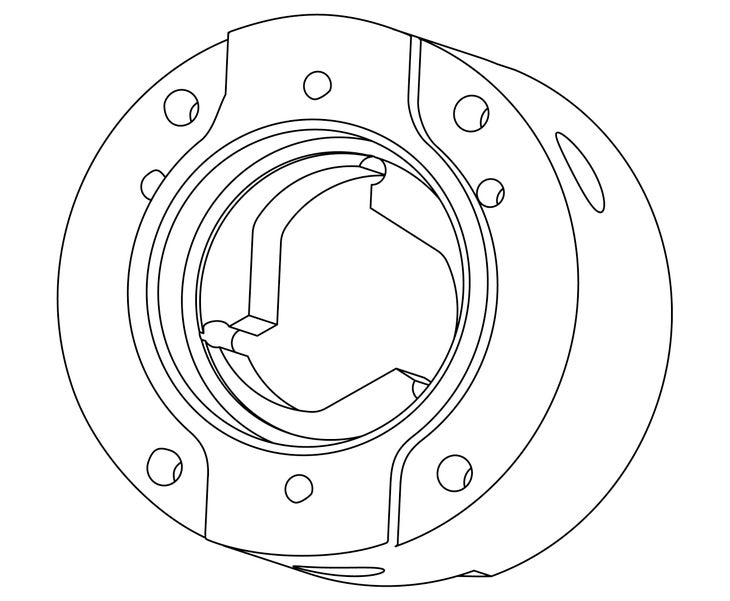
For extra security, Perfect Descent units utilize a secondary braking system that has a unique shape like a fin (fig. 1); this brake engages if the primary brake does not activate, offering a redundant braking system. When moving up, the lanyard housing easily moves over the top of the fin (you’ll hear a clicking noise as the device goes over). When the lanyard is pulled out, the lanyard housing is slowed by catching in the recessed, curved part of the fin.
The Human Factor
The biggest issue with modern auto-belays has nothing to do with the devices themselves—it’s human error. Forgetting to clip in is the number one cause of injury when using an auto-belay, and most gyms have started utilizing “belay gates,” triangle-shaped tarps with a written clip-in reminder. You must physically unhook these to clip in and climb. Not having a belay buddy there for safety checks can also become an issue, so it’s imperative that you pay attention and always clip in!
Maximizing Solo Training Time
Do Laps
Since you don’t have another person to worry about, you can do as many laps as you want on a given route—as long as someone else isn’t waiting.
Downclimb
Refine footwork and overall technique by downclimbing every route. Try to climb up, down, up, then down again without coming off.
Climb Slowly
Focus on your weaknesses and move as slowly as possible, holding each move for a few seconds.
Mock Lead
If you’re just getting into lead climbing, practice clipping by tying into a lead rope AND clipping into the auto-belay. Clip the lead rope as you move up, with the auto-belay acting as your lifeline.
Resting
Try a route at your limit. If you fall and the auto-belay puts you back on the ground, hop back on the route as fast as possible. This will force you to practice resting on the route.
New Standards
Many of the original auto-belays were created to be used by construction workers once or twice a day. The products available today are designed specifically for climbing and include backup brake systems, as well as meeting national and international safety standards.