

This post is part 5 of 5 in our mini series titled 5 Impressive Ways to Style Divi’s Countdown Timer Module. Stay tuned this week for all five unique examples of Divi’s countdown module, with a tutorial on how to achieve each one!
Today is the final tutorial in our miniseries on the countdown timer! I hope these tutorials have been educational, as well as inspirational. The great thing about these tutorial miniseries is you can use them exactly as they are in the tutorial, or as a jumping off point to create beautiful websites that are completely unique to you.
So to finish off our countdown timer module miniseries, I have something that I think you’re really going to love. In other words, I’ve saved the best for last! In today’s tutorial, I’m going to show you how to use a full screen background video in your countdown timer, to “build suspense” in a fun and remarkable way. Let’s get started!
The Divi Countdown Module: Before & After
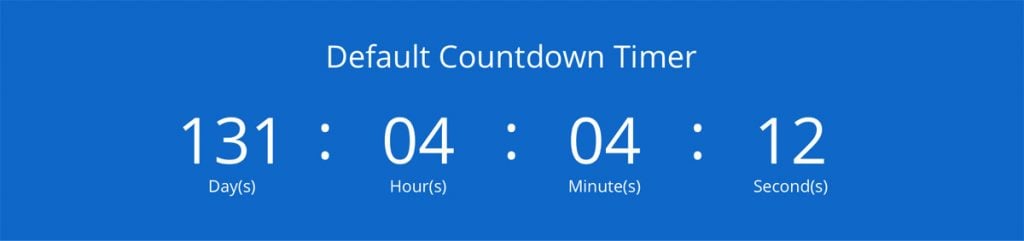
Here’s the default Divi countdown timer module, which is what we’ll be starting with.
And below you’ll see an animated GIF of what we’ll be creating today.
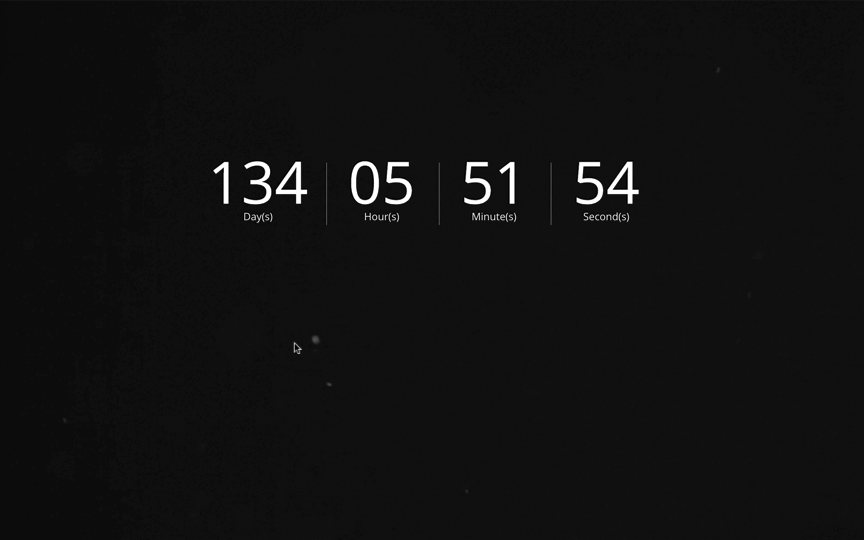
This countdown timer is unique for obvious reasons. The full screen section keeps you focused on the countdown, and the beautiful background video of the floating particles gives it a modern and sophisticated look. As I mentioned at the beginning of this miniseries, a countdown timer is perfect for building suspense for a website or product launch, or even an event. Today’s countdown timer fills that role perfectly!
How to Create a Countdown Timer With a Full Screen Background Video
Subscribe To Our Youtube Channel
Preparing the Design Elements
Today’s countdown timer utilizes a full screen background video. There’s lots of places to find free or premium stock footage, but for this tutorial we’ll be taking advantage of some free video clips from Videezy.
Here’s the direct link to the video we’ll be using: https://www.videezy.com/elements-and-effects/125-flying-particles-stock-video-in-hd
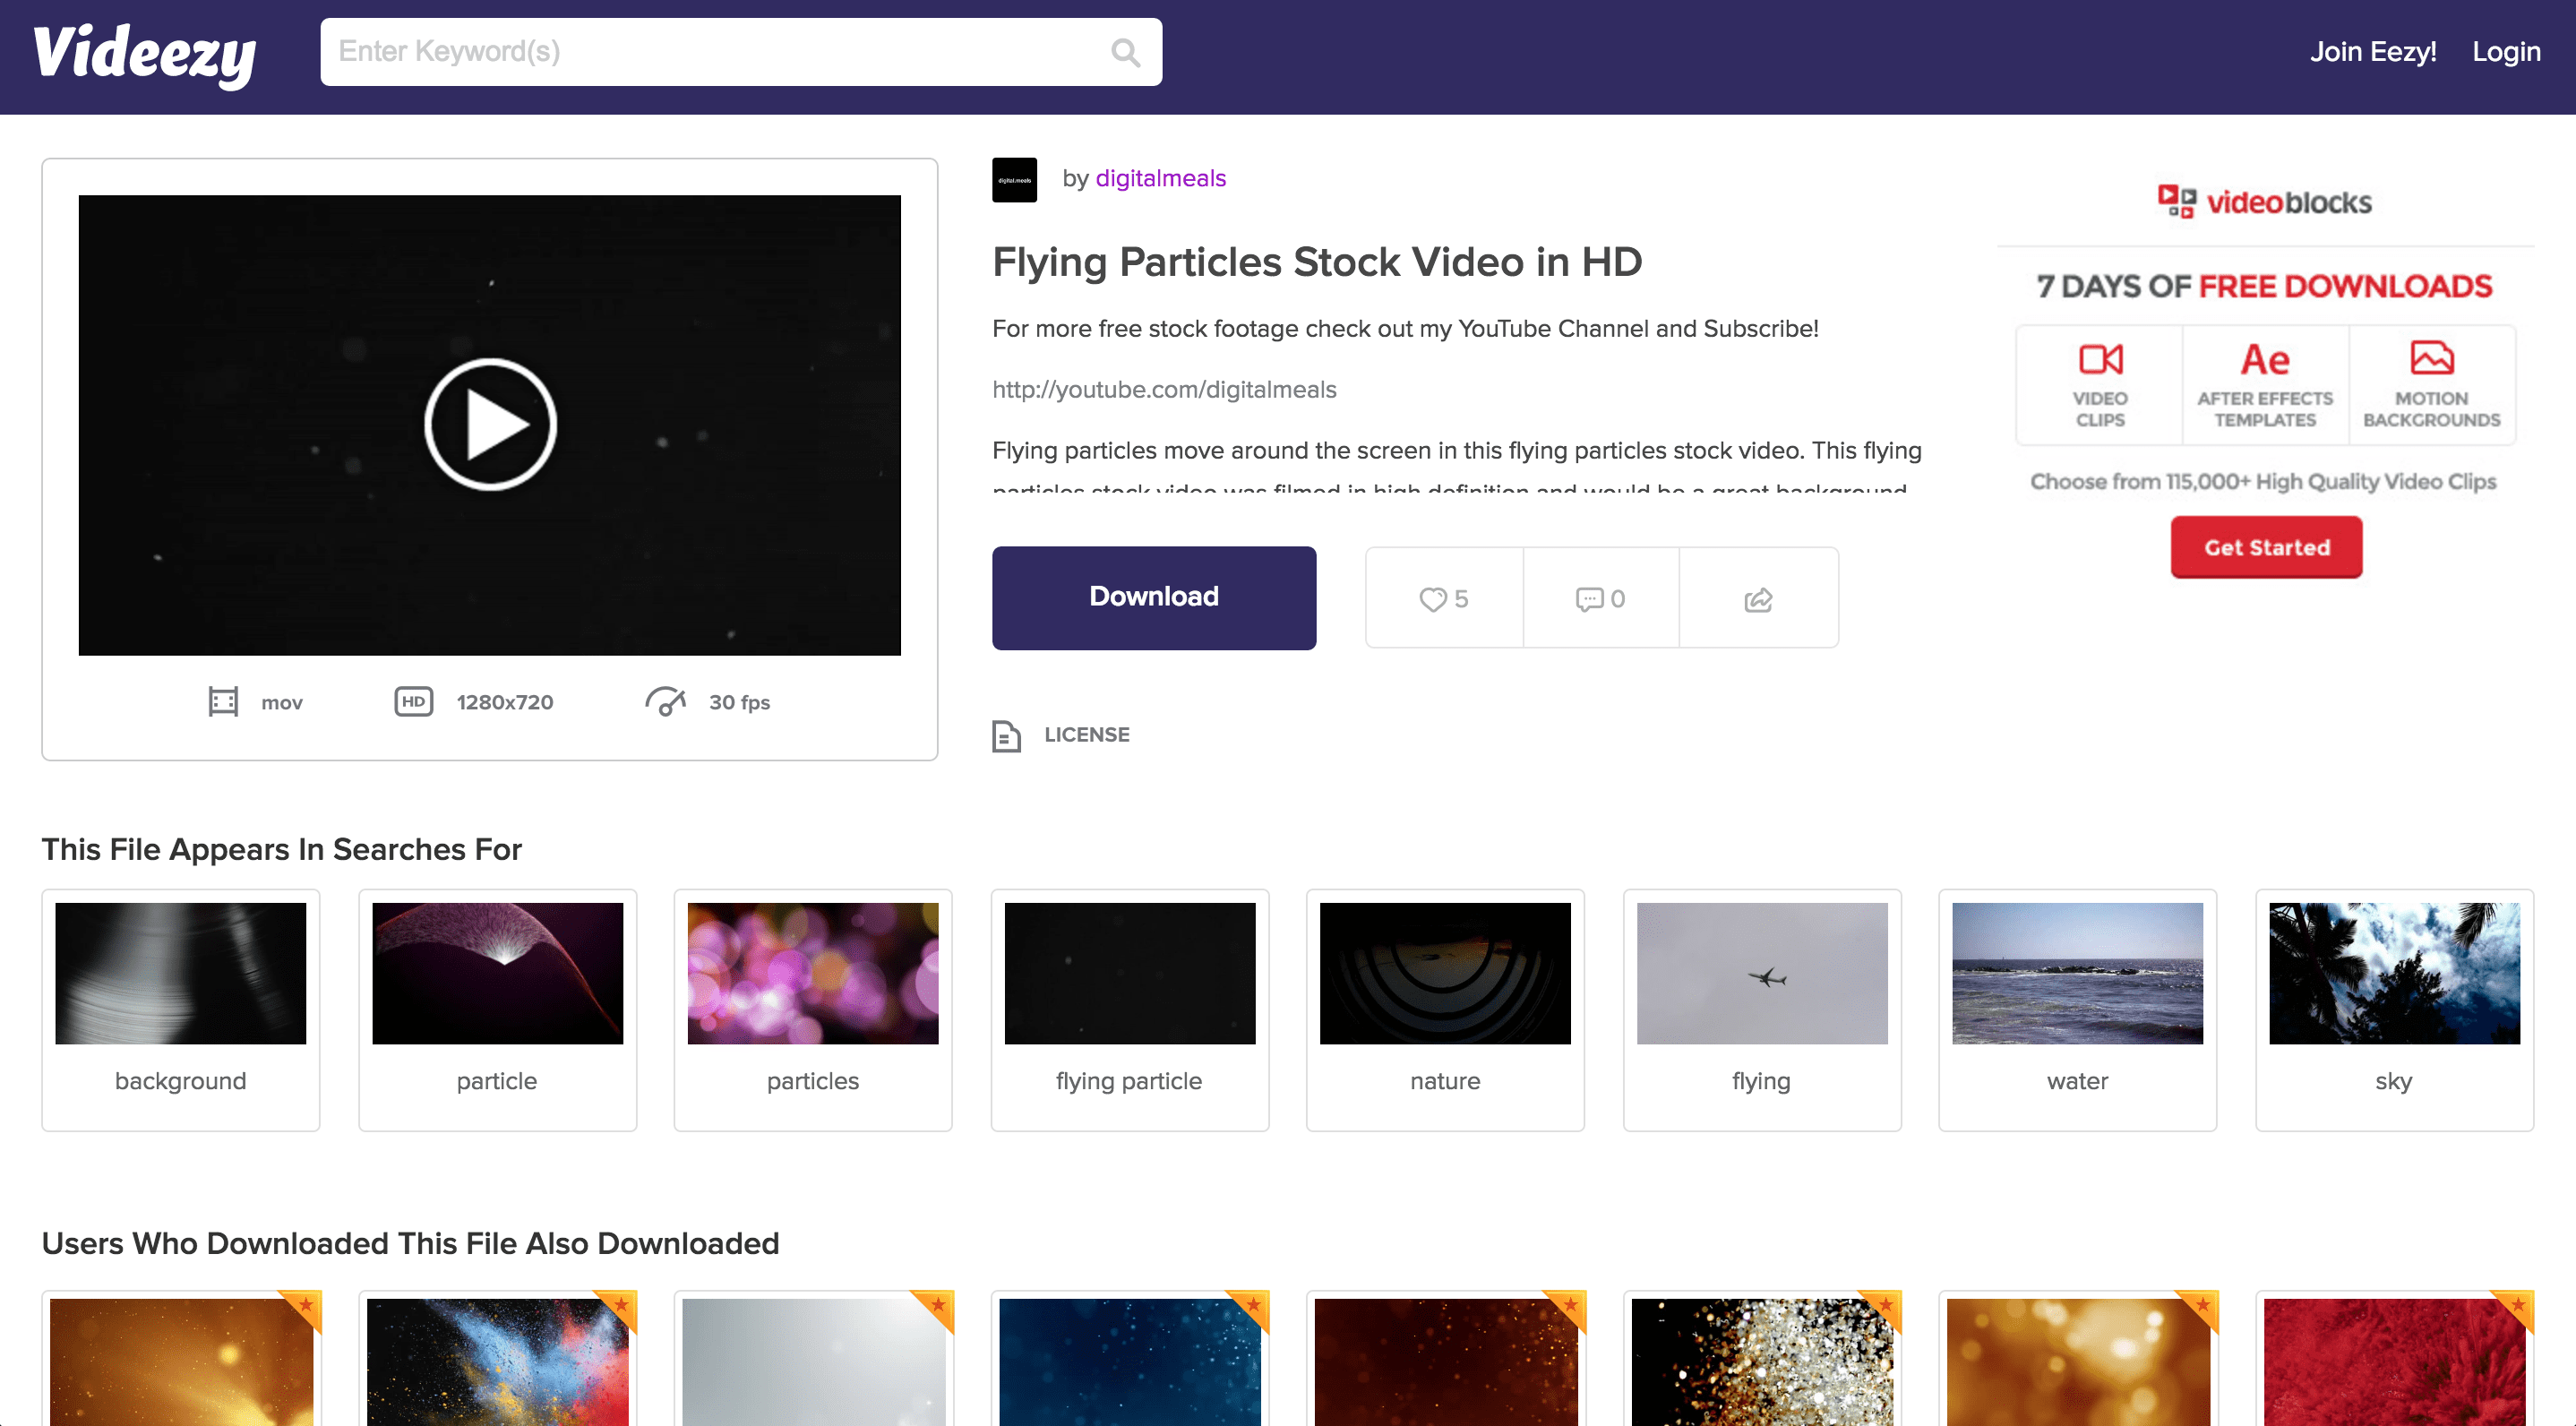
Go ahead and click the big purple “Download” button to download the free stock video to your computer. We’ll be utilizing it shortly. The rest of our design today is down with the built in Divi controls, plus some custom CSS, so there’s no more design elements to prepare. So it’s time to head to Divi!
Implementing the Design with Divi
You can use today’s tutorial in an existing page, but for the sake of simplicity, we’re going to work in a new page. So create a new page, give a title, enable Divi, then click the big blue “Use Visual Builder” button to open up Divi’s visual builder.
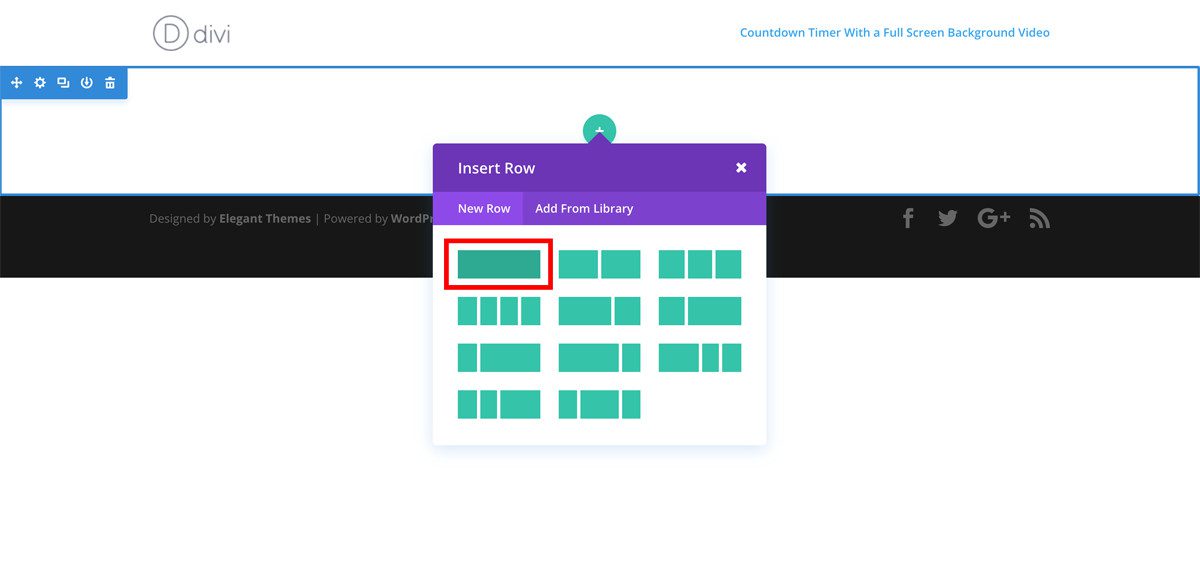
Divi automatically creates a new section for us, but now we need to create a new row. Go ahead and click the green plus icon, then click the icon to add a one column row, as shown in the red outline in the screenshot below.
Divi will automatically prompt you to choose a module to insert. You can start typing “countdown” and the countdown timer will be filtered for you. Click on it, and the countdown timer will be added to your layout, and the countdown timer module settings will be opened in front of you.
Adjusting the Module Settings
First, choose a date to count down to, and then change the “Use Background Color” to No.

Now, click on the “Design” tab and change the “Numbers Font Size” to 85px, and the “Label Font Size” to 15px. That’s all we need to change in the module settings. However, if you’re using something other than the default Divi font (Open Sans) then you’ll need to change all the fonts in the “Design” tab of the module settings to “Open Sans” in order to achieve the same look as my example. Otherwise, you can click the save button to close the countdown timer module settings. NOTE: it will look like there’s no countdown timer there at all, because we left the countdown module text color as “Light.” Once we add our background video in the instructions below, we’ll be able to see the countdown.
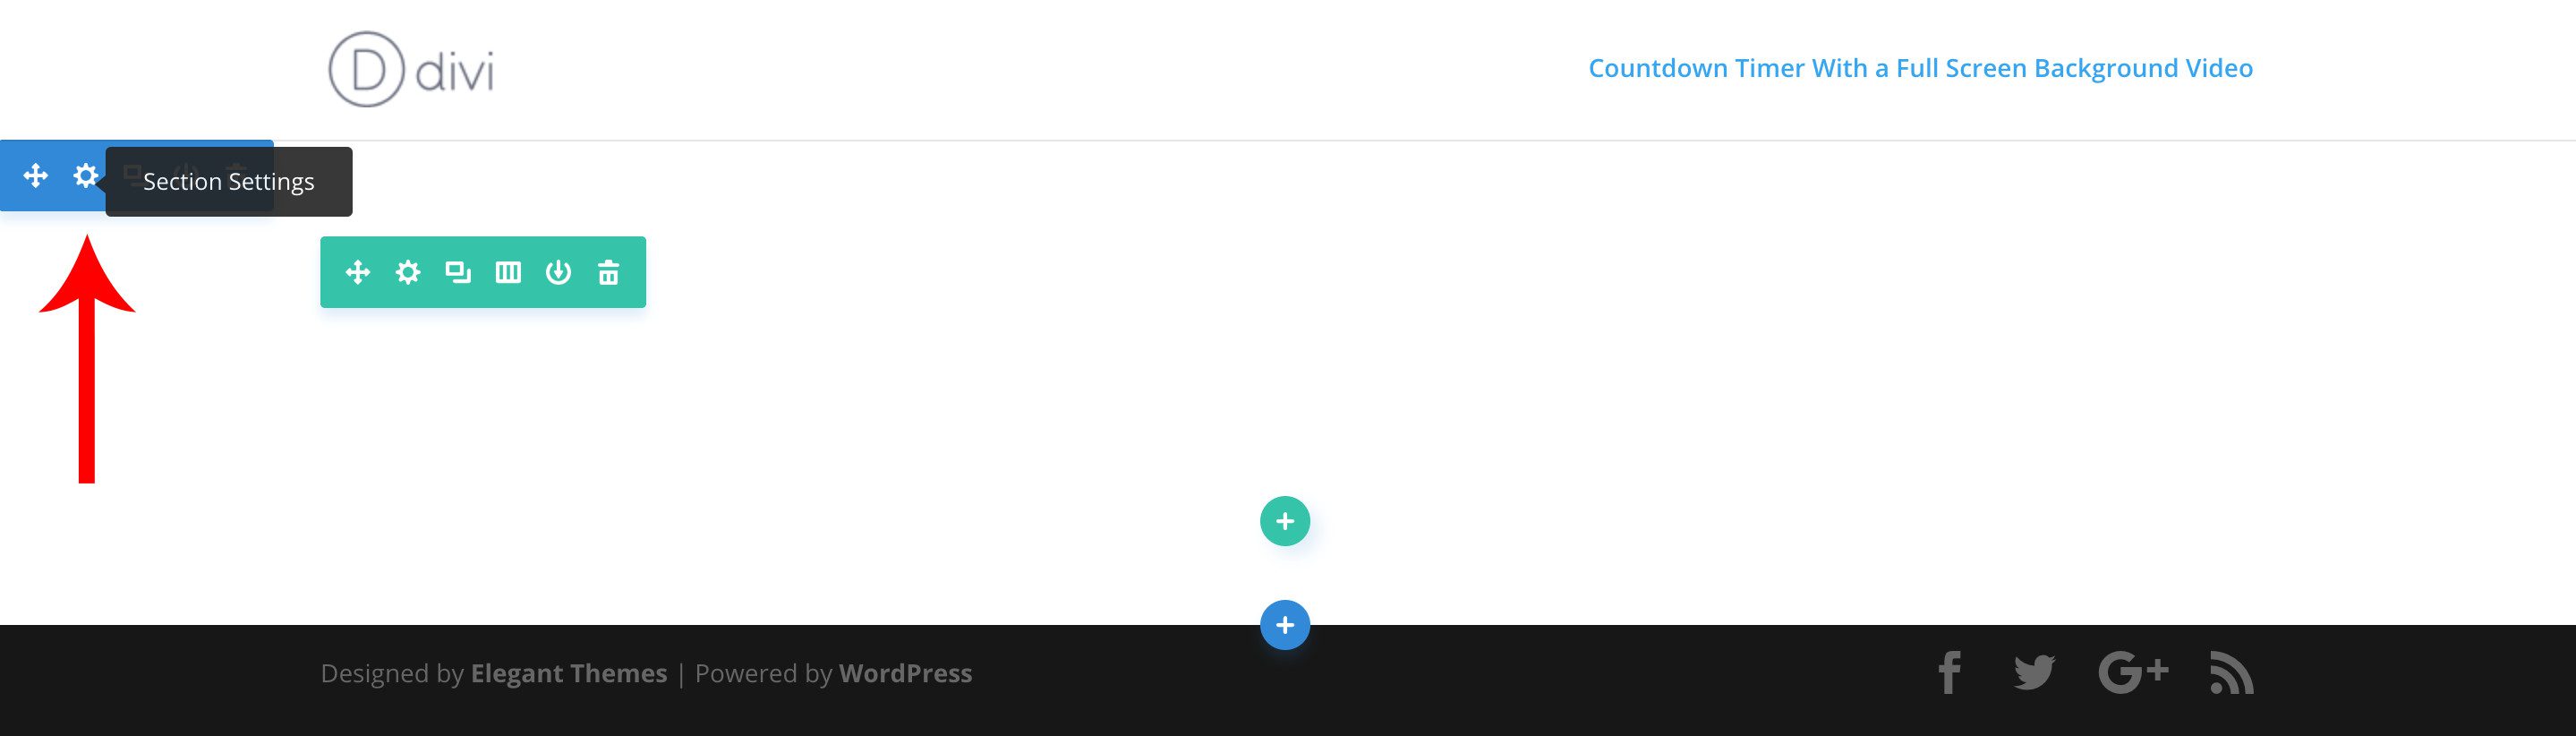
Adjusting the Section Settings
We now need to make a few minor adjustments to the section. Hover over the section and open up the Section Settings (click on the gear icon in the blue set of controls that appears when you hover over the section).
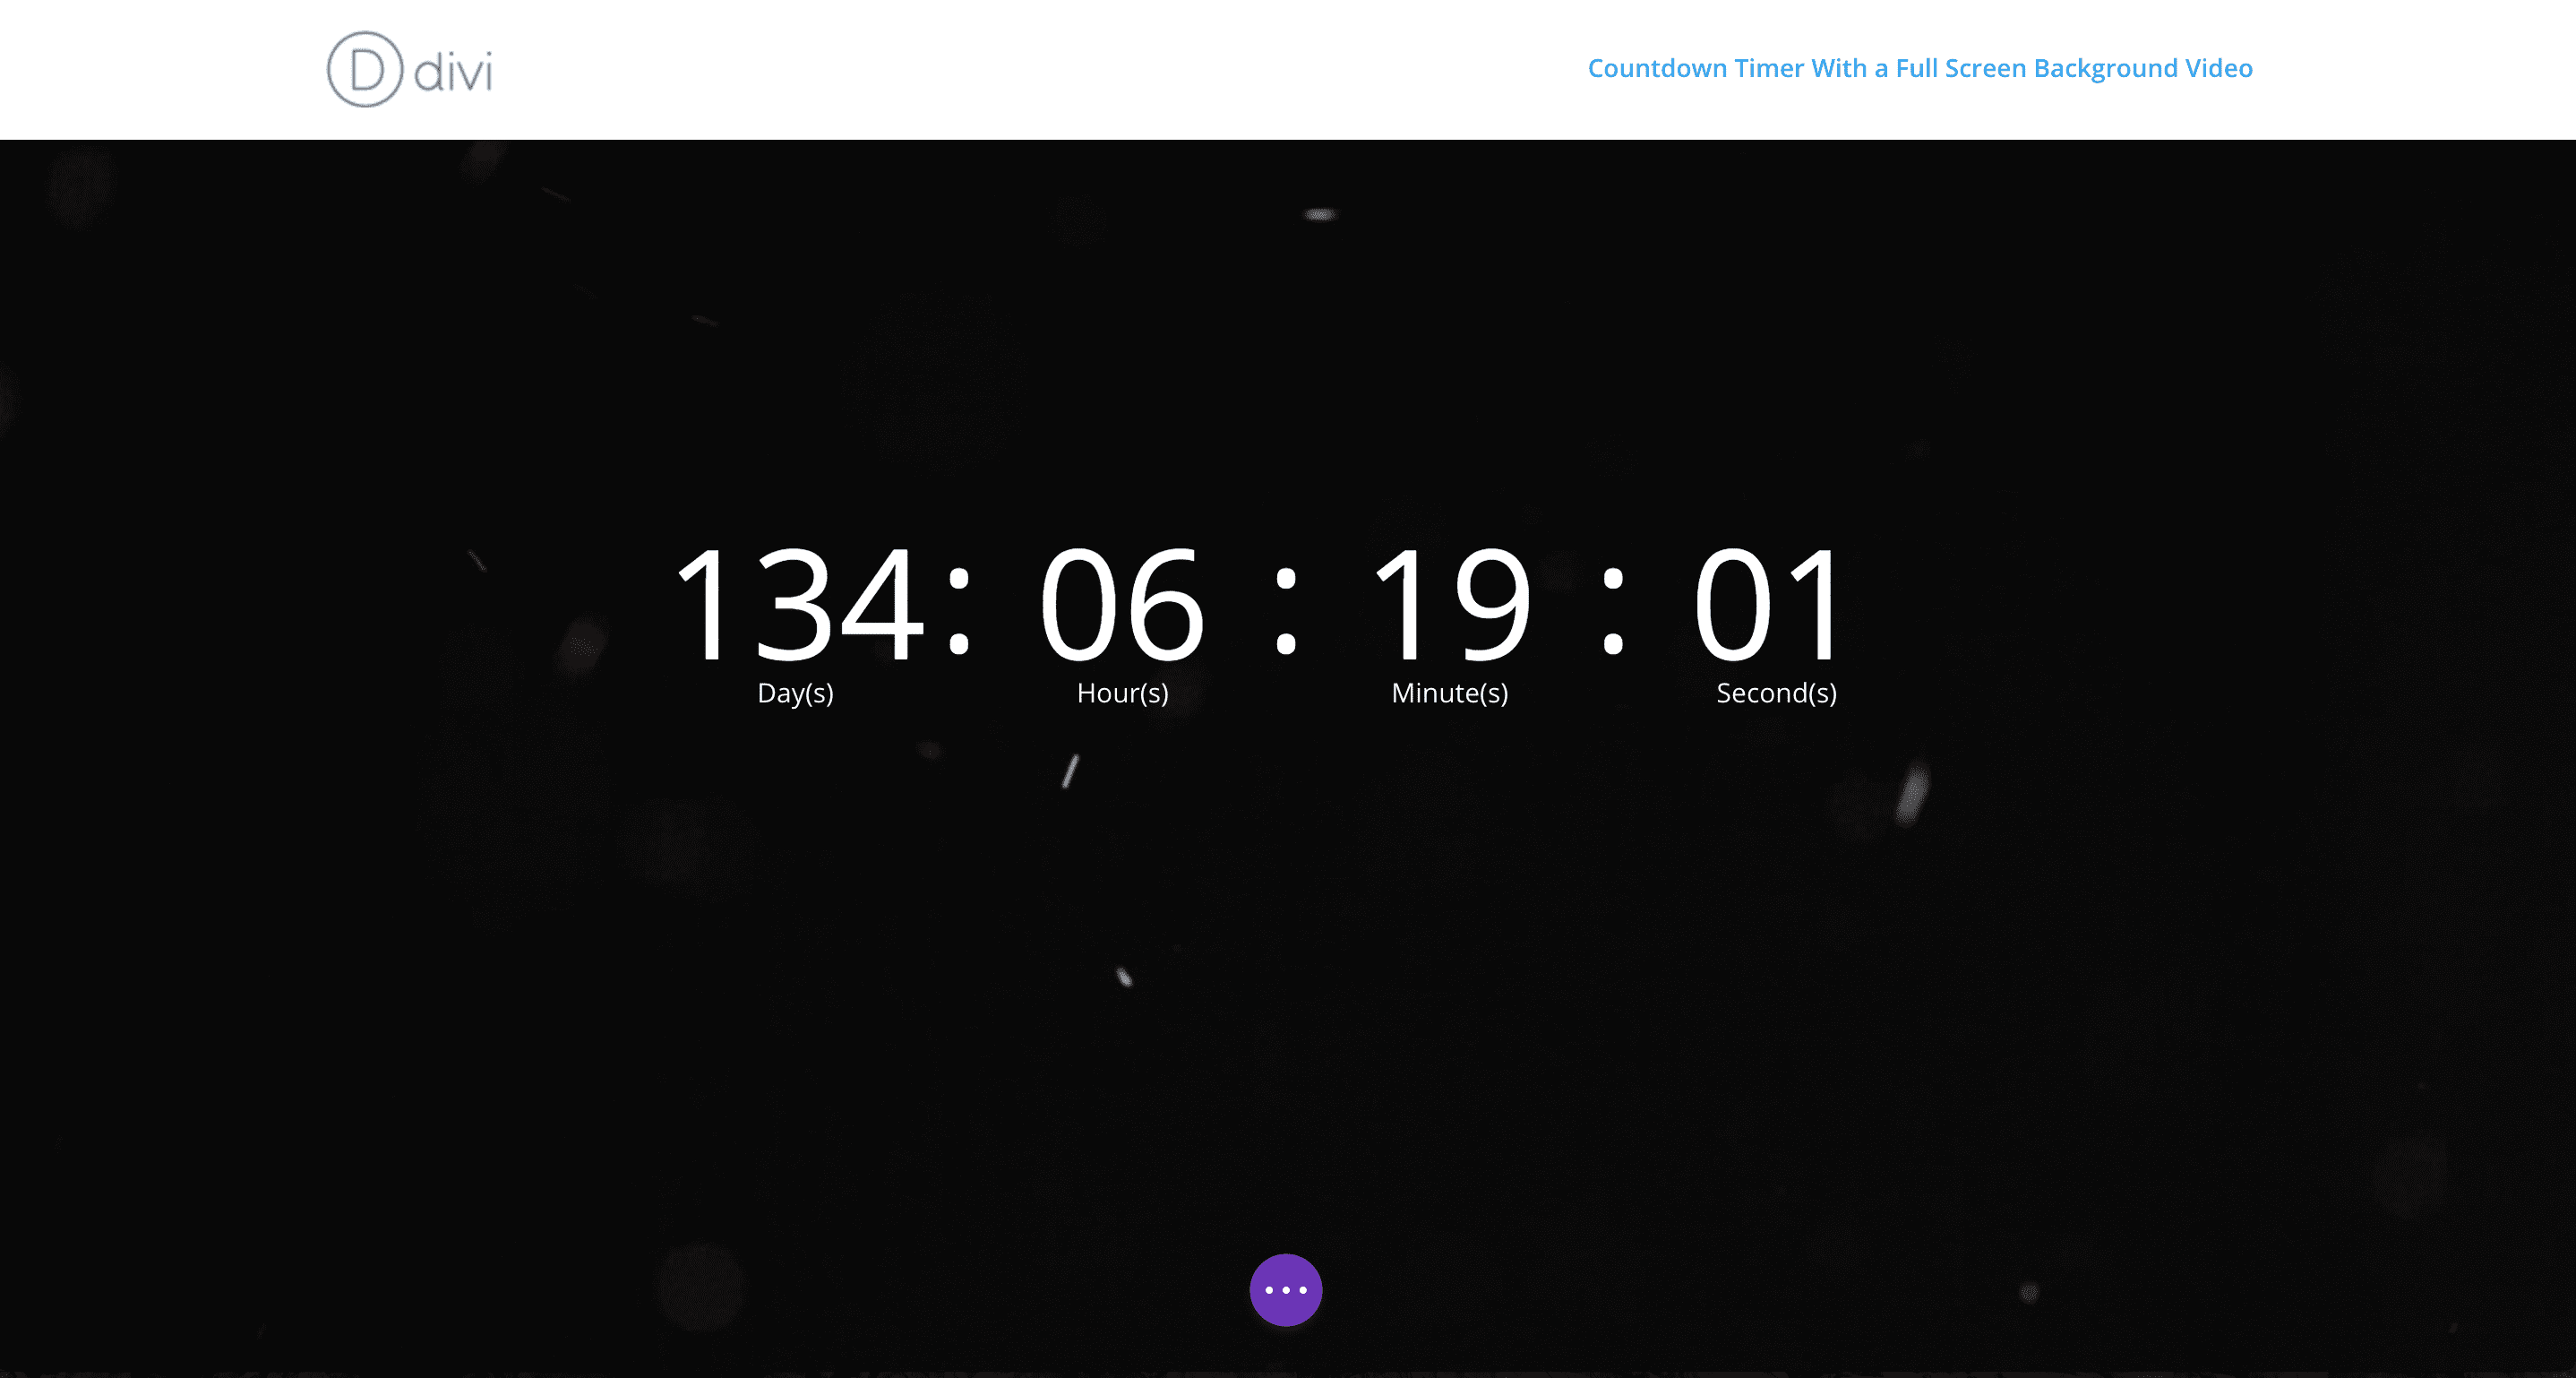
Once you have the section settings up, navigate to the “Background Video MP4” settings. Clicl the upload button and add the video we download earlier from Videezy. You should now see the background video playing behind our countdown timer!
We now need to make just one small adjustment in the Custom CSS tab of the Section Module Settings. Scroll down to the “Main Element” custom CSS box, and add height: 100vh; to the box. This makes the section full screen by making the section 100% of the viewport height.

Now click the green save button to save the section settings. Here’s what you should see so far. Getting close!
Adding the Custom CSS
The last thing we need to do is add the custom CSS to take us the rest of the way there! Yes, we did already add a small amount of custom CSS in the section and row settings, however for the remainder of the custom CSS we’ll be adding it to the Custom CSS box of either the Divi Theme Options panel or within the individual page settings.
Why don’t we add all of the CSS directly within the module, row, or section? Divi has pre-targeted CSS classes in the settings of the modules, row, and sections, however it does not target all the CSS classes that are available in the Divi stylesheet. So we’ll need to target those classes on our own by adding CSS to one of the areas mentioned above.
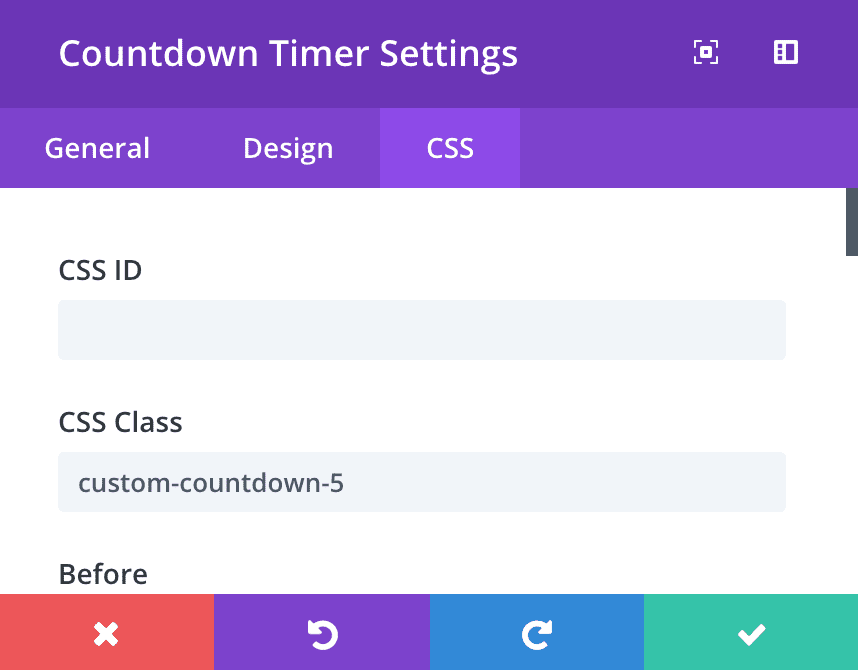
Before we add the CSS though, we’ll need to add our custom classes so that we’ll only customize the countdown timer module we are working on today, and not ALL countdown timers that are on the site or will be on the site.
So, open up the module settings, and click over to the CSS tab, and add custom-countdown-5 as the CSS class.
Now that our custom class has been added, we’re ready to add our custom CSS. As mentioned above, you can either add this CSS to the custom CSS box within Divi Theme Options, or within the Divi page settings for the individual page. Unless you’re planning to add additional countdown timers with this same design to other pages on your site, I recommend adding the CSS to the page settings for the individual page. This will allow you to see the custom CSS changes in real time (thanks to Divi’s Visual Builder).
To open up the page settings, click on the purple gear icon at the bottom of your screen. If you don’t see this then click on the purple icon that you do see, and it will pop-open the rest of the menu icons. Once the Page Settings are open, click onto the CSS tab and paste the below CSS into the box. You should see the changes in real time.
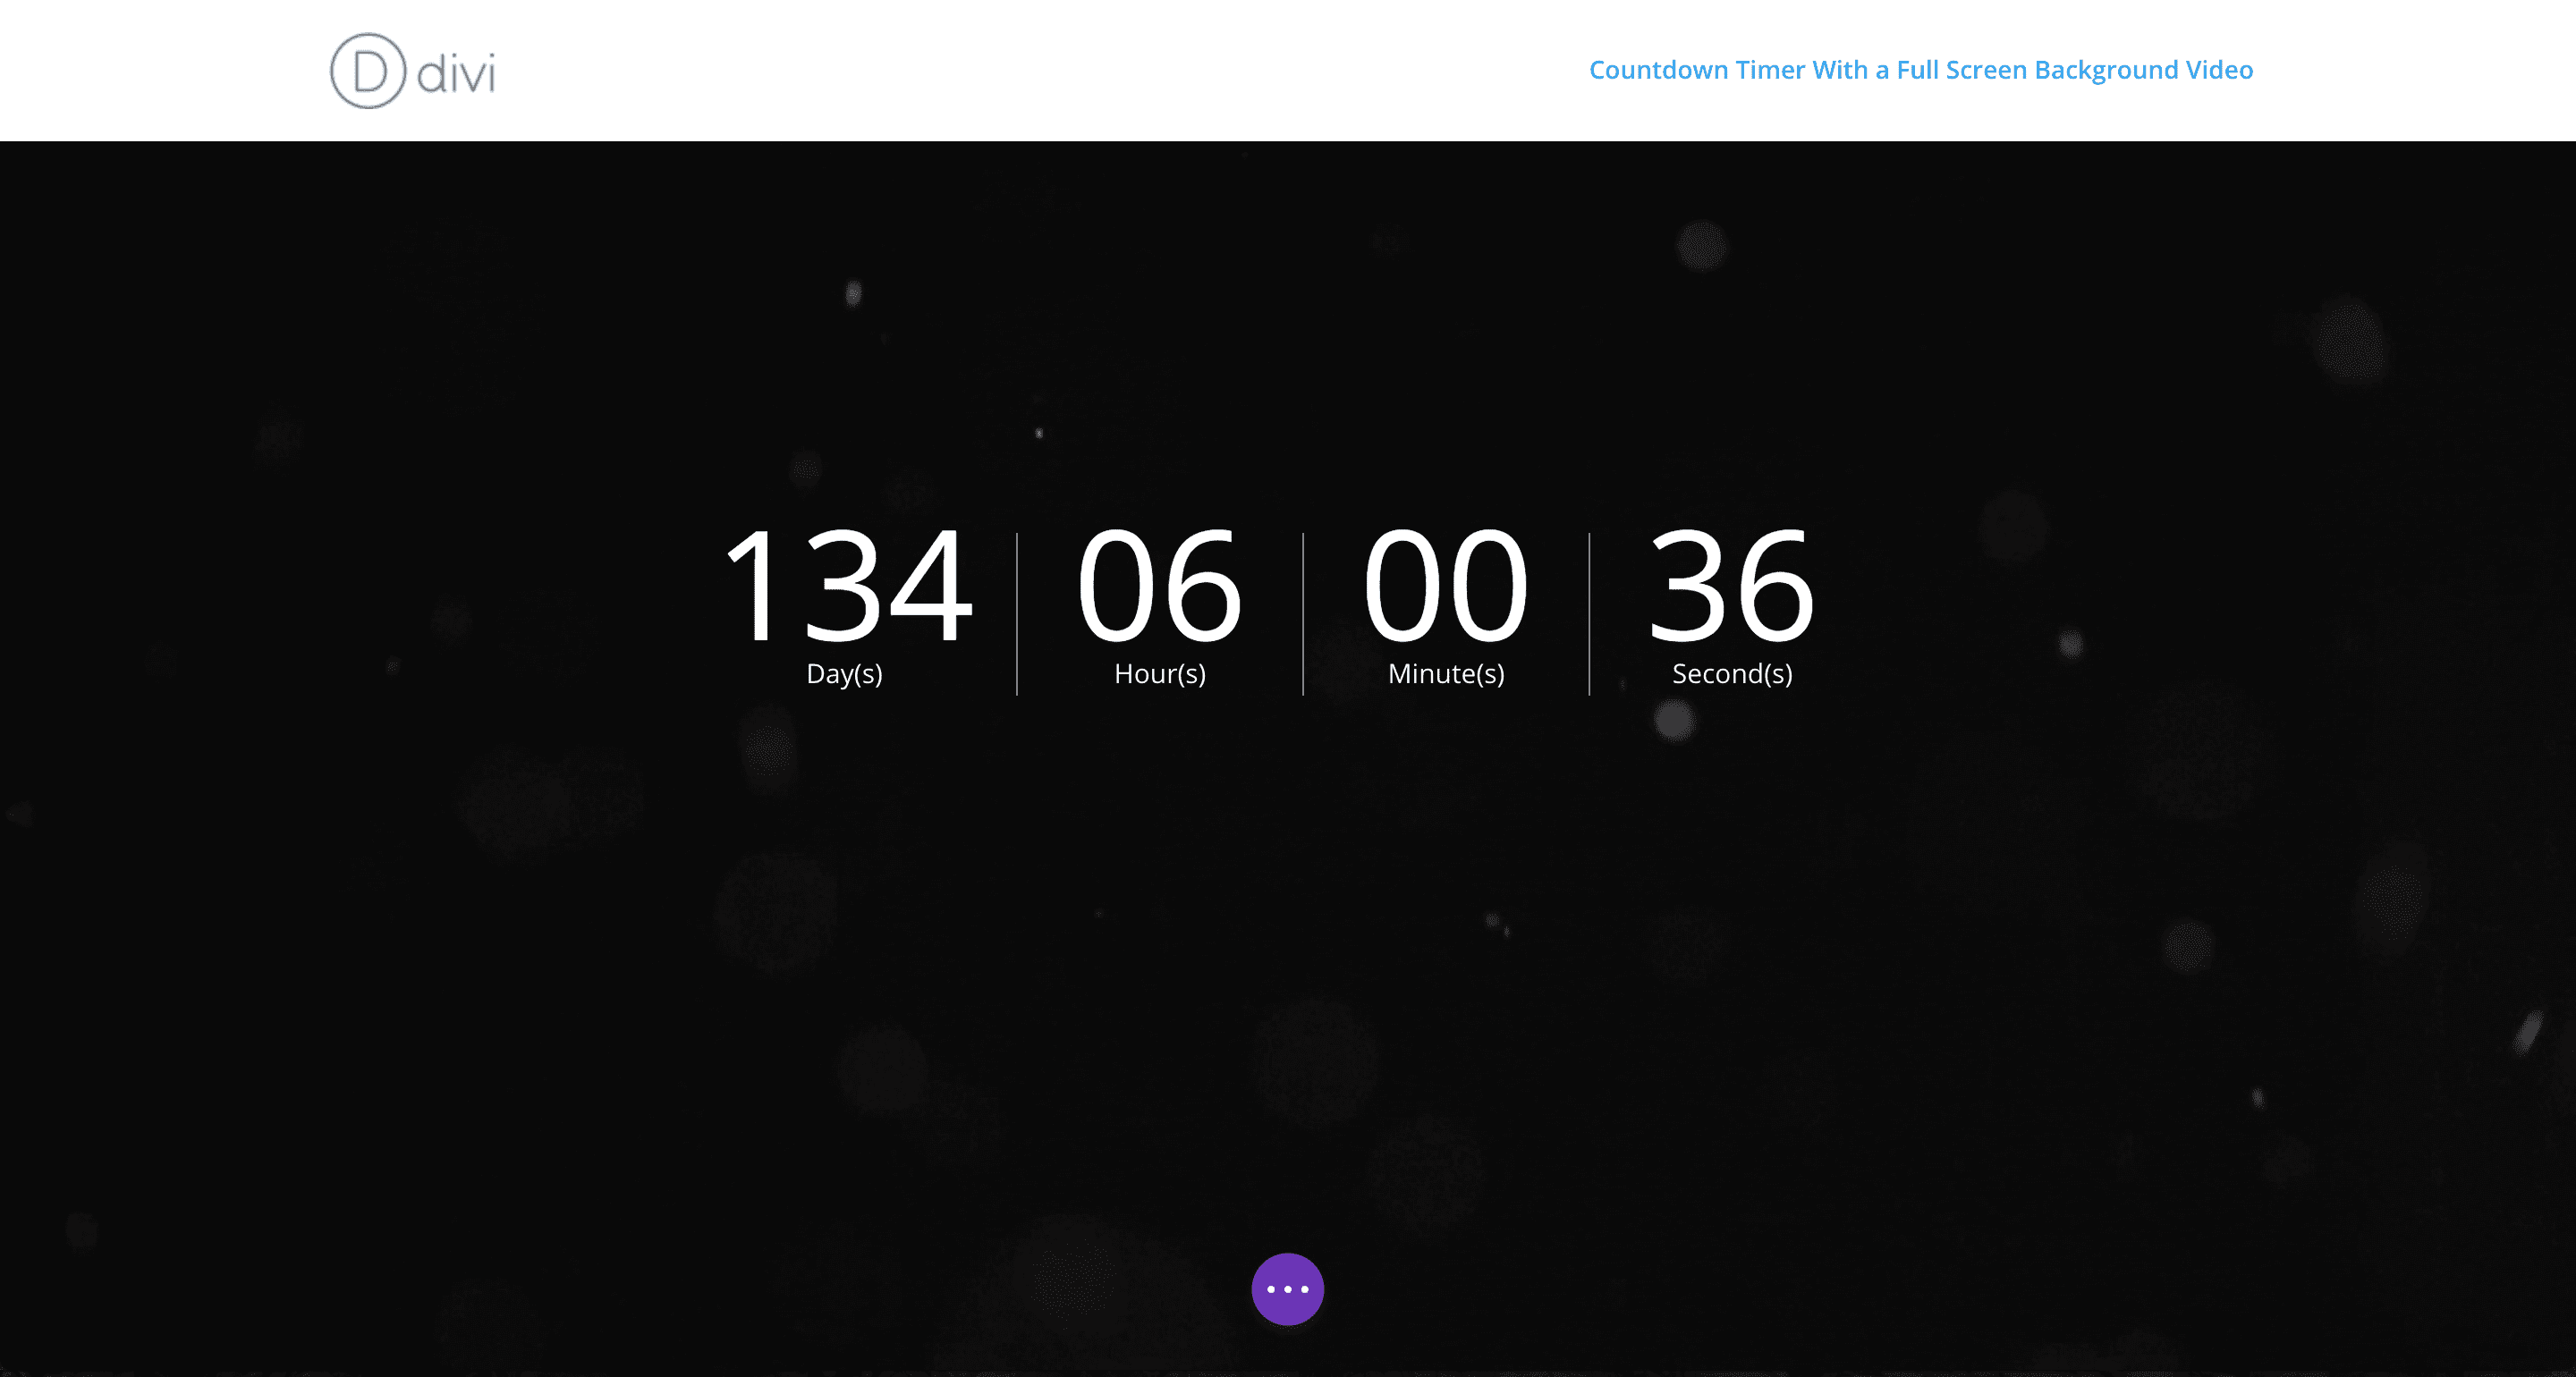
<pre>.custom-countdown-5.et_pb_countdown_timer .sep {
display: none;
}

.custom-countdown-5.et_pb_countdown_timer .section.values {
 border-left: 1px solid #808080;
}
.custom-countdown-5 .days {
border-left: none !important;
 margin-right: 16px;
}
Next, save your changes, and admire your creation!
BONUS: Additional Customization
In yesterday’s tutorial, I showed you how to add an animated gradient background to your countdown timer. We can combine the animated gradient background with our full screen background video for a even more unique look! Simply add the below CSS (after the CSS from above).
.et_pb_section:before {
content: "";
position: absolute;
top: 0;
left: 0;
bottom: 0;
right: 0;
-o-animation: colorcycle 20s ease infinite;
-moz-animation:
colorcycle 20s ease infinite;
-webkit-animation: colorcycle 20s ease infinite; animation: colorcycle 20s ease infinite;
background: linear-gradient(270deg, #a253e0, #f15b4f, #2ea3f2);
background-size: 600% 600%;
}
@-webkit-keyframes colorcycle { 0%{background-position:0% 50%} 50%{background-position:100% 50%} 100%{background-position:0% 50%} } @-moz-keyframes colorcycle { 0%{background-position:0% 50%} 50%{background-position:100% 50%} 100%{background-position:0% 50%} } @keyframes colorcycle { 0%{background-position:0% 50%} 50%{background-position:100% 50%} 100%{background-position:0% 50%} }
.et_pb_section_video_bg { opacity: .9; }
Here’s what it will look like:

This Concludes My Countdown Timer Series
While this concludes my countdown timer miniseries, there’s more great Divi tutorials in store for the community. Thanks for following along and I hope to see you back here for Divi blog posts every day!
Be sure to subscribe to our email newsletter and YouTube channel so that you never miss a big announcement, useful tip, or Divi freebie!


Excellent tutorial.
However, when I change colour/size of the numbers, only the h:m:s changes, but the days does not! What to do?
Thanks for The Tutorial. But can I change the text under the digits? The German translation is not quite correct. The day is, for example, Tag(s), but it would have to be called Tag(e).
A well put together and presented series Tim.
A great resource and much appreciated.
Thanks for the kind words, Keith! I’m glad you enjoyed it 🙂
Thank you for this tutorial and thank you for the bonus tip. The result looks really nice.
You’re welcome, Andrej. I’m glad you found it helpful 🙂
These countdowns are beautiful. Great resource. Thank you.
Thank you for sharing this great tip. Perfect christmas countdown. I’ll share this on facebook.
Glad you like it, Stig!
BONUS: Additional Customization doesn´t work. It makes no difference if you place the CSS or not
Hi Benjamin,
Double check that you copied and pasted it (and saved it) correctly. I just double checked it, and it does in fact work. The colors are more subtle, so there’s a chance you may not have noticed it. You can make the colors more visible by adjusting the opacity in the last line of the CSS above.
Is there a link to a demo version instead of a gif? I’d like to show an example to some clients 🙂
Also, if I’m working on a site, website.com/test
And I want this to be my splash page on website.com, do I have to install WP & Divi in my root folder as well? Thanks!
This is AWESOME!
Hi Izamar,
No there isn’t a demo, but you could fairly quickly follow the tutorial and video to get it up and running on a test page in order to show it to a client 🙂
Yes you’ll need to install WordPress & Divi in the root folder if you plan on using Divi on the main domain.
Great work on all of these countdown designs! Very inspiring. 🙂
Thanks Ryan, I’m glad to hear it 🙂
Excellent topic ,this is helpful for us.