
When it comes to affordable wireless lavalier mic systems for video, Sennheiser G3 EW100 kits are king. You'll find them everywhere from low-budget films to schools and interviews, and they're available choice at most gear rental houses. These kits are the gold standard for a reason: they're affordable, robust and built to last. They have a good range (around 300' outdoors) and rarely suffer from interference.
The G3s do have some limitations, though. Mains powered receivers are even less likely to suffer from interference and have a better range. Plus, the antennae of the transmitter is susceptible to bending when stuffed in a pocket. These kits don't provide the versatility or expandability required for feature films and larger shoots, but you can't find a better wireless kit at this price. For low-budget applications, these are the ideal choice.
In this tutorial, you will learn how to set-up and use these kits effectively.


Part 1. Connect All the Parts
Insert Batteries
After removing the kit from the packing, the first step is to insert the batteries. Squeeze the tabs on the side of the device to open the front door and insert the batteries - but don't turn anything on yet. If one of the devices turns on automatically, turn it off before proceeding.
Prepare the Mic
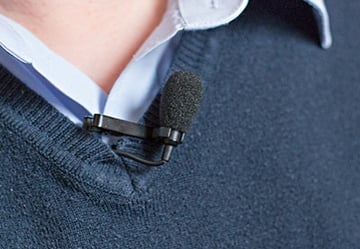
Now prepare the lavalier microphone. Install the clip and push on the foam shield.
It's worth noting that the lavalier microphones tend to exaggerate the treble and sibilant frequencies. Try adding an EQ with a subtle one to two dB high shelf cut in post-production if you notice any issues. These microphones are omnidirectional, so can be pointed downward (away from the talent's mouth) to reduce sibilance and plosives.

 Quick Tip: When to Turn Your Lav Mic Upside Down


 A Master Guide To Voice Equalization—How To Apply EQ to Voice Recordings

Connect the Mic to the Transmitter
Find the transmitter by checking the labels on the back of the devices. Once you've found it, plug in the microphone and screw it down gently. The clocking screw should be snug, you don't need to over-tighten.
Attach the Receiver to the Camera (As Needed)
If you are recording audio directly to a camera (and not a portable audio recorder) it's worth using the included hot-shoe mount. Attach the receiver to the mount and then attach the mount to your camera.
Connect the Receiver to the Camera or Recorder
There are two cables included with the kit: one XLR and one 1/8 jack.
If you are recording to a camera or a portable audio recorder that has XLR inputs, grab the XLR cable and plug the receiver into the XLR jack on the camera or recorder. Always use XLR if you have the option.
If you are recording to a camera that only has a 1/8 jack input, grab the jack cable and plug the receiver into the camera or recorder.
Part 2. Device Setup and Sync
Make sure that both transmitter and receiver devices are turned off. Check the labels to find the receiver and turn it on by opening the front door and pressing the On/Off button.
Easy Setup
Once the receiver has turned on, you will see the following screen:


Press the Set button. This will take you to the main menu. Now, using the arrow buttons, scroll to the Easy Setup option and press Set again to select that menu item.
Scroll to Scan New List and press Set again. This will scan your environment for empty radio channels. You should do this at the beginning of every shoot, and whenever you change locations, as every environment is different.
Once the scan has completed, scroll through the banks and select a bank with free channels by pressing Set. If you are only using one kit, any bank with more than one channel free will do. If you are using multiple systems, use the same bank but different channels for each kit.
Select a channel by pressing Set again. The receiver is now tuned to a free channel!
Sync Receiver and Transmitter
On the receiver, go back to the main menu by scrolling to Exit and hitting Set. Scroll to the Sync option and press Set again. You should now see the word Sync on the screen.
Turn on the transmitter with On/Off button. Align the purple IR windows by facing the two devices towards each other.
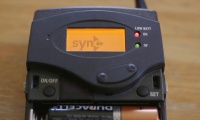
When successful, you will see a check mark on the transmitter and the RF light will turn green. Check that both devices are set to the same frequency before continuing. This is shown on the main screen; you can press the On/Off button at any time to exit the menu.
Part 3. Set Audio Levels
Mic Up Your Subject or Talent
Alright, now it's time to bring in the person who's voice you want to record. Placing a lapel mic is really a skill unto itself, and beyond the scope of this tutorial, but a good rule of thumb is to attach the mic at about the sternum.


Adjust Sensitivity Levels on the Transmitter
Now you need to set the audio levels on the transmitter. Open the menu by pressing Set, then scroll to Sensitivity and press Set again.
Ask your subject or talent to talk at a normal level. While they do, adjust the Sensitivity until the AF level is visibly moving to around half way up the scale. If the bar reaches the top of the scale, the audio will clip and distort. It's better to be slightly too quiet than being too loud and clipping the audio.
Set Output Levels on the Receiver
On the receiver, open the menu and navigate to the AF Out option. If you are using an XLR connection, start at -18dB. If you are using a 1/8 jack connection, start at 0dB instead.
Match Recording Levels on Camera or Recorder
Check the levels on your camera or recording interface and adjust the levels so that they too hover at about -18dB.

Part 4. Record!
Congratulations, you're good to go! Now go forth and record sweet audio.
Before you leave, comment below and let us know what you think of this wireless kit. Do you love using them? Or perhaps you prefer a different wireless kit? We'd love to hear from you.


