
Artificial lighting can be overwhelming, there are thousands of options to modify one single light source and there are dozens of companies that claim they have the best product and best bang for your buck. Regardless, photography equipment is expensive and I know I'd rather not waste money on a gimmick product when the same result could be achieved with just the right strobe placement or accessory.
With carpentry there is an right way and wrong way to do things. The right way usually involves a number of different tools. But, in many cases the same results can be achieved with one tool using the right method. The same can be applied to photography. Our eyes and ears get distracted by quick and witty gear advertising, but many photograpers don’t appreciate the tools lying in their closet.
When I first started dabbling with artificial light some 3 years ago, I used a beauty dish for almost every project. I really didn’t know its power or versatility; I just liked the output. Soon after, I found a new love for the Photek Softlighter and hard fashion lighting. Unfortunately, my beauty dish didn’t end up in the closet; it ended up in the trash.
I’ve spent the better part of this year "researching" the versatility of a simple Octabox and Beauty Dish. Two standard modifiers used by everyday studio photographer’s world-wide. What I found opened my mind and made me realize the basics of light; I don’t need a 10-foot Parabolic Umbrella or a 6-foot Scrim to achieve the right mood. When I started exploring the Profoto Softlight Beauty Dish and a Paul C. Buff Octabox I was skeptical, it took a lot of experimentation, but I came to realize why so many photographers love that style of light.
Octabox
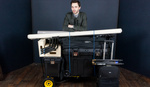
It’s an essential tool in every photographer’s studio. For those new to the game, an Octabox is an octagon shaped modifier which creates similar light to a rectangular Softbox. This particular Octabox is manufactured by Paul C. Buff, a company that produces strobes, modifiers and accessories for the intermediate to pro-level photographer, who isn’t looking to take out an extra mortgage on their house. Their line of "Alien Bee" and "Einstien" strobes are good quality, which are backed by an even better customer service. The best part of their product line is their collapsible modifiers. I travel for a living and most of my assignments are on location, the Paul C. Buff modifiers break down with a simple turn of a screw, which is exactly the type of gear I need. No annoying rods, crumpled baffles or speedrings.
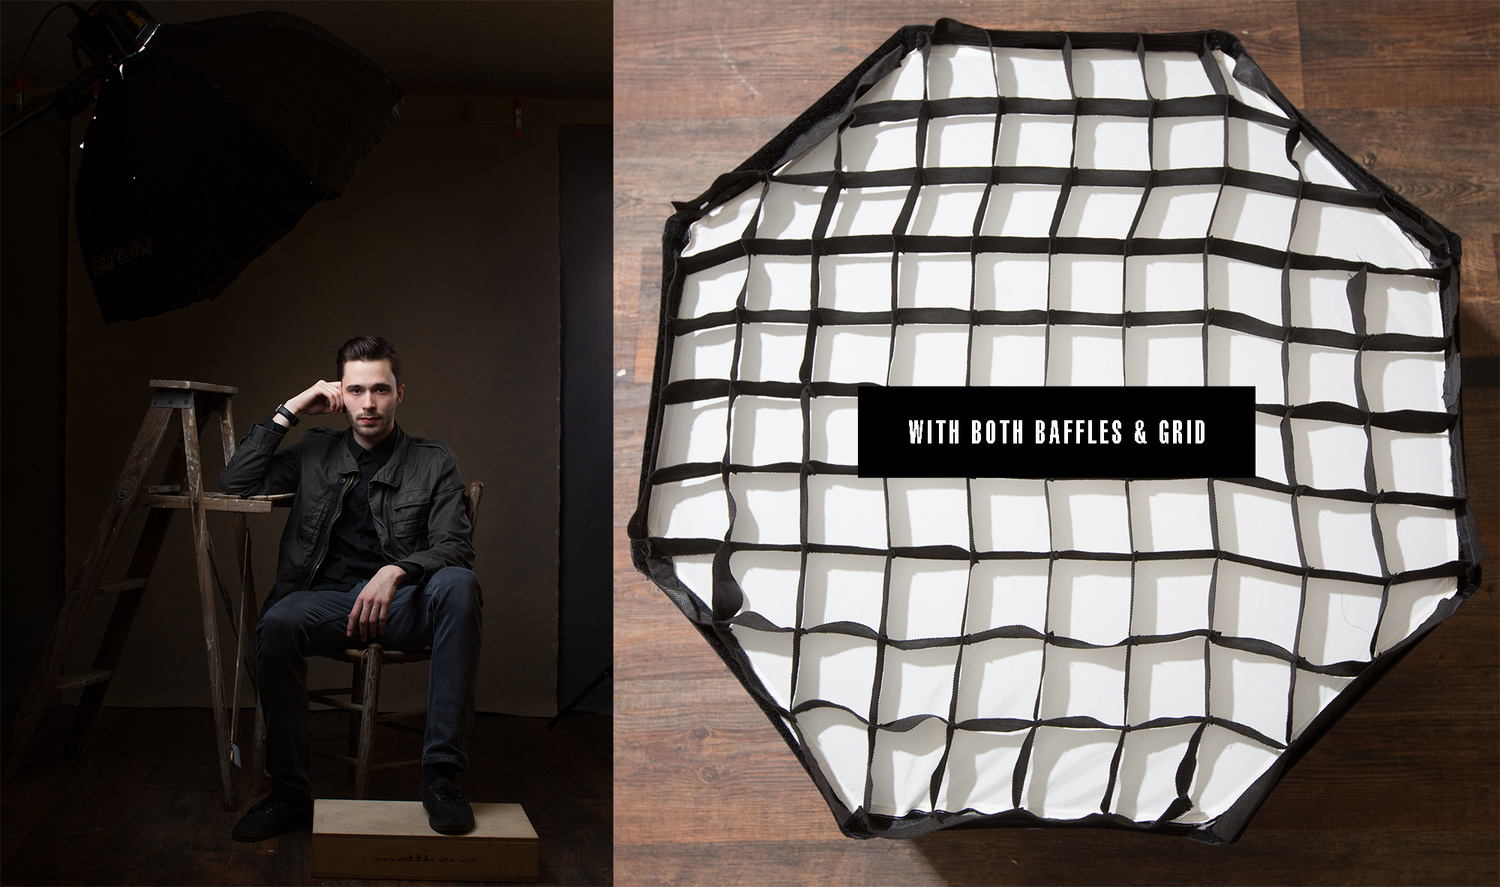
The Octabox comes with two diffusion baffles and the Grid is always sold separately. The inner diffusion baffle reduces the hot spot caused from the bare strobe and speads the light evenly to the main diffusion baffle. It also adds a second source of diffusion for a nice soft light.
Octabox With Both Baffles and Grid
The light is soft, but the honeycomb-style Grid provides direction to the light and reduces spill onto the background and floor.
Octabox With Both Baffles
The light is soft and natural, the light spills onto the background and floor producing a more rounded-wrapping light.

Octabox With Inner Baffle Only
While the light remains somewhat soft, it resembles the look of a large Parabolic Umbrella. It is a stronger, more directional light. This could also be considered an amplified Beauty Dish.

Octabox Bare
Without either sources of diffusion the Octabox acts like a large silver reflector. The light is controlled, but hard.

Whatever the subject matter might be, an Octabox is a flexible modifier that can adapt to any need, just open it up and start experimenting. Once you've nailed the type of modification the options are endless with placement. Get it close and pull it towards the camera, you may be surprised with the results.
Beauty Dish
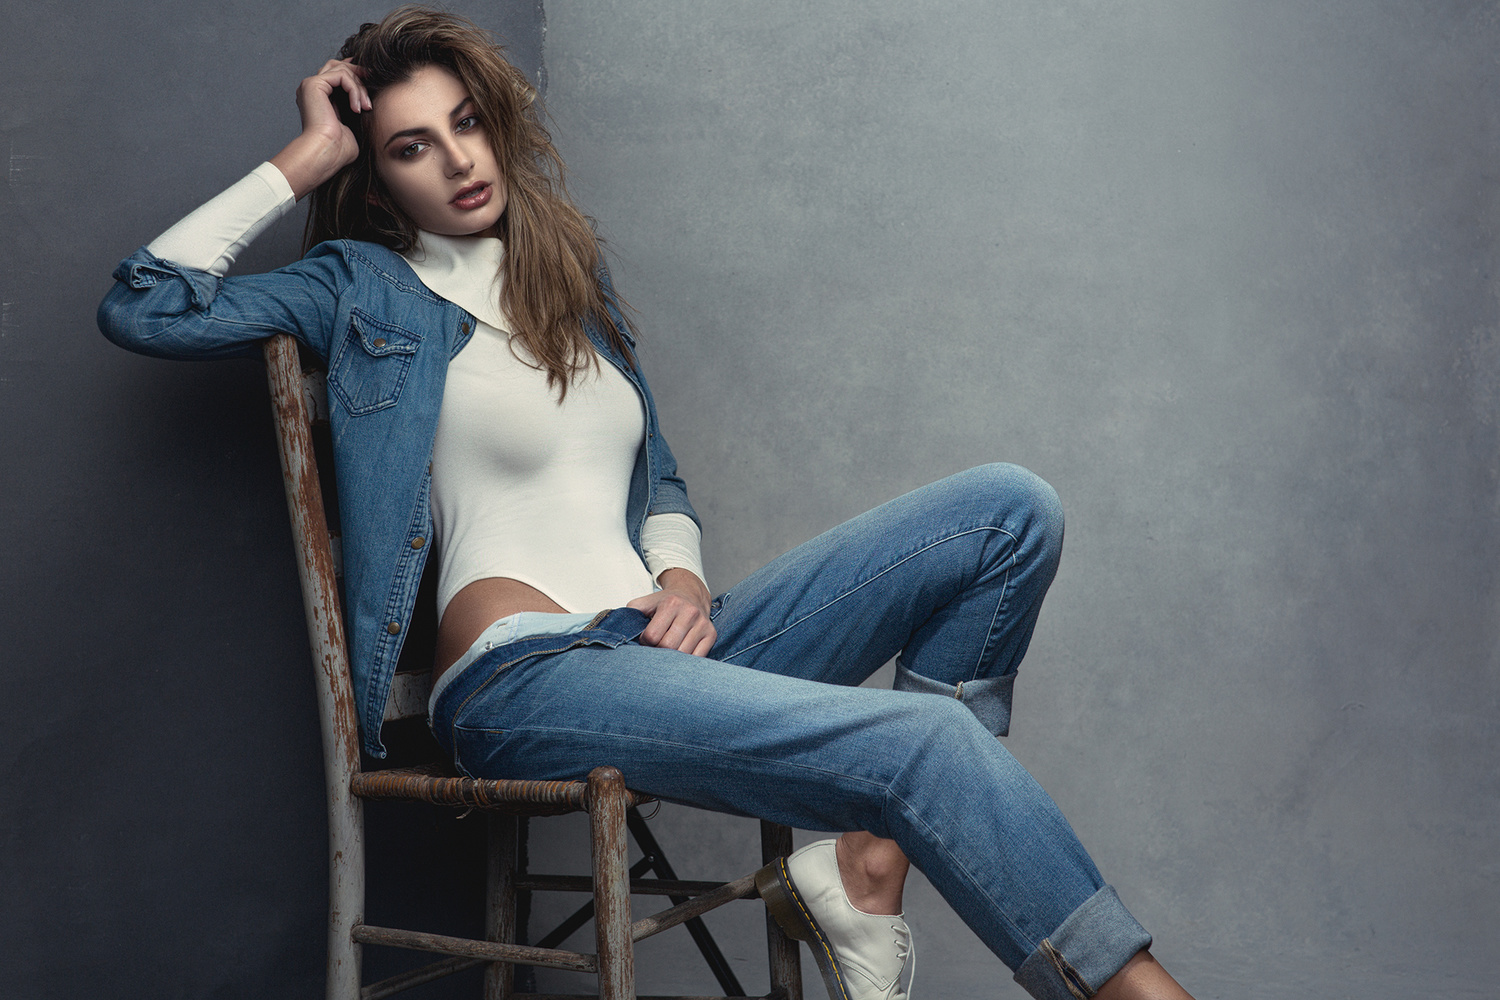
I've always been fascinated with Beauty Dishes and how they shape light. I guess you could say I have a love-hate relationship with them. I once disowned Beauty Dishes to only fall in love with them once again tenfold. A Beauty Dish is essentially an aluminum shell with a elevated circular plate that "softens" the flash. It acts as a parabolic reflector providing a contrasted, dramatic mood. I'm wielding a Profoto Softlight 20.5" Beauty Dish; it's costly, but you get what you pay for. The best part about a Beauty Dish is that it can provide a wide-array of light modification. You can achieve anything from soft wrapping light to a hard contrasted style of light, just by moving the dish a foot and tilting it an inch.
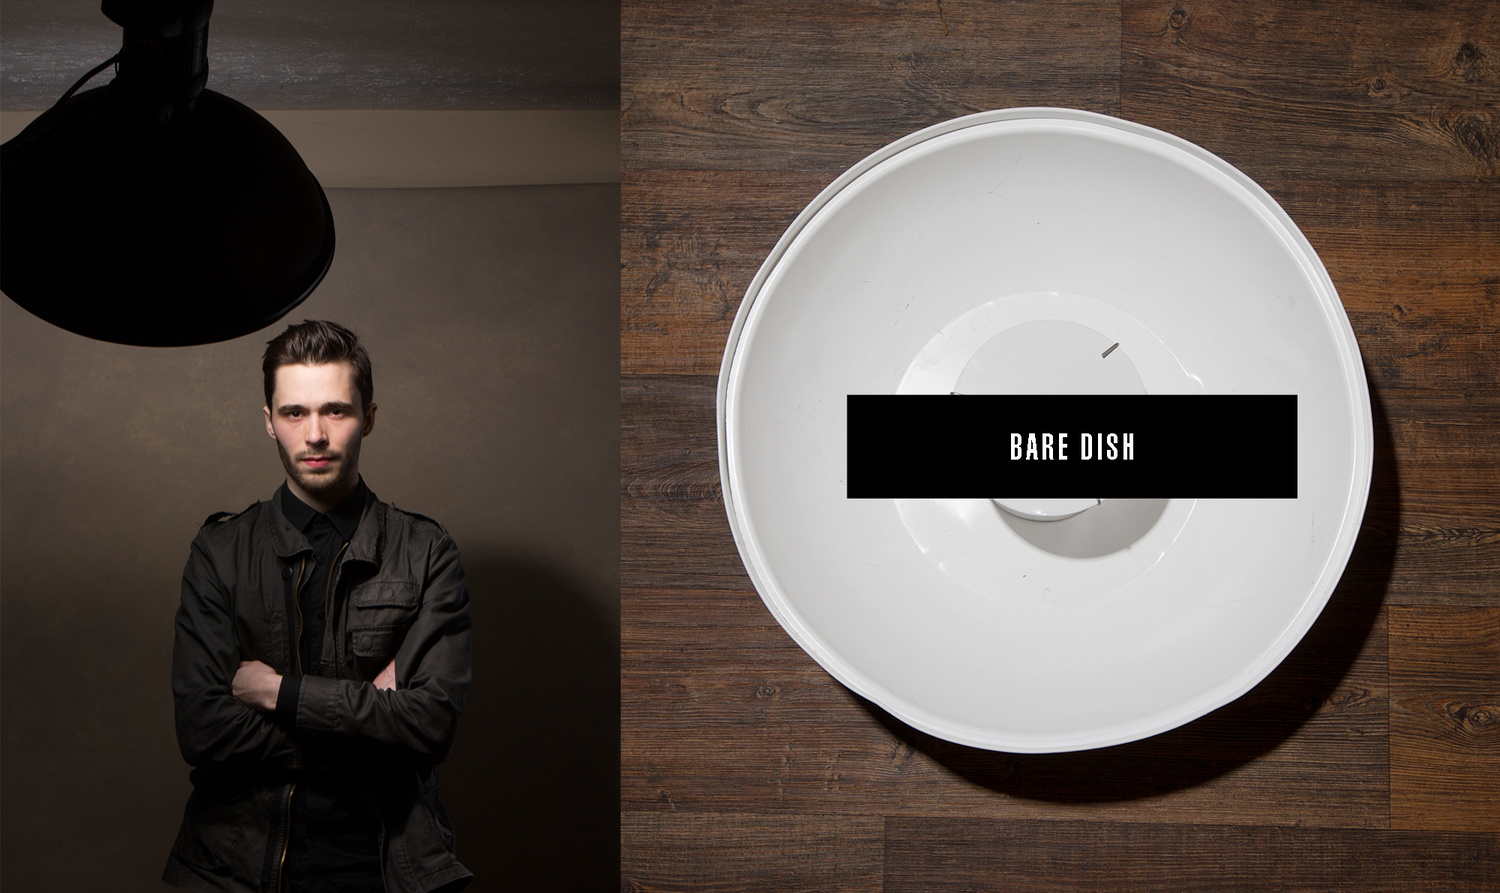
Beauty Dish Bare - Soft
With the dish overhead and the subject in the shadow of the elevated circular plate, the dish provides a nice soft light that wraps around the face. However, with a bare dish there is a lot of spill and in this case the spill causes a spherical shadow on the background from the circular plate. But, that could be a desirible gradated effect.

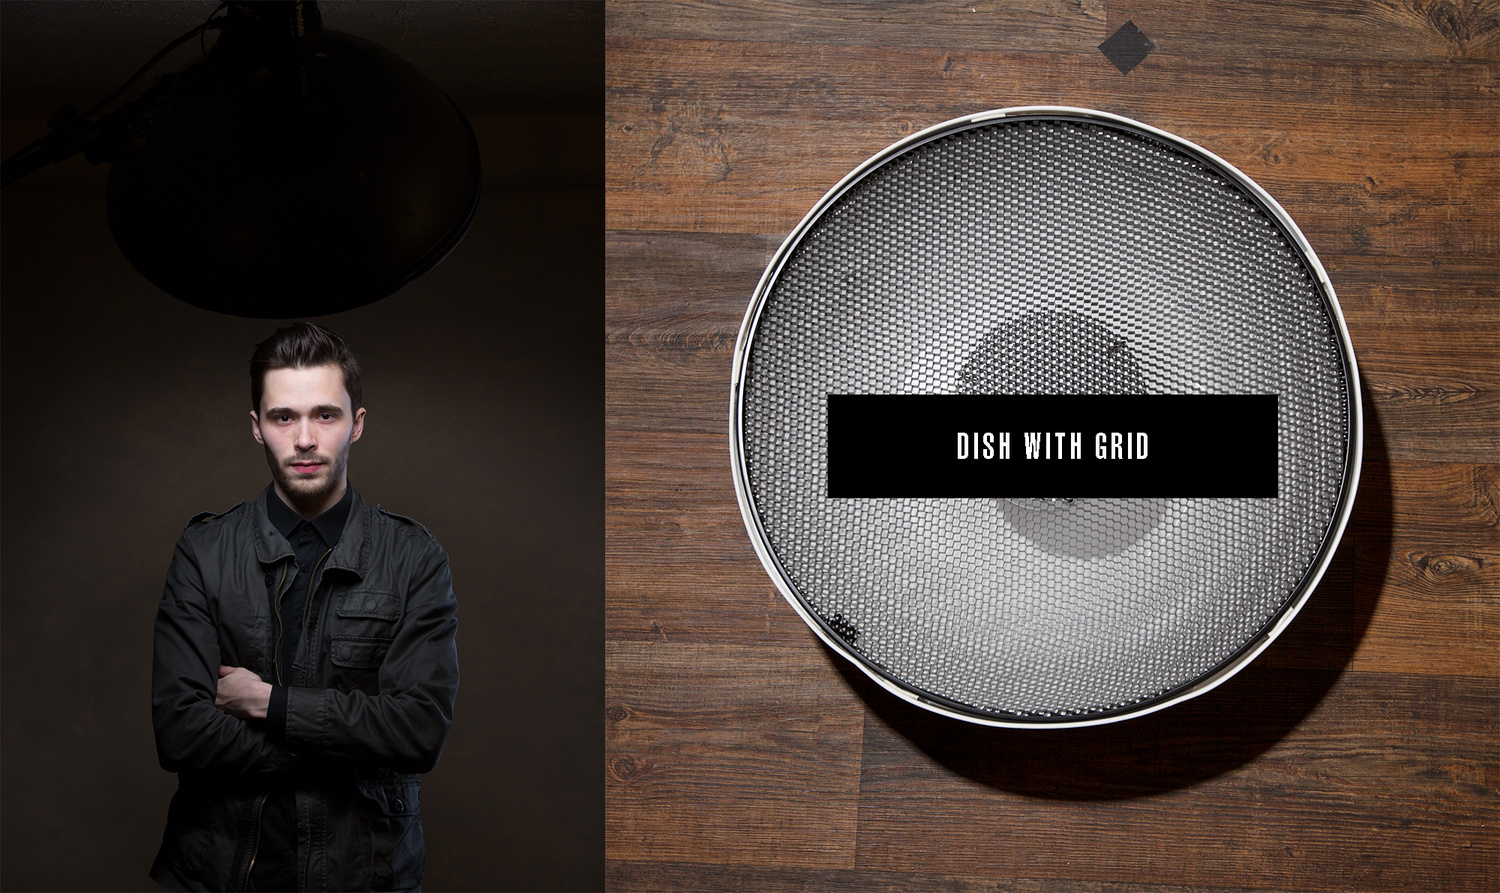
Beauty Dish With Grid
A Beauty Dish with a 25° Grid is one of the most dramatic forms of modification available. The spill is eliminated and the direction of the light source is far more controlled.
Beauty Dish With Diffusion Sock
Once a diffusion sock is placed over a bare beauty dish the results can be similar to a softbox, but far more controlled. The light creates a nice contrast, but is rounded and wraps a face well. Placement is an important element for good results, an overhead boom is the best route.

Beauty Dish Bare - Hard
This is where the versatility of a Beauty Dish really kicks into high gear. Simply moving the dish a foot to the left provides a harder more dramatic contrast of light. The drama is created by the "parabolic spill" coming form the outer rim of the dish. It's not the full blunt of a bare light, but a controlled hard light. If your subject is close to the background, just watch the shadows, they tend to be... interesting.
Beauty Dish Bare - Hard - Side
Moving the dish around the face to the left(or right) then pulling it a foot forward so the "parabolic spill" illuminates the face can create drama as well as some interesting shadows on the background.

Beauty Dish With Grid - Side
Once a Grid is placed over the Beauty Dish, the "parabolic spill" is controlled and the image becomes far more dark and dramatic.

You're the carpenter and craftsman of the photograph. A carpenter can use a hammer and nail or a drill and screw, both have their proper applications. But, what really matters is how a nail or screw will effect the overall construction. Every modifier has varying forms of light-shaping and usually the necessary abilities to get the job done. So, be the carpenter, build your light and you might find yourself dusting off that old Beauty Dish in the closet.
If you're passionate about taking your photography to the next level but aren't sure where to dive in, check out the Well-Rounded Photographer tutorial where you can learn eight different genres of photography in one place. If you purchase it now, or any of our other tutorials, you can save a 15% by using "ARTICLE" at checkout.


excellent and thorough breakdown!
Thank you my friend!
awessommeee
Thanks brother!
Next time you feel the need to throw camera gear in the garbage call a brother! haha Great article and some excellent points!
LOL! I know, some trash man might be the next Joey L. Thanks my man! Appreciate it.
Love these types of articles and I've been watching your stellar work on Facebook that are really excellent end-product examples as well. I'm really trying to get past the "blast everything with even flat light" mode that looks good but can get repetitive and boring for beauty.
Thanks for posting....this goes hand in hand with the Hurley video I started watching.
Thank you Jason! Means a lot to me to have your support. Cheers friend!
Great breakdown Clay, I follow you here and on Twitter, I throughly enjoy your images! A couple questions if I may...do you use profoto strobes or einsteins, or a combo of both? It seems like you like the buff octas for their ease of use but I'm curious how much nicer the profoto beauty dish is than the buff white beauty dish (that's pretty affordable) well I assume if you use profoto strobes the beauty dish makes perfect sense. Thanks again!
Same question I had. I'm sure the Profoto dish is better but only someone who has used that and something else could answer just how much better.
Thanks Bryan! I really appreciate the love and support. I use a combination of Profoto D1 Heads and Alien Bee B800's. I mostly use the Profoto heads, but again, I love the collapsible modifiers from Paul C. Buff.
From experience, the Paul C. Buff Beauty Dishes are junk compared to the Profoto Beauty Dish. But the Profoto gear is also much more expensive. I wanted to show both spectrum's in this article, not just all expensive pro-level gear. Hope this helps!
Great breakdown.
I'm in the market for a beauty dish, and your comment regarding PCB vs. Profoto caught my attention.
Do you think the PCB is "junk" because of build quality OR because of the light it produces?
Thanks Jon! From experience I would never recommend the PCB Beauty Dish because of the build quality and the light it produces, both! They just aren't reliable.
I need to print these out into flash cards and leave them in my beauty dish case.
Totally unrelated to the article, what do you use as your beauty dish case? I never fly with mine because I cant find anything suitable to keep it safe.
Cheers
I'd actually love to know this as well!
I use the LumoPro Carrying Case for 22" Beauty Dish and Grid, which works well enough with some padding in the case though it is fabric.
http://mpex.com/lumopro-carrying-case-for-22-beauty-dish-and-grid.html
tenba case is the best if you are flying.
http://www.bhphotovideo.com/c/product/264314-REG/Tenba_634_502_Car_Case_...
LOL! Awesome Brett! I mean, feel free, be sure to share pic if you do! :)
Finally some good explanation on this subject. Need to play more with my Octabox.
Thank you for reading Paulo!
This is great, but the photos are so small I can't really see the detailed differences. Clicking the pix takes me to your FB page. Can you post larger images, please?
Thanks for reading Geoffrey! Your wish is my command. Click the images for a bigger preview.
Clay, I love your work and have the utmost respect for you. I wanted to ask about the use of the rim light in some of these photos. I'm noticing a blue rim light in several, with a huge effect from it in the last beauty dish image where he actually has blue light hitting the side of his face. It may be helpful to see these images without the rim light so beginners can see what the effect of only the modifier you're discussing looks like.
Thanks for checking it out Teri! The kicker is simply for separation. It's subtle, but brighter in others because I had to close the aperture to compensate for the change in modification. While I considered doing that, I still wanted a good presentation, I think the kick is subtle enough not to change the feeling of the key.
Great writeup! I have a difficult time with my BD, guess it's time to pull it out and try some of your suggestions! :) Thanks!
Thanks Christian! Do work!
Great Topic spot on Clay
Thanks PJ! Appreciate that!
Just starting out and this is a great breakdown for me. Thank you!
Great to hear Mark! I tried to make it simple for those new to the game!
Amazing article! It's really amazing to have all this different information in just one! Thanks for sharing!
Thank you Erwin! Much appreciated man!
This is all I've got too.
BAM deluxe!! This is awesome!!
Will help so many =)
Ha! Thank you Linus! Much appreciated my friend!
Great breakdown I really appreciate the photo examples.
Thanks for checking it out Lee!
Welcome!
Is there major difference in shooting into the modifier vs. shooting through. Sorry if I worded that wrong.
Great article!! Now i can se the importance of the grids!!, Thank you so much!
Thanks for reading Mario! Grids are everything!
The "sock" for the beauty dish is a recent invention popularized by Buff and some other low cost beauty dish's.
Almost every fashion and beauty photographer that I've worked with all used a variety of Rosco diffusion gells for diffusion. There are a bunch of good ones to try 1/2 white, 1/4 tough lite, full white, opal frost, tough rolux and velvet frost are the most common ones along with the different thicknesses of Tough Spun. If you are shooting at any major studio in Manhattan i.e. Milk, Pier 59, Industria all the equipment rooms have these on large rolls but you can buy them by the sheet that are only 20" wide but that has never been a problem even with a 22" dish.
Thanks for reading TD! I have used Rosco paper and Cinefoil quite a bit, it's great for certain applications. The audience of Fstoppers generally isn't your top fashion photographer. they're mostly your everyday studio, portrait shooter. The sock has become a pretty industry acceptable-standard and I think works just as well, depending on the subject at hand!
are there any 3rd party grids for the Profoto beauty dish?
Try HoneyGrids I know they make a variety of Profoto grids. http://www.honeycombgrids.comI think that grids are only really needed on a main light if you are working in a small space otherwise if you are trying to keep light off the background just move forward and if you need to control spill use a black flag...
The same day I asked the question I glanced at my beauty dish and saw that I already had the Profoto grid for it. This post will be bookmarked so I can make better use of it.
Great article!!
Thank you Morten!
Thanks Clay - practical advice. Love this kind of article, really good steer as it is easy to get sidetracked by one more new modifier, but as you prove over and over again, less can be more.
Thank you Mark! Less can certainly be a whole lot more. :)