Windows 10 April 2018 Update common problems and fixes
If you're having problems upgrading to the April 2018 Update, in this guide, we'll highlight the most common issues and the steps to resolve them.
The Windows 10 April 2018 Update (version 1803) has finally arrived, and it's rolling out worldwide as a free update for compatible desktops, laptops, and tablets. The new version is the fifth major refresh that Microsoft is releasing (the first of two updates coming out this year), and it delivers a new set of features and changes to improve productivity, performance, and security.
However, a new release also means new potential problems because feature updates are not the same as those quality updates you get every month. Instead, every new release of Windows 10 goes through significant code restructuring which can introduce compatibility issues as well as bugs that can negatively impact the experience.
Alongside the issues that may appear as a result of the new version, you may also come across problems that aren't necessarily problems with the new feature update. Sometimes, an installation could fail because of outdated drivers, conflicts with programs, and configurations you may have applied that will prevent installing the new version.
In this Windows 10 guide, we'll highlight a number of common problems and the different ways you can resolve them as you install the April 2018 Update on your device.
Problems and fixes moving to Windows 10 version 1803
It's important to note that during the installation of a new version of Windows 10, you may encounter two types of problems. You may see errors that are common issues during the upgrade process, which they're not necessarily bugs, and then, there are those errors that can occur as a result of a bug, compatibility problem, or unknown issue with the new feature update.
This guide includes the instructions to resolve both types of problems during and after the installation of Windows 10 version 1803:
- How to fix Windows Update errors installing April Update
- How to fix Windows Update error 0x800F0922 downloading April Update
- How to fix unexpected error downloading installation files
- How to fix Windows Update error 0x80070020 installing April Update
- How to fix missing or damaged update files error 0x80073712
- How to fix update isn't applicable to your device problem
- How to fix Media Creation Tool errors installing April Update
- How to fix stuck downloading updates using the Media Creation Tool
- How to fix damaged files on USB bootable media
- How to fix error 0x8007025D using an ISO file installing April Update
- How to fix storage error 0x80070070 during installation
- How to fix error 0x80070522 installing April Update
- How to fix Windows 10 before installing a feature update
- How to fix compatibility error 0x800F0923 during installation
- How to fix driver error 0xC1900101 during installation
- How to fix installation error 0x80200056 after accidental restart
- How to fix software compatibility error 0xC1900208 during installation
- How to fix problems trying to complete the installation
- How to fix minimum hardware requirements error 0xC1900200, 0xC1900202
- How to fix Windows 10 activation problems
- How to fix microphone problems after the Windows 10 April 2018 Update
- How to fix Update Assistant stuck downloading Windows 10 April 2018 Update
- How to fix slow Alt + Tab while gaming after installing Windows 10 version 1803
- How to fix new partition appearing after installing Windows 10 April 2018 Update
- How to fix black screen problem on Windows 10 April 2018 Update
- How to fix camera access problem after installing Windows 10 April 2018 Update
- How to fix Nvidia settings issue after installing Windows 10 version 1803
- How to fix GPU issue upgrading Windows 10 version 1803
- How to fix Fast Startup re-enabled after installing Windows 10 version 1803
- How to fix System Protection disabled after installing Windows 10 version 1803
- How to fix apps freezing on Windows 10 April 2018 Update
- How to fix error 0x8007042B upgrading to Windows 10 version 1803
- How to fix upgrade process installs wrong edition of Windows 10
- How to fix Chrome freezing after installing Windows 10 April 2018 Update
- How to fix File Explorer crashing on Windows 10 April 2018 Update
- How to fix networking problems on Windows 10 April 2018 Update
- How to successfully install the Windows 10 April Update
How to fix Windows Update errors installing April Update
Although the best way to download and install the latest release of Windows 10 is to use the Windows Update option, sometimes you may see an error message that won't let you install the new version.
Get the Windows Central Newsletter
All the latest news, reviews, and guides for Windows and Xbox diehards.
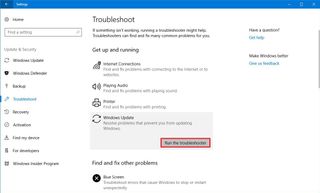
There are a number of errors that may appear, and they'll be different depending on the problem that caused them. However, if you're having trouble, the quickest way to troubleshoot and resolve this issue is to use the Windows Update troubleshooter tool.
- Open Settings.
- Click on Update & Security.
- Click on Troubleshoot.
- Under "Get up and running," select the Windows Update option.
- Click the Run the troubleshooter button.
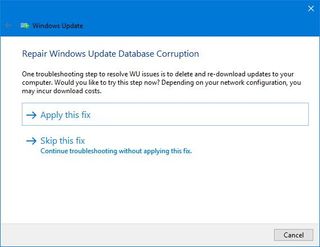
- Click the Apply this fix option (if applicable).
- Continue with the on-screen directions.
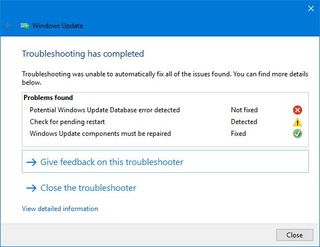
- Restart your device.
After completing the steps, go to Settings > Update & Security > Windows Update, click the Check for updates button to try the upgrade one more time.
It worth noting that there could also be a problem with your device network adapter. In this case, you can use the Network Adapter troubleshooter available under "Find and fix other problems" in the Troubleshoot settings page to resolve this issue.
How to fix Windows Update error 0x800F0922 downloading April Update
The error 0x800F0922 can indicate that your computer cannot contact the Microsoft's update servers, or it can mean that the System Reserved partition doesn't have enough space.
Disconnect VPN
If you see these errors using Windows Update, the problem could be an active VPN connection.
To fix this problem, disconnect your current VPN session and then try to update again.
Resize System Reserved partition
It's unusual to have a System Reserved partition that is smaller than required, but sometimes third-party programs like security software may save data into this partition, which can be the reason that you can't install the April Update.
To fix this problem, you'll need to find a third-party tool to resize and make the System Reserved partition larger (at least 500MB).
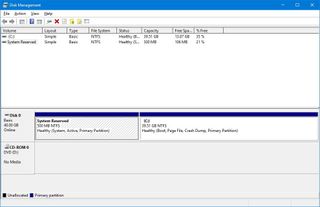
Alternatively, you can perform a clean installation, which will create the proper partition to run Windows 10 without problems.
Use Media Creation Tool
Alongside problems contacting the update servers or partition size, you may also come across error 0x80246007 while using Windows Update to download the latest version of Windows 10. This error indicates that the update didn't download successfully.
The best way to get around this problem is to use the Media Creation Tool to perform a clean installation which will create the proper partition to run Windows 10 without problems.
How to fix unexpected error downloading installation files
The error 0x80190001 usually happens when an unexpected problem occurs trying to download the upgrade files to install the Windows 10 version 1803 using Windows Update.
If you see this error message, use Disk Cleanup to remove the temporary installation files and try again.
- Open Start.
- Search for cleanmgr and click the result to launch Disk Cleanup.
- Select the C: drive.
- Click OK.
- Click the Clean up system file button.
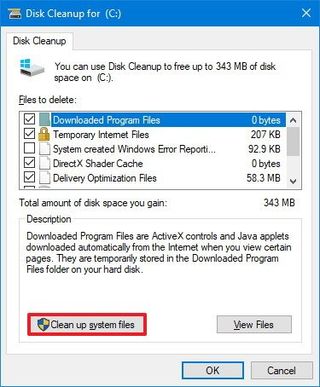
- Click OK ensuring that the C: drive is selected.
- Select Temporary Windows installation files .
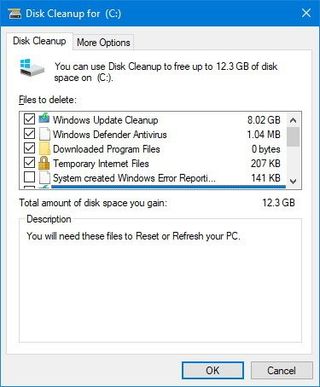
- Click OK.
- Click the Delete Files button.
After removing the files, go to Settings > Update & Security > Windows Update, click the Check for updates button.
If this method doesn't work, use the Media Creation Tool to upgrade your device manually.
How to fix Windows Update error 0x80070020 installing April Update
Usually, you'll see error 0x80070020 using Windows Update to install a feature update if an application is conflicting with the Windows 10 automatic update mechanism.
This error is likely caused by a third-party antivirus or security software. You can troubleshoot this problem doing a clean boot of Windows 10 and then try to go through the upgrade on more time.
If you don't want to use the clean boot process, make sure to temporarily remove any third-party antivirus, security software, and older programs that may be causing the conflict, and then try to upgrade again.
On Windows 10, you can uninstall applications using these steps:
- Open Settings.
- Click on Apps.
- Click on Apps & features.
- Select the app you want to remove, and click the Uninstall button.
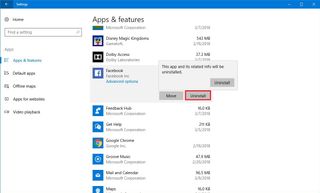
- Click the Uninstall button again to confirm.
After completing the steps, repeat the instructions to remove any other conflicting applications. Then try to upgrade one more time, and after the process, remember to reinstall your third-party antivirus or security software.
How to fix missing or damaged update files error 0x80073712
When you see error 0x80073712 or 0x80245006, it means that the required files to install the April Update are missing or damaged.
To fix this problem, use the Disk Cleanup tool to remove the setup temporary files and then try again:
- Open Start.
- Search for cleanmgr and click the top result to launch Disk Cleanup.
- Select the C: drive.
- Click OK.
- Click the Clean up system file button.

- Click OK, ensuring the C: drive is selected.
- Select Windows Setup temporary files or Temporary Windows installation files.
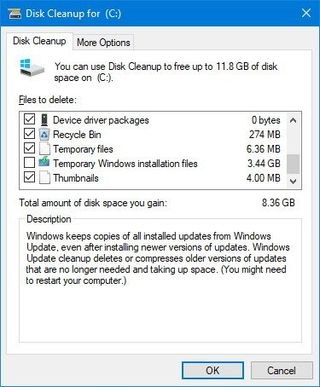
- Click OK.
- Click the Delete Files button.
After removing the files, go to Settings > Update & Security > Windows Update, click the Check for updates button.
If you're still having problems, you should upgrade to version 1803 using the Media Creation Tool.
How to fix update isn't applicable to your device problem
As you try to upgrade to Windows 10 version 1803, you may see a message that reads: Error: The update isn't applicable to your computer. This message indicates that your device doesn't have the required updates installed to support the new version.
Windows 10 installs updates automatically, but if your computer doesn't connect to the internet for some time, and then you try to use a USB bootable media to upgrade, you're likely to see this problem.
To resolve this issue, make sure to install the latest updates before proceeding with the upgrade:
- Open Settings.
- Click on Update & Security.
- Click on Windows Update.
- Click the Check for update button.
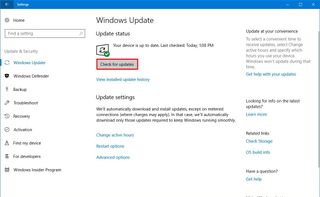
In the rare case that the required update isn't downloading, you can install it manually using this guide.
How to fix Media Creation Tool errors installing April Update
When trying to install the April Update using the in-place upgrade option with the Media Creation Tool, there's a chance you may see a Dynamic Update related problem, but even after restarting the process your computer will get stuck again downloading the installation files.
If you see this problem, you can try launching the process manually:
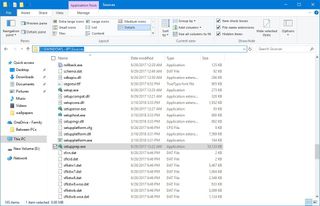
- Open File Explorer.
- Browse to the following path:
C:\$Windows.~BT\Sources\Windows\sources - Double-click the Setupprep.exe file to start the upgrade process again.
How to fix stuck downloading updates using Media Creation Tool
If you're using the Media Creation Tool to upgrade to the latest version of Windows 10, sometimes the tool will get stuck trying to download any available updates before the installation process.
You can resolve this issue starting over again, but after the Media Creation Tool finishes downloading the required files on your device, quickly disconnect your wire or wireless connection from the internet. When you do this, the tool will timeout, skip the update process, and continue with the installation.
Once the new version has been installed, and you're in the out-of-box experience (OOBE), connect your computer to the internet and finalize the update. Then check for updates on Settings > Update & Security > Windows Update, and click the Check for Updates button to download and install any available patch for version 1803.
How to fix damaged files on USB bootable media
In the case that you're using a USB bootable media to install the Windows 10 April Update, during the process the installation may fail, or an error may appear preventing a successful upgrade.
This is a very common issue that is often caused by one or multiple corrupted files in the USB flash drive. You can quickly resolve this issue re-downloading the files again from the Microsoft servers using the Media Creation Tool to create a new USB installation media.
- Download the Media Creation Tool from Microsoft.
- Double-click the MediaCreationTool.exe file to launch the tool.
- Click Accept.
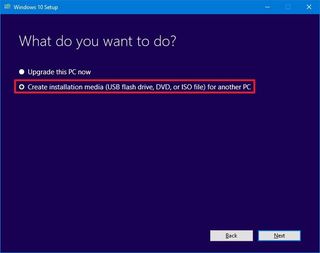
- Select the Create installation media (USB flash drive, DVD, or ISO file) for another PC option.
- Select the correct language, architecture, and edition as necessary, if different from the default selection.
- Click Next.
- Select the USB flash drive option.
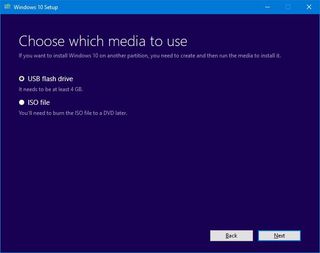
- Click Next.
- Select a removable drive from the list.
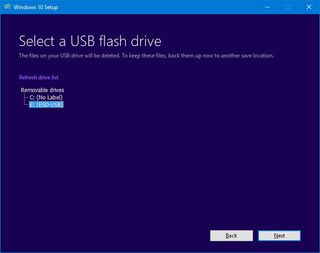
- Click Next.
- Click Finish.
Once you've completed the steps, you can use the new bootable media to successfully install the April Update.
How to fix error 0x8007025D using an ISO file installing April Update
If you see error 0x8007025D - 0x2000C, this means the metadata of the ISO file is corrupt, and it won't let you install the Windows 10 April Update.
You can quickly get around this issue by using the Media Creation Tool to create a new ISO file.
- Download the Media Creation Tool from Microsoft.
- Double-click the MediaCreationTool.exe file to launch the tool.
- Click Accept.
- Select the Create installation media (USB flash drive, DVD, or ISO file) for another PC option.

- Select the correct language, architecture, and edition as necessary, if different from the default selection.
- Click Next.
- Select the ISO file option.

- Click Next.
Once you've completed the steps, the tool will create an ISO file that you can use to upgrade your computer, virtual machine, or another device.
How to fix storage error 0x80070070 during installation
Windows 10 requires a least 16GB of free space to upgrade a 32-bit version, or 20GB to upgrade a 64-bit version. If your device doesn't have enough free space to complete the installation, you're likely to see one of these errors:
- 0x80070070 – 0x50011
- 0x80070070 – 0x50012
- 0x80070070 – 0x60000
- 0x80070008
- 0xC190020e
To fix this common upgrade problem on Windows 10, use the Disk Cleanup utility to free up space:
- Open Start.
- Search for cleanmgr and click the result to launch Disk Cleanup.
- Select the C: drive.
- Click OK.
- Click the Clean up system file button.

- Click OK ensuring that the C: drive is selected.
- Select the files you want to delete, including:
- Recycle Bin.
- Temporary Internet Files.
- Temporary Files.
- System error memory dump files.
- Previous Windows Installation.
- Temporary Windows installation files.
- Windows Update Cleanup.

- Click OK.
- Click the Delete Files button.
Once you've completed the steps, try to install the Windows 10 April Update one more time.
If you couldn't free up enough space, it's also possible to connect a USB flash drive with at least 16GB of available storage that Windows 10 will detect and use as temporary storage to complete the installation.
How to fix error 0x80070522 installing April Update
If you get error 0x80070522 as you try to upgrade your computer to the April Update, it means that you're trying to install the update using an account without administrator privileges.
In the case you're using a standard account, make sure to sign-in with an administrator account or have someone with the right privileges to perform the upgrade for you.
How to fix Windows 10 before installing a feature update
Sometimes using the same Windows 10 installation without maintenance, you're more likely to run into performance and other problems that can prevent the April Update from installing on your computer.
If you've been running the same installation for a long time, use the SFC command-line tool to repair any files that may be corrupted or replace missing system files.
Refer to this guide to use the System File Checker (SFC) tool with Command Prompt to repair your Windows 10 installation.
If you're still having issues, you can also use the Deployment Image Servicing and Management (DISM) tool to fix your current installation.
How to fix compatibility error 0x800F0923 during installation
The error 0x800F0923 indicates a problem with a device driver or compatibility issue with an application.
Usually, this error will appear when there is a problem with the graphics driver, outdated driver for a specific piece of hardware, or there's a compatibility problem with older software or security application, such as your third-party antivirus.
If your computer was working without issues before installing Windows 10 version 1803, it could be difficult to figure out which driver or program is blocking Windows Update.
In this case, the best way to get around this problem is to use the Media Creation Tool to do an in-place upgrade. If there's something that will conflict with the installation process, the tool will let you know on a report.
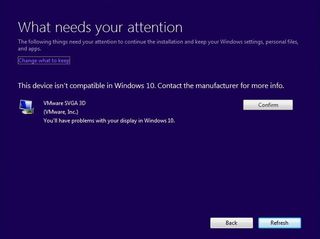
If it's a driver related issue, download and install the latest update from your manufacturer's support website.
If you're using the latest drivers, but the problem continues, one way to overcome this issue is to temporarily remove the driver, and continue with the April Update installation. Then after installing the new version, you can reinstall the devices again.
To remove a driver from Windows 10, do the following:
- Open Start.
- Search for Device Manager and click the top result.
- Expand the device causing the problem.
- Right-click and click Uninstall.
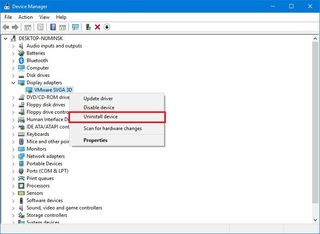
After completing the steps, you can try to install the Windows 10 April Update on your device one more time.
In addition to error 0x800F0923, you may also experience error 0x80070490 - 0x20007 during the upgrade process, which means that one or multiple device drivers are incompatible. The error 0x80070003- 0x20007 indicates that the upgrade process failed during the driver installation phase.
If you get one of these errors, after Windows 10 rolls back to the previous version automatically, use the steps mentioned above to temporarily uninstall the device driver that may be causing the problem, and then try to upgrade again.
When dealing with software compatibility issues, check your software vendor support website to download and install the latest patches for the application.
Alternatively, you could uninstall the app blocking the feature update and then continue with the installation.
- Open Settings.
- Click on Apps.
- Click on Apps & features.
- Select the app you want to remove, and click the Uninstall button.

- Click the Uninstall button again to confirm.
Then after installing the upgrade, you can reinstall the application again.
How to fix driver error 0xC1900101 during installation
When you get an error that starts with 0xC1900101 is likely that the problem is a device driver.
Here's a list of 0xC1900101 possible errors:
- 0xC1900101 - 0x20004
- 0xC1900101 - 0x2000c
- 0xC1900101 - 0x20017
- 0xC1900101 - 0x30018
- 0xC1900101 - 0x3000D
- 0xC1900101 - 0x4000D
- 0xC1900101 - 0x40017
Also, error 0x80090011 indicates that a driver error has appeared during the user data migration process.
In order to get around these errors, here are some fixes you can try:
Install latest drivers
To prevent 0xC1900101 or 0x80090011 errors, make sure to install the latest update for the driver with the problem from your manufacturer support website.
To update a driver on your computer, do the following:
- Open Start.
- Search for Device Manager and click the top result.
- Expand the device causing problems, which is likely to appear with a yellow exclamation mark.
- Right-click and select Update Driver Software to check for updates. (Alternatively, you can use the Uninstall option to bypass the error.)
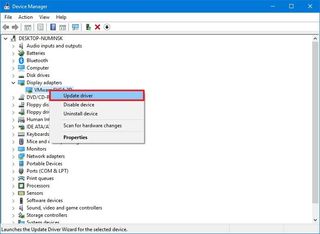
In the case that you're downloading the driver from your manufacturer support website, use their instructions to update, instead of the steps mentioned above.
Disconnect devices
You can also disconnect the device or peripheral causing the problem, proceed with the April Update installation, and then reconnect the hardware.
As a rule of thumb, you always want to remove all non-essential peripherals, including Bluetooth devices, printers, external storage, and other hardware that you think may cause issues.
Use SFC and DISM tools
Use the SFC command-line tool built into Windows 10 to repair the installation and fix potential problems with drivers.
If you're still experiencing driver issues with 0xC1900101 errors, use the DISM command-line tool for repair the installation.
Free up hard drive space
If your device doesn't have enough, you may also see one of the errors. Always ensure that there's at least 20GB of free storage.
You can also use our guide with several tips on how to free up disk space on Windows 10.
Repair hard drive errors
You may also see one of these errors if there are errors with your computer's hard drive. You can check and repair drive errors using the CHKDSK command-line utility.
- Open Start.
- Search for Command Prompt, right-click the top result, and select Run as administrator.
- Type the following command and press Enter:
chkdsk/f c: - If you're unable to run the tool, type Y and press Enter to schedule a checkup.
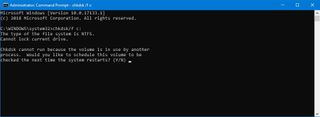
- Restart your computer to trigger the scan.
The tool will scan and automatically repair any problems with the hard drive. After the process completes, make sure to restart your computer before trying to upgrade again.
Upgrade manually
Using the Media Creation Tool to perform a clean installation is perhaps the best alternative to update to version 1803 to prevent 0xC1900101 errors.
How to fix installation error 0x80200056 after accidental restart
During the upgrade process, you may get error 0x80200056 as a result of an accidental restart, but it's nothing serious. Simply start the installation one more time, and the process should go through this time.
How to fix software compatibility error 0xC1900208 during installation
When you see the error 0xC1900208 – 0x4000C, it means that one or more programs are incompatible with the new version of Windows 10, and you won't be able to continue with the installation process.
The fastest way to get around this common problem installing the Windows 10 April Update is to uninstall the application causing the issue. Usually, this error is caused by a third-party antivirus or another type of security software.
To uninstall an application on Windows 10, do the following:
- Open Settings.
- Click on Apps.
- Click on Apps & features.
- Select the app that's not compatible.
- Click the Uninstall button.

- Click the Uninstall button again to confirm.
If you're removing a classic desktop (win32) application, you may need to follow some additional steps as directed by the uninstaller.
How to fix problems trying to complete the installation
During the installation of feature update or quality update, you may come across two error messages, including:
- Error: We couldn't complete the updates. Undoing changes. Don't turn off your computer.
- Error: Failure configuring Windows Updates. Reverting changes.
These are common errors when an update fails to install, and unless you track down the exact error, you won't be able to find the appropriate solution.
The best action you can take is to check the Windows Update history information to find out the error, which you can use to find the correct fix.
To check the update history information, do the following:
- Open Settings.
- Click on Update & Security.
- Click on Windows Update.
- Click the View your update history link.
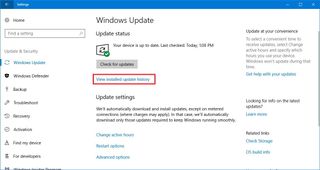
- Check the error code for the update that failed to install.
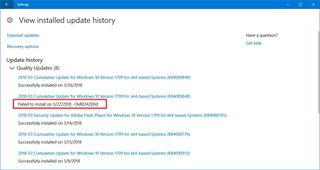
Once you find out the exact error, use the internet to try figuring out the solution. Also, remember to check the Windows Central forums to seek help.
How to fix minimum hardware requirements error 0xC1900200, 0xC1900202
In the rare case that you come across error 0xC1900200 – 0x20008 or 0xC1900202 – 0x20008, it means that your device doesn't meet the minimum hardware requirements to install the new version of Windows 10.
Usually, if you're upgrading from the previous release of Windows 10, you're likely not to see these errors. However, if you're upgrading the original version released back in 2015 on an older computer, then chances are that you'll see one of these errors.
Here are the Windows 10 April Update minimum hardware requirements:
- Processor: 1GHz CPU.
- RAM: 2GB for 32 bit or 64 bit.
- Storage: 16GB for 32 bit or 20GB for 64 bit.
- Graphics: DirectX 9 or later with WDDM 1.0 driver.
- Display: 800 x 600.
Although most devices already running Windows 10 are not likely to have hardware problems, it might be an issue with low-end computers. When there are requirement problems, it's typically the memory, which you can resolve upgrading the system RAM. However, you may also want to consider getting a new device.
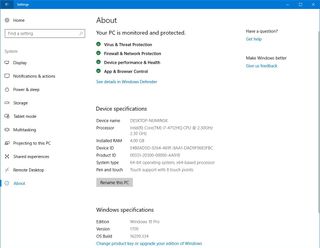
You can use this guide to learn the steps to check your system hardware information on Windows 10 to figure out if hardware update is needed.
How to fix Windows 10 activation problems
Windows 10 is capable of reactivating automatically after a re-installation, but the process not always works perfectly, and there's a small chance that your computer won't activate after installing the April Update. When this happens, you'll see a Windows not activated message with a 0x803F7001 error in the Settings app.
Luckily, there's an Activation Troubleshooter option in the Settings app to fix any problem trying to re-activate your copy of Windows 10.
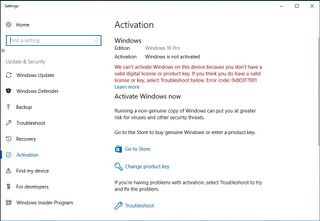
In the case that you're still unable to activate Windows 10, it's also recommended to wait a few days to see if your device re-activates automatically.
How to fix microphone problems after the Windows 10 April 2018 Update
After upgrading to version 1803, a small number of users have been reporting that the microphone is getting detected, but it doesn't pick up any sound.
In order to get around this issue, it's recommended to enable the microphone in your Privacy settings using these steps:
- Open Settings.
- Click on Privacy.
- Click on Microphone.
- Turn on the Allow apps to access your microphone toggle switch.
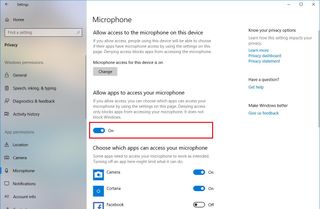
After completing the steps, you also want to make sure to check the list and enable microphone access for the apps you want, if they're currently disabled.
In the case the feature isn't enable, click the Change button and turn on the toggle switch.
How to fix Update Assistant stuck downloading Windows 10 April 2018 Update
The Update Assistant is a tool that Microsoft has designed to help update systems that for unknown reasons aren't getting the new version through Windows Update.
However, if you try to use this tool to install the Windows 10 April 2018 Update, there's a chance that it may get stuck downloading at 76% and 99% for many hours preventing the process from ever completing.
While there could be many reasons for this problem, it's typically a connection issue.
If you're experiencing problems with the Update Assistant, there are at least three things you can do, including:
- Disconnect the your device from the internet for several seconds and then reconnect it again to continue with the download.
- Restart your computer and try to use the Update Assistant again.
- Use the Media Creation Tool to perform an in-place upgrade to version 1803.
How to fix slow Alt + Tab while gaming after installing Windows 10 version 1803
It's been reported by a number of users that after installing the April update, using the Alt + Tab keyboard shortcut works noticeable slow.
The problem appears to be related with the Focus assist settings, which disabling the gaming automatic rule fixes the problem. Here's how:
- Open Settings.
- Click on System.
- Click on Focus assist.
- Under "Automatic rules," turn off the When I'm playing a game toggle switch.
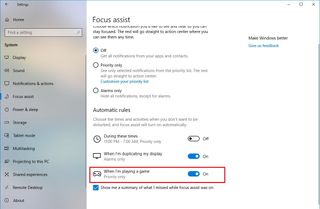
Once you've completed the steps, the Alt + Tab shortcut should start working as before updating to the April 2018 Update.
How to fix new partition appearing after installing Windows 10 April 2018 Update
After installing the Windows 10 April 2018 Update, a lot of users on Reddit and at the Microsoft forums (link 1) (link 2) are noticing an additional drive running out of space in File Explorer.
It's a drive of 449MB with on 45MB of empty space that typically uses the F drive letter, and it's marked as OEM Partition.

This is actually some sort of recovery partition, and deleting it is not recommended, but a way around this problem is to hide it using these steps:
Warning: This is a friendly reminder that editing using DiskPart can be risky, and it can cause irreversible damage to your installation if you don't do it correctly. It's recommended to make a full backup of your PC before proceeding.
- Open Start.
- Search for Command Prompt.
- Right-click the result and select Run as administrator.
- Type the following command to start DiskPart and press Enter:
dikspart - Type the following command to list all the volumes and press Enter:
list volume - Type the following command to select the volume in question and press Enter:
select voluem FImportant: Proceed with caution, and replace "F" with the letter that appears in the newly created partition. - Type the following command to remove the letter and hide the partition in question and press Enter:
remove letter=FImportant: Proceed with caution, and replace "F" with the letter that appears in the newly created partition. - Use the exit command to close DiskPart.
After completing these steps, the drive will disappear from File Explorer, but it'll continue to be present on your computer.
According to reports, Microsoft is aware of the issue, and the company may release a cumulative update to automatically address this problem.
How to fix black screen problem on Windows 10 April 2018 Update
During the upgrade process, or after installing the Windows 10 April 2018 Update, you may see a black screen impacting the user experience.
Typically, a black screen on Windows 10 occurs because of a problem during the feature update installation process, a quality update that previously didn't install correctly, or it may also be an issue with graphics driver or a piece of hardware on your computer.
If upgrading to the new version, you're experiencing a black screen, you can follow these steps to troubleshoot and fix the problem.
In the case that nothing seems to work, you can rollback to the previous version using these steps:
- Open Settings.
- Click on Update & Security.
- Click on Recovery.
- Under "Go back to a previous version of Windows 10", click the Get started button.
- Select the reason you're rolling back.
- Click Next.
- Click No, thanks.
- Click Next.
- Click Next again.
- Click Go back to earlier build to begin the process.
In order to avoid the same problem again, you can use these instructions to postpone the update until the problem has been fixed.
How to fix camera access problem after installing Windows 10 April 2018 Update
On the Windows 10 April 2018 Update, users are finding out that many apps no longer have access to the camera. However, this is not a problem or a bug with this new release, it's actually a change that Microsoft is implementing with version 1803 to give users more control over their privacy.
If you have apps that require camera access on your PC, you need to follow these steps:
- Open Settings.
- Click on Privacy.
- Click on Camera.
- Turn on the Allow apps to access your camera toggle switch.
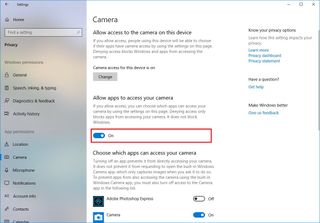
Once you've completed the steps, you also want to make sure to check the list and enable camera access for the apps you want, if they're currently disabled.
In the case the feature isn't enable, click the Change button and turn on the toggle switch.
How to fix Nvidia settings issue after installing Windows 10 version 1803
If you have a device with an Nvidia graphics card, there's a small chance that after installing the April 2018 Update, you will no longer find Nvidia settings anywhere.
A number of users have been reporting the same issue. For example, Reddit user Blazing_Saddles explains:
My pc just updated to the april update. But I've noticed a few things. First of all, it seemed to remove my nvidia gpu completely which is weird. I can't even right click on the screen where you can usually see the nvidia stuff.
However, if the Nvidia settings are no longer available after upgrading to the new version, you can quickly fix this issue by downloading and install the latest driver from Nvidia GeForce website.
In the case that you need additional help, you can use our guide to install graphics drivers on Windows 10.
How to fix GPU issue upgrading Windows 10 version 1803
A number of users are reporting that they're getting a "Cannot uninstall App: Hybrid laptop with Discrete GPU Connected to Display. Please uninstall manually and then refresh" message after installing the Windows 10 April 2018 Update.
Apparently, it's a problem that's only happening with certain Dell's Alienware computers, and reinstalling the latest graphics drivers will not solve this issue.
At this time there's not a fix to resolve this issue, but you can temporarily get around this problem removing the update and go back to the previous version using these steps:
- Open Settings.
- Click on Update & Security.
- Click on Recovery.
- Under "Go back to a previous version of Windows 10", click the Get started button.
- Select the reason you're rolling back.
- Click Next.
- Click No, thanks.
- Click Next.
- Click Next again.
- Click Go back to earlier build to begin the process.
If you don't want to install the update again until you're sure the problem has been fixed, you can use these steps to delay the Windows 10 April 2018 Update on your computer.
Update May 3, 2018: Microsoft has acknowledged that there is a problem with certain Dell laptops, including Alienware 13 R3, Alienware 15 R3, Alienware 15 R4, Alienware 17 R4, and Alienware 17 R5 laptops. As a result of this problem, the company is currently blocking the April 2018 Update on affected devices until there's a permanent fix for this problem.
How to fix Fast Startup re-enabled after installing Windows 10 version 1803
It's been reported by various Windows 10 users that upgrading to the April 2018 Update the Fast Startup feature gets re-enabled automatically without user interaction.
Fast Startup is a feature that simply makes Windows 10 boot faster, but many users prefer to keep it disabled because, in some scenarios, it may cause problems, and it'll prevent you from using certain features like Wake-On-LAN.
If you're among those who disable fast startup, you might want to double-check the settings to see if it's still off. Here's how:
- Open Control Panel.
- Click on Hardware and Sound.
- Click on Power Options.
- Click the Choose what the power buttons do option on the left.
- Click the Change settings that are currently unavailable option.
- Under "Shutdown settings," clear the Turn on fast startup option.
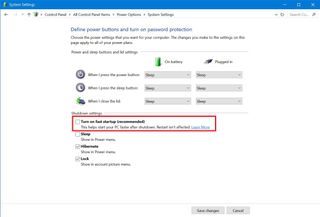
- Click the Save Changes button.
How to fix System Protection disabled after installing Windows 10 version 1803
On Windows 10, System Restore is disabled by default, but many users usually enable and configure this feature to revert changes is somethings isn't working correctly after changing settings, installing an update or an application.
However, it appears that during the installation process of the April 2018 Update, Windows 10 disables System Restore again without notifying the user.
If you use this feature to protect your installation, you might want to double-check the settings to see if it's still enabled. Here's how:
- Open Start.
- Search for Create a restore point, and click the result System Properties.
- Under "Protection Settings," select the main system drive, and click the Configure button.

- Select the Turn on system protection option.Quick Tip: Use the slider to set the storage you want to reserve for System Restore, which by default is only one percent.

- Click Apply.
- Click OK.
After completing the steps, a new restore point will be created automatically when an important system change occur, such as before an installation of a system update.
How to fix apps freezing on Windows 10 April 2018 Update
A small number of users who are jumping early to the Windows 10 April 2018 Update are reporting frozen screen when try to use certain applications, such as Google Chrome, Mozilla Firefox, and Office, among other apps and Cortana.
Microsoft is aware of the this problem that's happening on some devices after installing version 1803, and the company says that it's working on a permanent fix that is expected to rollout on May 8, 2018. However, in the meantime, you can trying these workarounds if Chrome or other apps is causing your screen to freeze.
- If you're using a keyboard, simultaneously press the Windows logo key + Ctrl + Shift + B to wake the screen.
- If you have a tablet, simultaneously press both the volume-up and volume-down buttons, three times within 2 seconds. If Windows is responsive, a short beep will sound and the screen will blink or dim while Windows attempts to refresh the screen.
- If you're using a laptop, close and re-open the laptop lid.
In the case the recommendations are not working, you can temporarily remove the update and go back to the previous version until Microsoft Release the fix using these steps:
- Open Settings.
- Click on Update & Security.
- Click on Recovery.
- Under "Go back to a previous version of Windows 10", click the Get started button.
- Select the reason you're rolling back.
- Click Next.
- Click No, thanks.
- Click Next.
- Click Next again.
- Click Go back to earlier build to begin the process.
How to fix error 0x8007042B upgrading to Windows 10 version 1803
As you try to install Windows 10 version 1803 on your computer using the Update Assistant tool, you may receive the error 0x8007042B with a message that reads: "Something went wrong" as the assistant tries to proceed with the upgrade.
Unfortunately, the message isn't clear on the specific problem and how to resolve it, but there are a few things you can try to successfully install the April 2018 Update on your device.
The first thing that you can do is to use these instructions to make sure you're doing everything possible to prevent errors during the upgrade.
Once you've disconnected unnecessary peripherals, uninstalled needless apps, and remove third-party security software, try to use the Update Assistant again.
In the case that you're still getting the same error, you should consider using another installation method, such as using the Media Creation Tool or doing a clean install of Windows 10.
How to fix upgrade process installs wrong edition of Windows 10
A few users have been reporting that the upgrade process to the April 2018 Update ends up installing the wrong edition of Windows 10.
For instance, Reddit user Skerh claims that after installing the April 2018 Update on two machines running Windows 10 Pro end up getting "Windows 10 family."
In the same discussion, user Korabxh reports that doing a clean install of Windows 10 Pro end up installing Windows 10 Enterprise instead.
Also, on Windows Central, reader johnmurray also reports that installing version 1803 on a Windows 10 Pro device end up installing the Windows 10 Enterprise edition. As a result, the product key no longer works, because it's a key for a different product.
Although it may appear that these are isolated incidents, it's also a reminder of the importance of creating a full backup before upgrading, and the risks installing a new version during the early days, which are known to include some hiccups.
If you're among the first users to upgrade to the Windows 10 April 2018 Update, and you end up with the wrong edition, you can use these steps to rollback to the previous version:
- Open Settings.
- Click on Update & Security.
- Click on Recovery.
- Under "Go back to a previous version of Windows 10", click the Get started button.
- Select the reason you're rolling back.
- Click Next.
- Click No, thanks.
- Click Next.
- Click Next again.
- Click Go back to earlier build to begin the process.
Once you're back into the previous version, you may want to use an alternative process to upgrade to install the correct edition. For example, if you originally used the Media Creation Tool, then this time try to upgrade using the Update Assistant or vise versa.
If you're not in the rush, it's recommended to rollback and then wait until May 8, which is when the feature update will be more broadly available through Windows Update, and perhaps then the correct edition will install.
In the case the option to rollback isn't available, you'll need to go back using the full backup you've created before installing the update, and then try to upgrade one more time.
How to fix Chrome freezing after installing Windows 10 April 2018 Update
Although Microsoft is already working on permanent solution to fix the freezing problems with Google Chrome, in the Chromium community, Yang Gu from Intel Web Team, reveals that the problem can be traced to how the new version of Windows 10 works with Google's graphics engine (which is also used by Firefox).
The Chromium thread also says that this problem is only happening to devices running Intel's Kabylake processors, and you can use this workaround to prevent the browser from freezing using these steps:
- Close Chrome.
- Find the shortcut you use to open the browser.
- Create a copy of the shortcut.
- Right click on the new shortcut, and select Properties.
- Under "Target:," at the end of the line, add a space, and paste the following command flags:
--disable-direct-composition
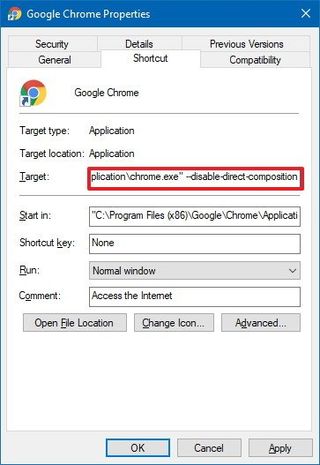
- Click Apply.
- Click OK.
After completing the steps, just double-click the modified shortcut to open Google Chrome, and moving forward it should not longer freeze.
Alternatively, you can open Chrome's settings at this location
chrome://settings/?search=hardware, and disable hardware acceleration.
How to fix File Explorer crashing on Windows 10 April 2018 Update
If you recently installed the Windows 10 April 2018 Update (version 1893), and File Explorer (explorer.exe) is constantly crashing, you're not alone.
A small number of users on Reddit and at the Microsoft community forums have been noticing the same problem, and it appears that it's issue caused by new Timeline feature that allows you to resume tasks you were working in the past.
While Microsoft hasn't officially acknowledged this as problem with the new version of Windows 10, a few users are claiming that File Explorer stops crashing after disabling Timeline using these steps:
- Open Settings.
- Click on Privacy.
- Click on Activity history.
- Clear the Let Windows sync my activities from this PC to the cloud option.
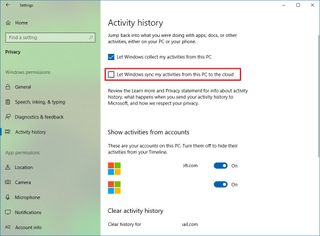
Once you've completed the steps, reopen the Settings app in the Activity history page, and click the Clear button. Hopefully, after disabling this feature, you'll no longer see File Explorer crashing constantly.
Alternatively, some users claim that creating a new Windows 10 account and moving your settings and files to the new account also fixes the problem.
How to fix networking problems on Windows 10 April 2018 Update
After successfully installing the Windows 10 April 2018 Update, there is a chance that your device may not be able to connect to your Wi-Fi network after reboot automatically, or you may not be able to make consistent Internet connections.
Usually, networking problems can be caused by a number of things, such as a bug in the new release. The upgrade process may have changed or reset your network settings. Or it could be a problem with the network adapter driver, among other reasons.
While finding and fixing a network problem can be a complex task for many users, the best way to deal with these issues is using the network troubleshooter tool to fix the problem automatically.
- Open Settings.
- Click on Network & Security.
- Click on Status.
- Under "Network status," click the Network Troubleshoot button.
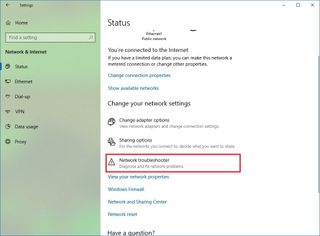
- Follow the on-screen directions.
If the troubleshooter didn't fix the problem, you can reset all your network adapters using these steps:
- Open Settings.
- Click on Network & security.
- Click on Status.
- Click the Network reset button.
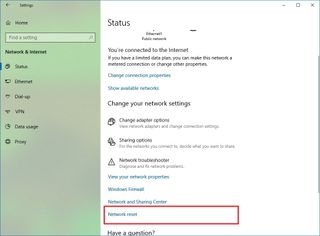
- Click the Reset now button.
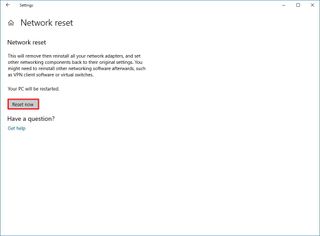
Using this process, Windows 10 will automatically reinstall every network adapter that has been configured on your device, and it'll reset your network settings to their default options.
If you're still having networking issues, use our guide, which includes a comprehensive set of instructions to get you back online quickly, including the steps to reinstall the network adapter driver.
How to successfully install the Windows 10 April Update
Usually, moving to a new release of Windows 10 is a smooth process, but because developing an operating system that runs across thousands of different hardware configurations isn't an easy task, at least in the early days, hiccups during and after the installation are common.
However, there are several steps you can follow to reduce the chances to come across errors as you upgrade to the April Update.
Create a full backup
Although there's a built-in mechanism that can automatically restore the previous version of Windows 10 if something goes wrong, you can't expect that it'll work all the time. As a result, it's very important to create a backup of your entire computer to have a way to roll back in case something goes critical wrong while installing version 1803.

Luckily, Windows 10 includes a tool to quickly create a system image that includes everything you need to recover your computer, including installation, apps, settings, and files.
If you don't know how to do this, you can use our guide to create a full backup of Windows 10.
Remove unnecessary apps
Incompatible and outdated applications are one of the main reasons an upgrade may fail. The best way to stay ahead and prevent these problems is to uninstall those apps you don't use and those that are likely to cause compatibility conflicts. Usually, you want to remove older classic desktop programs and security tools before clicking the install button.
To uninstall apps, anti-malware, and other security software on Windows 10 is an easy process, just do the following:
- Open Settings.
- Click on Apps.
- Click on Apps & features.
- Select the app you want to remove, and click the Uninstall button.

- Click the Uninstall button again to confirm.
If you're removing a classic desktop application, you may need to follow additional steps to complete the process. In the case that you have multiple incompatible applications, repeat the above steps to remove them.
In addition, you may want to consider (temporarily) removing any third-party antivirus and security tools to prevent potential problems during the installation. (It's assumed that you understand the that leaving your computer unprotected isn't recommended.)
If you're using the Windows Defender Antivirus, you can temporarily disable its real-time protection to proceed with the upgrade process.
- Open Windows Defender Security Center.
- Click on Virus & threat protection.
- Click the Virus & threat protection link.
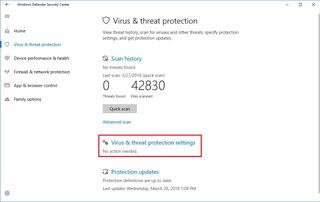
- Turn off the Real-time protection toggle switch.
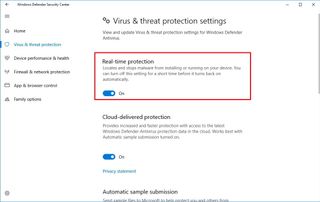
Once the April Update installs on your device, the real-time protection will reactivate automatically. After the upgrade, you can also install any other third-party malware solution you want.
Disable firewall
The Windows Firewall or any other firewall can also be the reason for problems and errors during the upgrade process to a new version of Windows 10. Before the installation, make sure to disable your firewall.
You can disable the Windows Firewall using these steps:
- Open Windows Defender Security Center.
- Click on Firewall & network protection.
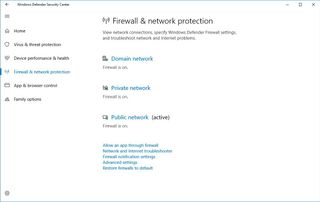
- Click the Domain network link.
- Turn off the Windows Firewall toggle switch.
- Click the Private network link.
- Turn off the Windows Firewall toggle switch.
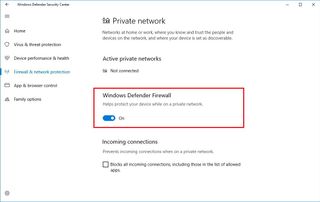
- Click the Public network link.
- Turn off the Windows Firewall toggle switch.
Remove any update blocks
If you've been making custom configuration changes to your installation, before trying to upgrade, make sure to remove any block that will prevent Windows Update from downloading the new version.
Although there might be many configurations that you may have applied to your computer, you can follow these steps to find out if you're not blocking the April Update:
- Open Settings.
- Click on Update & Security.
- Click the Advanced options link.
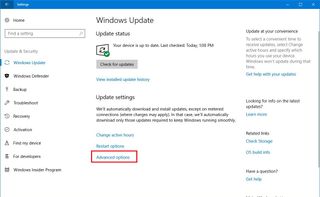
- Under "Choose when updates are installed," make sure that settings are configured to Semi-Annual Channel (Targeted) and 0 days for both of the deferred options.
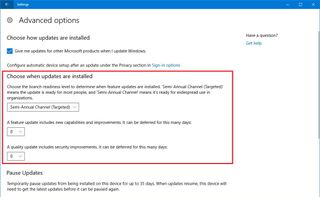
Additionally, you want to make sure that the Pause Updates toggle switch is turned off.
Disable metered network connections
When you have a Wi-Fi or Ethernet network connection set as metered, Windows 10 automatically prevents your device from getting big feature updates. If you want to upgrade to the latest version as soon as it becomes available, you want to disable any network connection set as metered.
If you're connected to the internet with a limited data plan, make sure you have enough data available in your account or connect to an unlimited network connection before proceeding.
To disable a metered connection, do the following:
- Open Settings.
- Click on Network & Security.
- Click on Wi-Fi or Ethernet.
- Click the network connection.
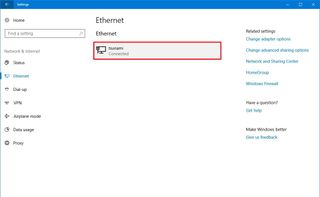
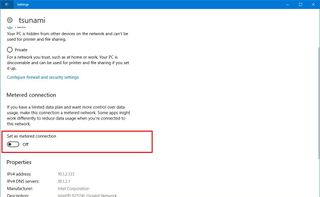
- Turn off the Set as metered connection toggle switch.
Disconnect unnecessary peripherals
During the installation of a new version of Windows 10, you may also come across problems as a result of incompatible hardware connected to your computer.
In order to avoid problems, it's always a good idea to disconnect non-essential devices before the upgrade. This includes disconnecting removable storage peripherals, such as USB flash drives, SD cards, external hard drives, printers, scanners, adapters, and Bluetooth devices.
During the installation process, you only need a keyboard and mouse, monitor, and an internet connection. Once the installation completes, you can reconnect all your devices to your computer.
Use a clean installation
If you've already followed all the best practices and tips, and you're still unable to upgrade your computer, you should consider performing a clean installation.
A clean installation takes longer, but it deletes everything on the primary hard drive, and installs a fresh copy of Windows 10 with the April Update that can help to improve performance and resolve many issues in your current installation.
The easiest way to start from scratch is to use the Media Creation Tool to prepare a USB bootable media, which you can use to boot your computer and install Windows 10. If you don't know the steps to start, we have you covered with our guide that will walk you through every step of the way to perform a clean installation.
Wrapping things up
Although the new version of Windows 10 is now available to the masses with a slew of new changes and new features to improve security, performance, and productivity, be aware that during the initial rollout there might be still some unknown bugs and compatibility problems.
In the case you're thinking on upgrading to version 1803 as soon as it launches, before pushing the install button, consider that the best way to upgrade is to wait until it becomes available automatically through Windows Update.
As a result of potential issues, Microsoft usually begins rolling out new feature updates slowly to devices known to work correctly with the update and blocks the rest. Then after the new version goes through more testing, it'll expand more broadly to other devices.
Did you have any problems installing the April Update? Did you find a solution? Let us know in the comments.
More Windows 10 resources
For more helpful articles, coverage, and answers to common questions about Windows 10, visit the following resources:
- Windows 10 on Windows Central – All you need to know
- Windows 10 help, tips, and tricks
- Windows 10 forums on Windows Central
Mauro Huculak is technical writer for WindowsCentral.com. His primary focus is to write comprehensive how-tos to help users get the most out of Windows 10 and its many related technologies. He has an IT background with professional certifications from Microsoft, Cisco, and CompTIA, and he's a recognized member of the Microsoft MVP community.

