Hi folks,
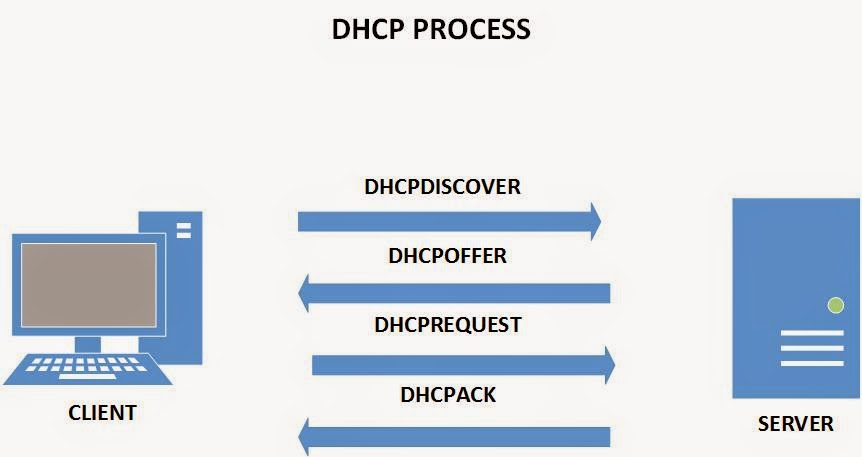
In the previous article we’ve configured a CentOS machine and installed the DHCP package. We’ve then created a sample configuration file for our machine, but we haven’t finished deploying our DHCP server yet. In this article we’ll finish our configuration and hopefully, we’ll be able to obtain an IP address lease from our DHCP machine. Note that all these configurations will be made in my virtualized environment by using two Virtual Machines (a DHCP server and a DHCP client).
Now that the sample configuration file has been copied in our install directory, open the dhcpd.conf file using your favorite editor. I’ve edited the file and kept only the information that we require for our server. The file should look similar to:
authoritative;
ddns-update-style none;
option domain-name “ppscu.com”;
option domain-name-servers 10.10.10.1; 127.0.0.1
option routers 10.10.10.1
default-lease-time 600;
max-lease-time 7200;
subnet 10.10.10.0 netmask 255.255.255.0 {
range 10.10.10.150 10.10.10.200;
}
The #sign is used to comment lines so whatever is written after this character is not executed. It’s important to put the “;” symbol at the end of each line.
I will try to explain each parameter used in our configuration file:
- authoritative – an authoritative server will respond to requests coming from clients that are part of the same subnet. Simply put, if a client from a subnet that was not configured on the DHCP server requests an IP renewal, the DHCP server will send DHCP NACK messages forcing the client to release its IP configuration.
- ddns-update-style none – disables dynamic DNS
- option domain-name “ppscu.com” – sets the domain name of the DHCP clients
- option domain-name-servers 10.10.10.1 – sets the DNS servers used by clients
- option routers 10.10.10.1 – configured the network routers
- default-lease-time 600; and max-lease-time 7200; – the number of seconds a client can hold its IP allocation before submitting a renewal
Note that if we include these settings in the subnet configuration section, the settings will only be applied to that particular subnet. In this example we’ve configured these settings for the whole server thus all subnets configured on this machine will carry the same settings.
- subnet 10.10.10.0 netmask 255.255.255.0 { – the subnet in which the DHCP server operates
- range 10.10.10.150 10.10.10.200; } – the pool of IP addresses used by DHCP clients
After we’ve finished our configuration, it’s time to test the configuration file for errors by typing dhcpd -t. If there are no errors received, the DHCP daemon can be started. You can verify its status by typing service –status-all | grep dhcpd
![]()
Start the DHCP daemon by typing /sbin/service dhcpd start. You can stop it by typing: /sbin/service dhcpd stop
If you type ps -el | grep dhcpd, you should be able to see the daemon running on your machine. If you have any problems with the server at this point, type service dhcpd restart to restart the DHCP daemon:

We can also check if the server listens on UDP port 67 by typing netstat –paun
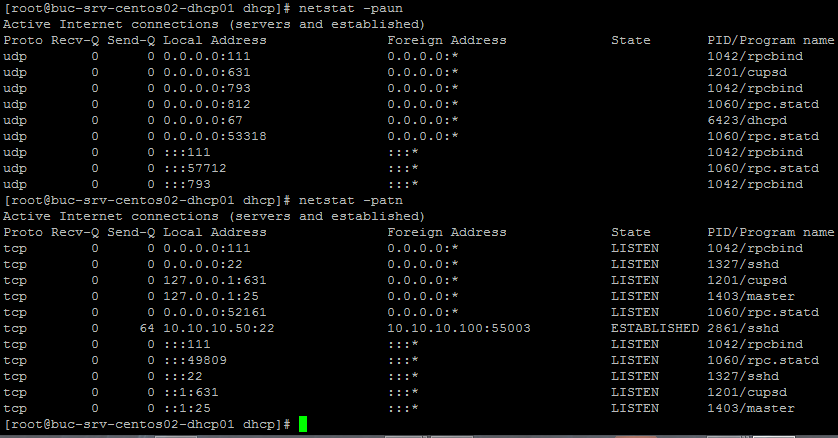
p = display PID/Program name for sockets; a – all; u – show only UDP ports; n – numeric
———————————————————————————————————————
CLIENT CONFIGURATION
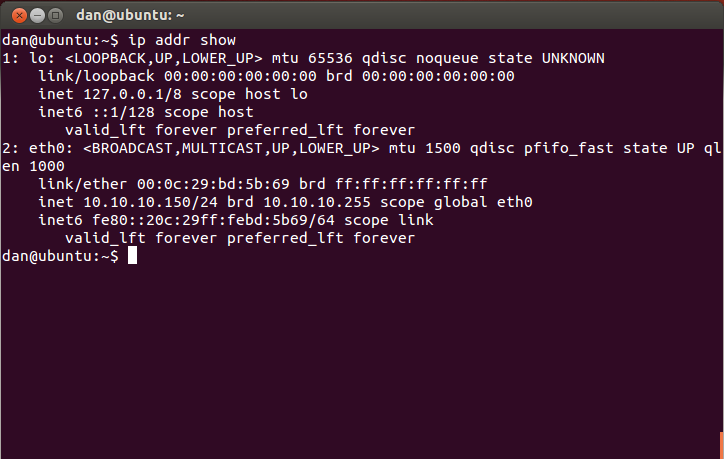
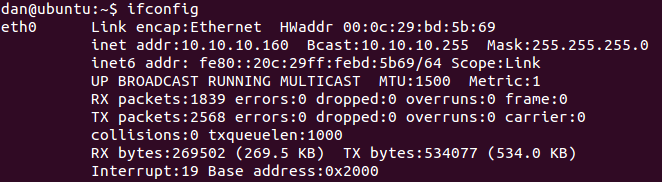
On the client side, you will need to type dhclient [interface name]to configure the DHCP client to listen on the specified interface. After this step is complete, if you typeifconfig orip addr show, you should be able to see the leased IP address:
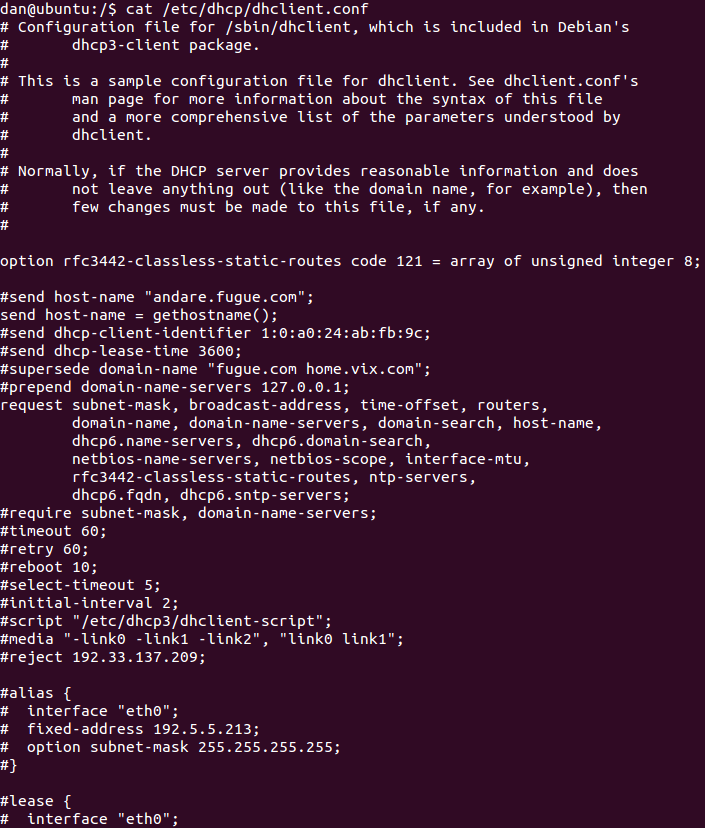
The dhclient configuration file is stored in /etc/dhcp/dhclient.conf. By editing this file, we can set custom settings for the DHCP client:
The database of the DHCP client is stored under /var/lib/dhcp/dhclient.leases
Here you will be able to see all the DHCP data the client has received from the server.
———————————————————————————————————————
If we return on the DHCP server, we can check out its database in which the leased IP addresses are stored which can be found in /var/lib/dhcpd/dhcpd.leases. Execute cat /var/lib/dhcpd/dhcpd.leases to view its content:
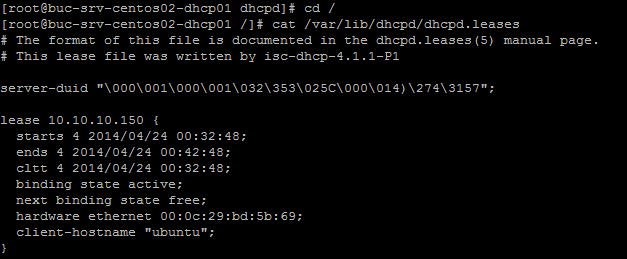
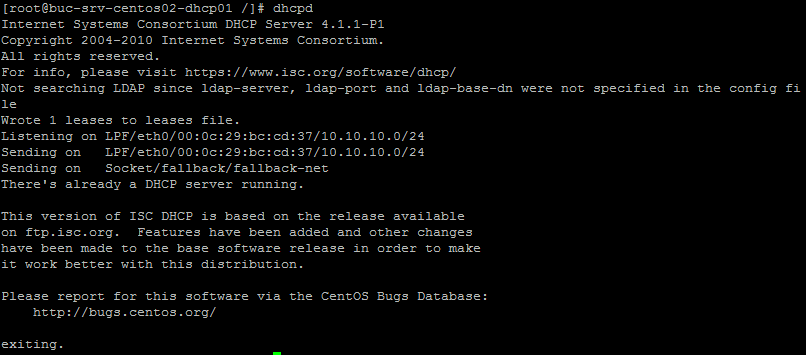
By checking this file we can also verify what IP addresses have been leased to our DHCP clients. The number of leased IP addresses can be easily viewed by typing dhcpd once the daemon has been started:
If we want to reserve a specific IP address for a DHCP client, we’ll need to type in the following:
host ubuntu1 { host identification within the dhcpd.conf file
hardware ethernet 00:0c:29:bd:5b:69; – MAC address of the host
option domain-name-servers 10.10.10.1; – specific DNS servers used by this host (optional parameter)
option routers 10.10.10.1; – specific gateway used by the host (optional)
fixed-address 10.10.10.160; – host’s reserved IP address
}
Once you’ve made this configuration, restart the DHCP daemon by typing service dhcpd restart. On the client side, we’ll need to disable/enable the network interface by typing ifconfig eth0 down followed by ifconfig eth0 up.
Another method of renewing the leased IP address is by typing: sudo dhclient -r eth0 followed by sudo dhclient eth0.
If there are no problems on the server, the DHCP client will renew its IP address:
We can further modify our dhcpd.config file to set custom settings for a group of DHCP clients by adding the following entries:
group {
option domain-name-servers 10.10.10.1; – global settings applied to this group of hosts
option routers 10.10.10.1;
host ubuntu1 { 00:0c:29:bd:5b:69; } – each DHCP client with its corresponding MAC address
host ubuntu2 { 00:0c:29:bd:5b:70; }
host ubuntu3 { 00:0c:29:bd:5b:71; }
}
As you’ve seen in this article, the DHCP client-server configuration it’s pretty easy to understand once you’ve learned the basics for this service. We’ve now finished our DHCP deployment with a server capable of offering dynamic IP allocation to our network hosts. We’ve also tested that the lease works by configuring a DHCP client. Hope this article will serve you well in understanding how to deploy a DHCP infrastructure on Linux machines. Wish you a great day and hope you’ll visit us soon to check out our latest articles.