By College Tourist; Author: Veronica White, University of East Anglia
"It's dark out" is no excuse to put your camera away. Nighttime photo safaris are an exciting way to explore a destination whilst at the same time capturing some amazing photos.
Whenever I travel, I often take at least one night during the trip to go on a "nighttime photo safari." I love walking around big cities with my camera or exploring nature with the night sky above me. Here, I've put together 8 essentials for taking Instagram-worthy night travel photos that I've learnt in the last few years. Whilst most of these tips are aimed at DSLR users, the general rules still apply to people shooting with point-and-shoot cameras or phones. Before we start however, a quick safety note: whenever I go out to take pictures at night in an unfamiliar place, I always make sure I have a friend (safety in numbers) and a fully charged phone (in case I get lost). Now it's time to grab your camera and get out there after the sun has set to take some awesome photos!
1. Shoot in RAW Mode
One of the most important things to do before you start your nighttime photo safari is to switch from shooting in "JPEG" mode to shooting in "RAW." Unlike JPEG photos, RAW photos are uncompressed and therefore give you much more room to make adjustments in post-production (you may need to some free download software onto your computer before it can read the RAW files). Some of the aspects I almost always correct in post-production include contrast, highlights, shadows, sharpness and white balance.

Light trails on the Brooklyn Bridge in New York City, USA. Shutter speed - 1.3 seconds.
2. Bring a Tripod
One of the most frequent reasons for blurry night photos is camera movement. This can drastically be reduced if you use a tripod. Attach your camera to the tripod, carefully press the shutter release button and then do not touch the camera again until the photo has finished being taken. You don't worry about lugging around a bulky tripod as there are many foldable ones that are perfect for travelling! To further reduce any camera shake, you can use a remote to take the photo or set a timer on your camera to avoid touching the camera body at all.
3. Shoot in Manual
Before you attempt to do a photo safari after the sun has set, make sure you know your camera -- one of the most annoying things is trying to change settings on your camera when you can't even see the buttons! By shooting in manual mode instead of automatic you have full control of all the settings. These are the three most important ones you need to pay attention to:
- aperture: use a low f-stop (= lens wide open) in order to let a lot of light into the camera and produce a nice blurred background
- ISO: whilst you may be tempted to use a very high ISO as a way to increase the overall exposure in your photo, this will cause the final image to be very grainy, so try to stick to ISO 800 or lower. Of course, if your photo is still too dark after adjusting the other settings, you can resort to increasing the ISO to get the correct exposure.
- shutter speed: refers to the amount of time which the shutter is open -- a longer shutter speed will let more light onto the sensor and therefore, the photo will have a brighter exposure. At night, when there isn't much light, play around with longer shutter speeds until you find one that best suits the situation you're in. If you're looking to capture light trails from moving traffic, shutter speeds of over 2 seconds usually work best.
4. Find a Unique Angle
The cliché shots of iconic landmarks have all been taken before, so it's up to you to find a unique viewpoint or angle to add your own touch to the photo. To add some spice to your photograph, try getting down low and looking up, finding somewhere tall to stand on, placing something unusual in the foreground of the photo or just simply changing the angle you're holding the camera.

Changing the camera angle on Tower Bridge in London, England. Shutter speed -- 4 seconds.
5. Bring a Flashlight
When I go out to shoot at night, I always make sure I have a flashlight, for two reasons. To begin with, having a flashlight handy will help when setting up the shot. You can use the extra light to help scout out a location for your tripod and change settings on your camera. Additionally, instead of using the camera's flash, I often use an external flashlight to "paint" away the shadows and highlight the foreground for photos with long exposures. In the photo below, I lit up the trees using a flashlight so that the detail can be seen in the final image.
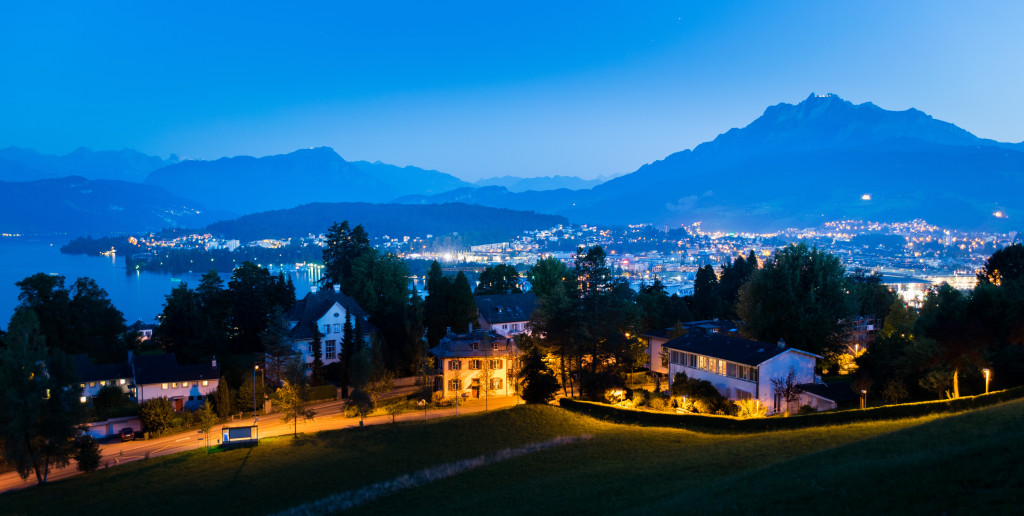
6. Get Up High
Try to find a location with a high elevation in order to capture nighttime cityscapes. This can be from a nearby hill or viewing point or even a tall building in the city. Whilst this suggestion doesn't only apply to night photography, views with sparkling city lights are often times more dramatic than daytime shots.
7. Be Patient
The perfect nighttime shot isn't something you're going to get right on the first try, it may take a few attempts before you get the exposure and motion blur correct. Whilst it may be frustrating repeating the same shot over and over again to get everything right, don't give up! I know this sounds cheesy, but it's completely true -- the more you practice, the better you'll understand the camera settings and the quicker you'll be able to set up your next shot. Consider bringing a tablet along with you on your photo safaris in order to preview the photos on a bigger screen whilst you're still shooting. This can help you avoid simple errors like unfocused subjects that are often times hard to see on the small screen on your camera.
8. Dress Warm!
One of the most annoying things that's happened to me during a nighttime photo safari was being absolutely freezing whilst shooting. Not only is it uncomfortable, but attempting to change the settings on your camera whilst your fingers are completely numb is not an easy task. Although daytime temperatures may be warm where you are, temperatures can drop quite surprisingly at night, and you may get cold whilst waiting around for the pictures to take. If it's winter, make sure you bring a decent pair of gloves to keep your fingers warm in between shots.
Fun night photo shoots for you to try:
- Painting with light: using a long shutter speed, move a light source within the photo frame in any way you want, whether that be to write your name, draw a heart or just scribble on the photo. Common methods of light painting are with sparklers and flashlights.
- Star trails: these require a lot of time and patience as the shutter has to be open for a long period of time to get a good sense of movement in the stars. Whilst it's possible to see slight blur with even just a 45-second shutter speed, to capture actual trails, put the camera on "Time," click once to open the shutter, wait at least 5 minutes and then click again to close the shutter. To take the middle photo below, I had the shutter open for about 12 minutes! This technique takes some experimentation, so don't expect to get a great photo the first time you try.
- Carnivals and amusement parks at night: shooting at a carnival or amusement park is lots of fun. Try to capture the colourful lights and the crazy movement of the rides.
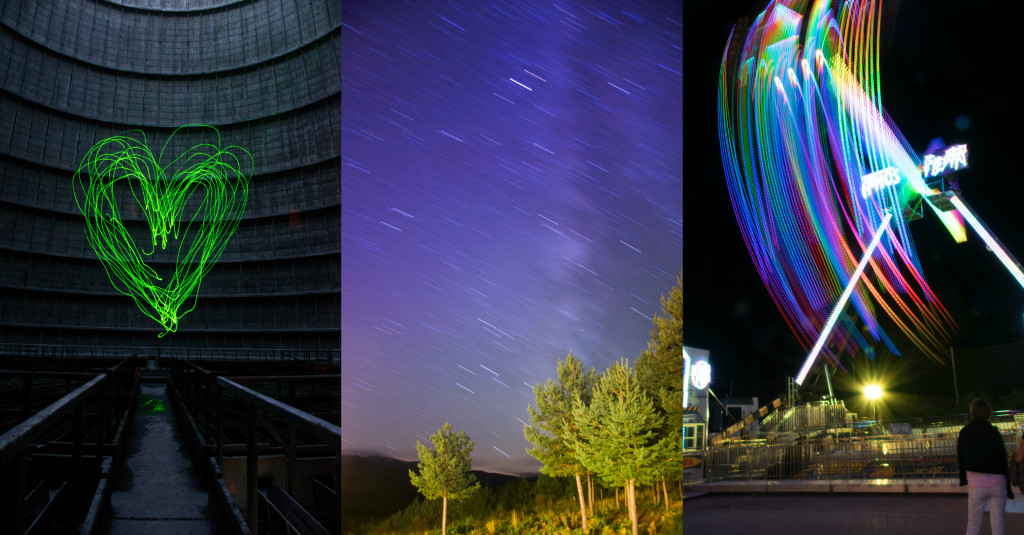
Left: Painting with light in an abandoned cooling tower outside Charleroi, Belgium. Shutter speed -- 20 seconds Middle: Star trails and the Milky Way in Gredos, Spain. Shutter speed -- 12 minutes. Right: Fun light trails at Luna Park in the South of France. Shutter speed -- 2.5 seconds.
All of the photos in this post were taken on my Nikon D5300 with a 18.0-140.0mm f3.5-5.6 lens and were edited using Adobe Lightroom or the Photogene4 app on my iPad/iPhone.
Read more student travel stories at The College Tourist
Follow The College Tourist on Facebook and Instagram