
7 - 7Shares
Nixplay is excited to present the first in-depth article of Explore More, a series of content pieces that revolve around unique photo-taking adventures, creating moments and chronicling memories. Be creative, try something new and Explore More. Stay tuned throughout 2018 to further unleash your sense of adventure and love for photography.
Special Note: This is the second part of a special series; part one provides you with a cosmic calendar of all the marvels that the world of astronomy presents for 2018 and helps you set your coordinates to increase your chance in witnessing shooting stars, eclipses, planetary alignments and everything in-between.
2018 is setting out to be an exciting year for all space buffs that are fascinated with a galaxy far, far away and we don’t mean the latest Star Wars movie. The year has already started out with a big bang thanks to the appearance of the year’s first supermoon on none other than New Year’s Day, a phenomenon that allows space geeks to see the moon 14% larger and 30% brighter, making it one of the easier space events to photograph. Yet, although we live in an age of smartphones where some take a selfie as soon as they stumble out of bed, space photography remains elusive in the eyes of many. In the second half of our space odyssey, we discover tips and tricks that will shine a light on the possibilities and relative ease in capturing that intergalactic masterpiece.
Eclipses and Planets
You may still remember August 21, 2017 , where a large chunk of the US population was exhibiting strange behavior by looking up at the sun. No, they were not out there to work on their tans, but a totality, a complete eclipse where the moon completely blocked out the sun. Gasps and cheers were ambient reminders of the excitement many experienced. Although this didn’t resonate across the animal kingdom with many wondering around very confused indeed. Animals aside, if you were watching the news back then, you would have seen people around with smartphones to capture this momentous occasion, except many struggled to get a perfect shot.
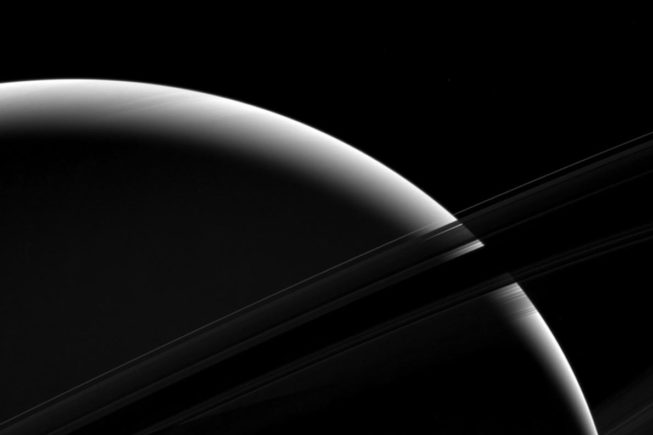
Saturn with its rings taken by NASA JP-Caltech Space Science Institute.
For those in the know, one of the more widely used methods to capture this beauty involves a telephoto lens and whilst it may sound like a mad scientist’s experiment, it’s much easier to use than you may think. There are two avenues to pursue to capture a good quality, presentable image of planetary sightings (depending on what planet, time of year and how far away from the sun it is) and eclipses – either with a DSLR camera or smartphone.
The superior method that can create that money-making shot, quite literally, is by using a DSLR camera. Your gear needs to be complemented by a telescope and telephoto lens, especially if you want to get close-ups that go as far as detailing the surface of the object being eclipsed. The ideal range that the focal range should be is 500 to 2,000mm, with a Barlow lens or 2x teleconverter giving it the extra boost. It is very easy to get carried away in all the fun and excitement of new, shiny, heavy equipment, we know. This is compounded with the fact that most cameras have smaller APS-C sensors, which basically are smaller than the standard film frames, causing the camera to focus on a smaller surface area and cropping out the edges. You would need to either use a focal reducer or using a telescope with a lower focal length.
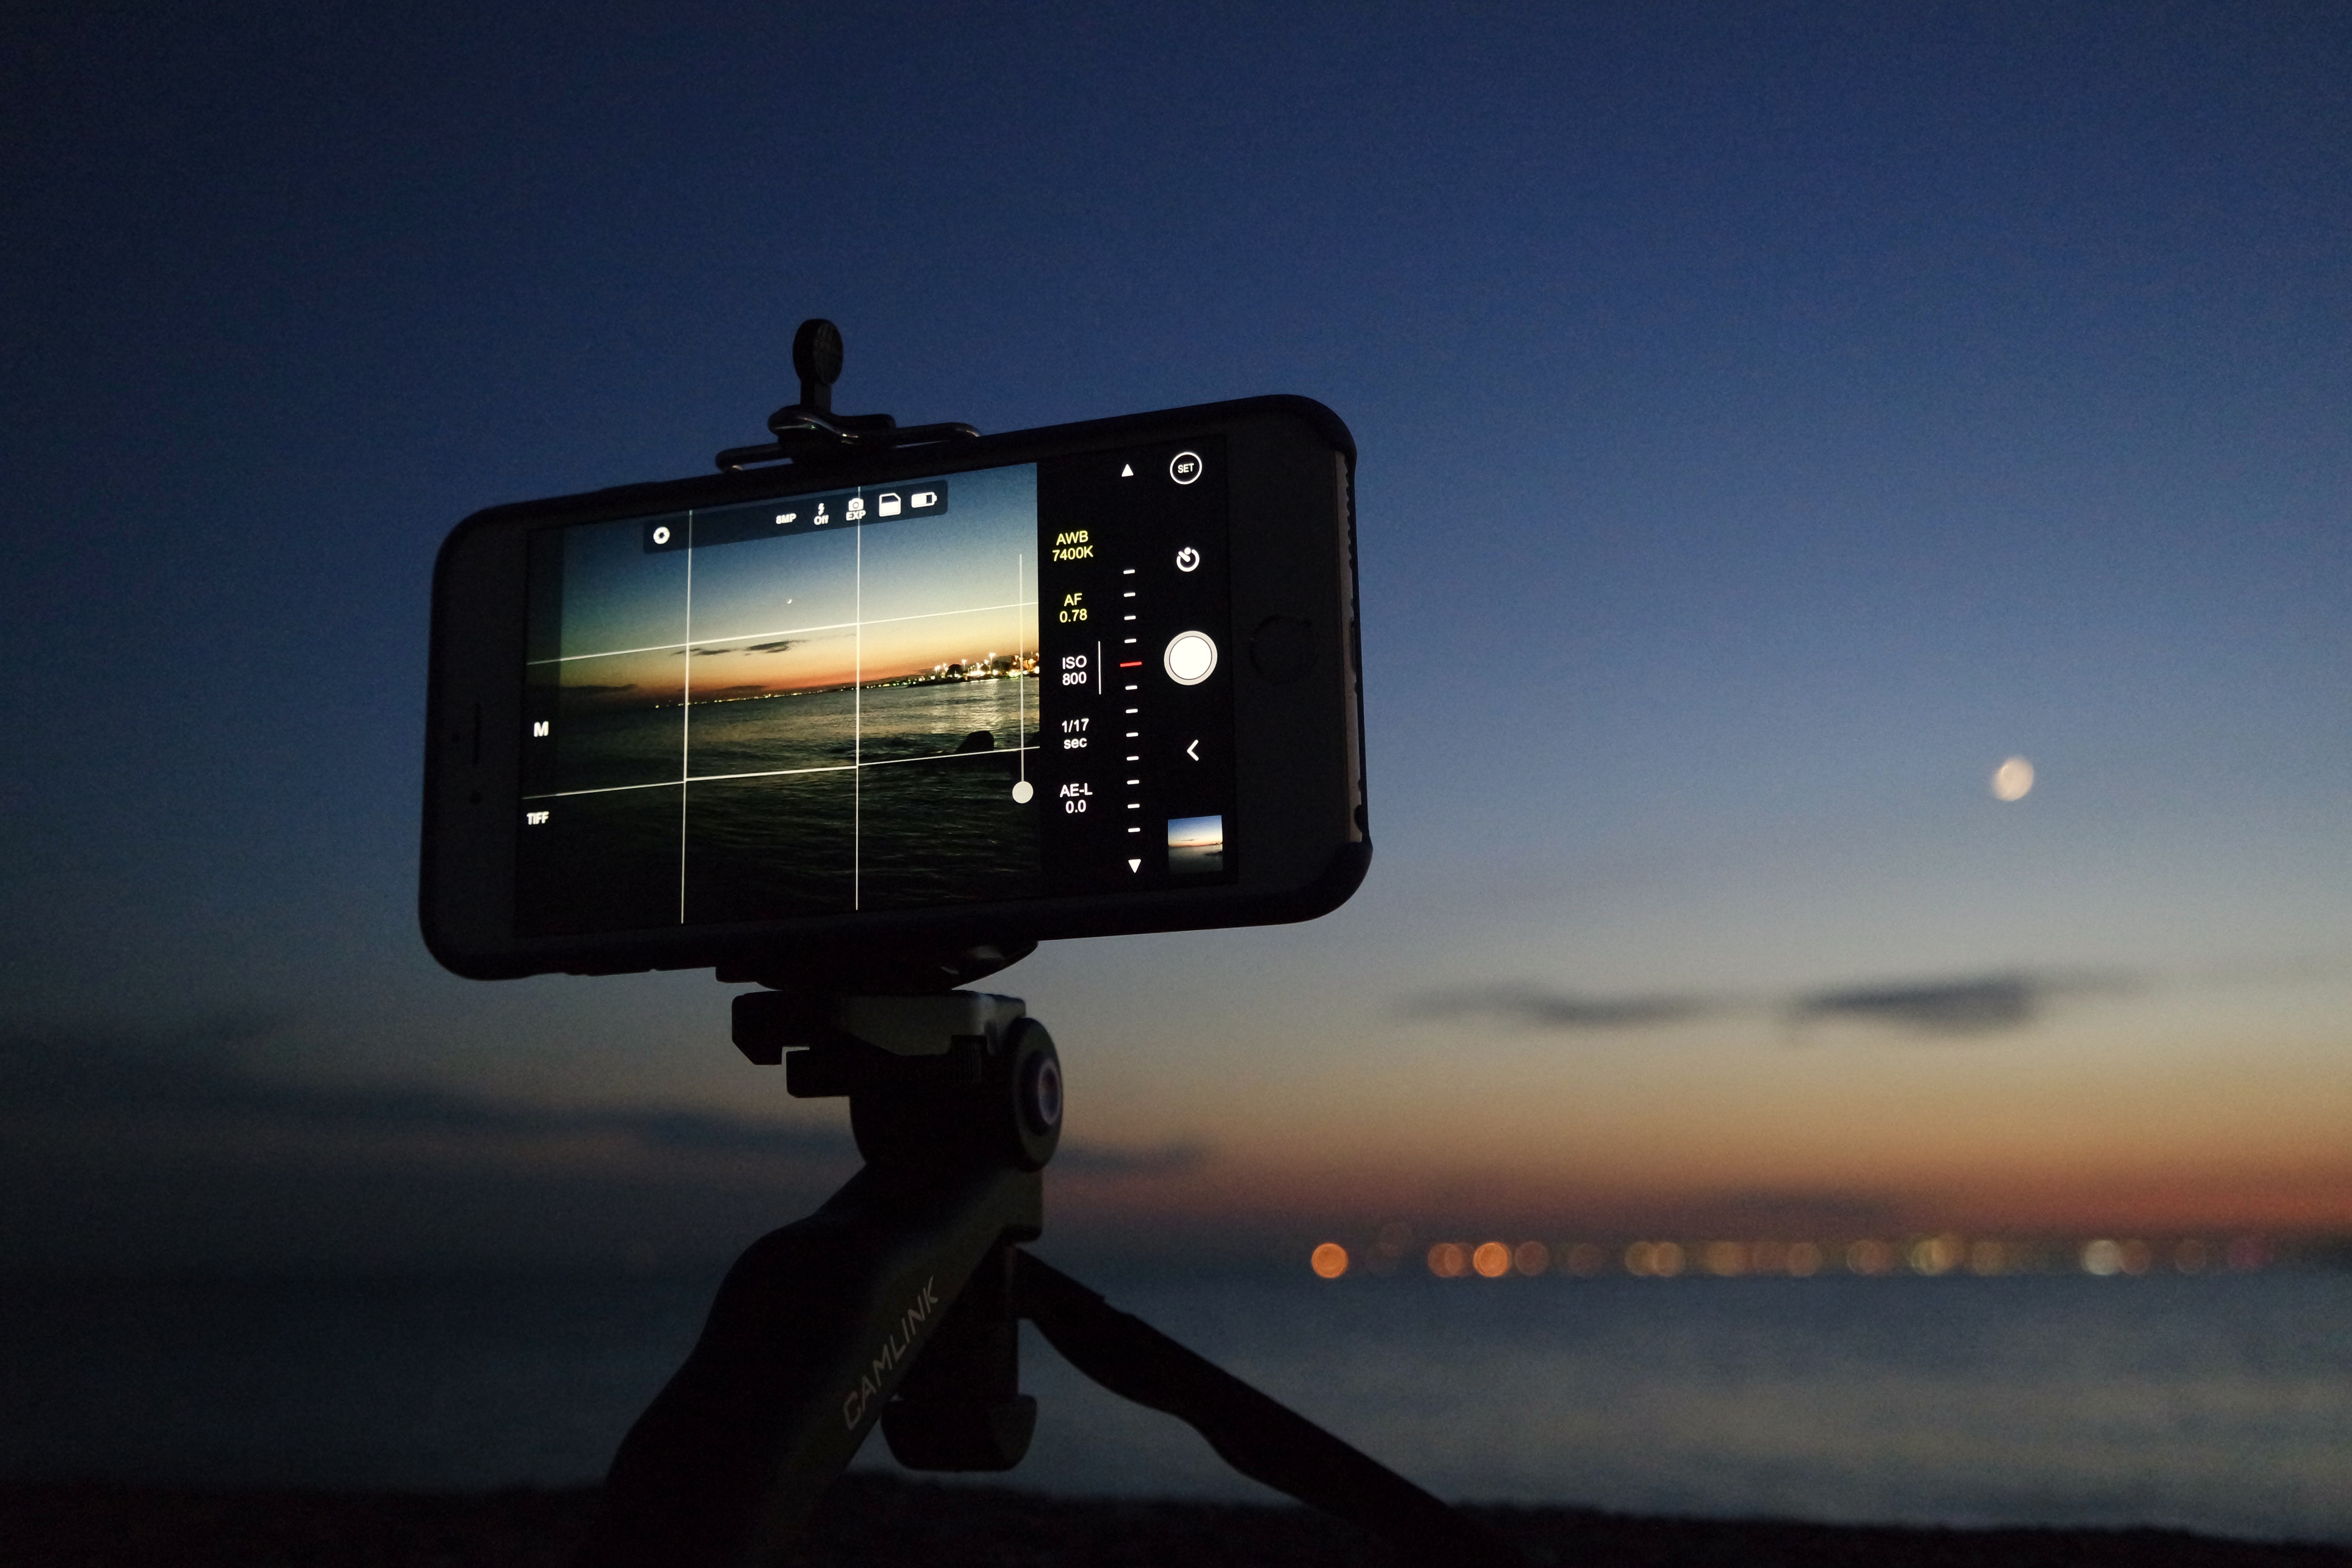
For folks that don’t want a workout with bulky, expensive equipment, lunar eclipses should be your go-to choice. Whilst it would obviously not allow you to get the most out of your shot, it’s still a method that will help you to capture the eclipse, in focus, which could turn out to be a good piece to add to an album. This doesn’t mean that you can aim your camera directly at the eclipse and hope for the money shot. Far beyond anything of value, you’ll be hard pressed to figure out whether it’s a picture of an eclipse or one that was set off accidentally whilst your phone was in your pocket. ‘Afocal projection’ is the go-to mobile method. Whilst the term may make your sincere writer sound smarter, all it means is that you point your camera right into the eye-hole of a telescope and it should be able to amplify the image to a good, presentable size. You would need to hold the camera steadily or on a tripod, ensuring that the moon looks to be in the center of your camera.
Seeing as eclipses are not fully static, the best practice is to ensure you move the camera every 1.5 minutes. Be sure to keep checking the images that you are capturing; if you start seeing black edges around the photograph, it means that you’re holding the camera too far away from the telescope’s eyepiece. Zooming in slightly is fine, but make sure you don’t zoom in too much – that low-resolution graininess is an enemy of the photographer. Of course, as the technology within phones develops, including their inbuilt cameras (think Huawei) these will only be getting clearer and crisper.
Your checklist should include a spare batter or portable charger at hand (for most eclipses a charged phone or camera will be enough due to them usually not being much longer than 7.5 minutes) and as Anthony Aveni, an astronomer and anthropologist writes in his new book, ‘In The Shadow of the Moon’, you only have 2 minutes and 40 seconds to capture that perfect picture during eclipses.
Comets and Shooting Stars
When it comes to comets and shooting stars, your job may get a bit more difficult. Characterized by their rapid movements across a larger plain to the frustration of even some of the most-famous astronomers that have walked this earth, including David H. Levy: “Comets are like cats; they have tails, and they do precisely what they want.”
Levy’s description stems from the fact that unlike eclipses, the moon and other planets, shooting stars and comets are moving objects that can cover a large plain. To conquer this issue, wide angle lenses with a large aperture are vital, even when the light is not very vivid – f/2.8 and below (which means faster) would be an appropriate. An f/28 would be good with an ISO 2000. A wide-angle lens would increase the probability of covering a greater territory, thus increasing your chance of a getting the right shot, at the right time – 20mm to 50mm is the range that most photographers go for.
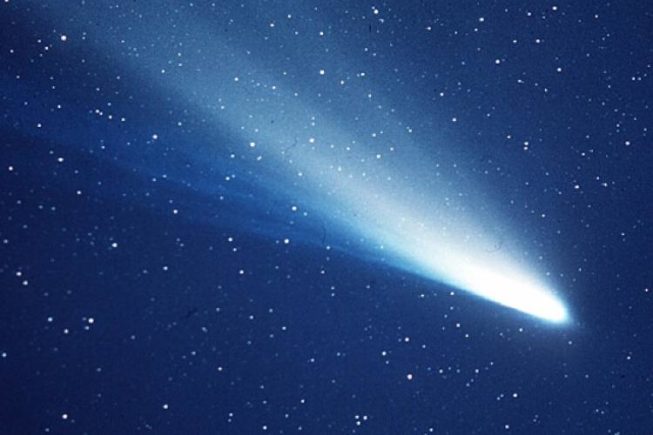
Debris from Halley’s comet causes the annual Orionid metoer shower. Photo by NASA/ESA/Max-Planck-Institute for Solar System Research.
Due to the motion of shooting stars and comments, a good idea would be to preset your camera. That is, unless you have titan fingers of steel and the dedication of a warrior – mostly since there are no warning bells and you cannot precisely calculate the time down to the minute, yet alone seconds in which they take place. The safest bet is to set your camera to capture photos automatically, to which an extension is needed. Known as the intervalometer, it sounds like a prop taken out of a superhero movie, but acts as a cable release that does the photo-shooting for you, with all the appropriate settings pre-programmed onto your camera – including the length and exposure and timing between shots. Finally, like with eclipses, a tripod is needed for stability.
Some may not have or want to spend money on expensive camera gear and the good news is that these lovable moving rocks can be admired and recorded by anyone from your 6-year-old to your grandmother with the help of that little-known device, the smartphone. A good tool to use would be to download an app called ‘NightCap Camera’ and once in can switch on meteor mode that automatically adjusts the settings for you to the best possible for the purpose. This nifty addition helps you take around 750 photos with a 5 second exposure time. Undeniably, like photographing eclipses, moon(s) and planets the pictures will be no-where near as good as on a DSLR, but despite their movements, shooting stars and comets would be easier to capture due to them being easier identified in the night sky even with the naked eye.
Comets are like cats; they have tails, and they do precisely what they want.
David H. Levy, Astronomer, science writer and discoverer of comets and minor planets
Yet again, the shooting environment is the most important aspect. Werewolves away, you need to make sure that the moon is not out, as having it there would only decrease the probability of photographing these shooting stars by 50%. Also, having multiple cameras is an even safer bet if you’re serious – the old phrase strength in numbers rings true here. Confusion can arise with airplanes and satellites; they’re a very real presence and many amateur photographers often confuse the two. As silly as this may sound to some, but having a search for some images of each would help you most to prevent dud shots.
The best way to make sure you’re thoroughly prepared and if you have time, try practicing. Lightening and flying rocks in our galaxy may have nothing in common, but is a great way to practice capturing strokes of light in the night sky. Again, if you are going to try, make sure you stand in a more sheltered place – your safety is our priority. Still confused or think that this is a job that only Albert Einstein is qualified to do? Don’t be, here’s a step-by-step to help you:
- Check the weather, making sure it’s clear and isn’t on a night whether and where the moon is out in force.
- Pack your camera gear including the tripod, spare batteries and a nice chair and snacks as you’ll probably be out there for an hour at the very least.
- Find a dark spot that has no light pollution. If you have coordinates as to where best to view the solar event, make sure it’s an appropriate location.
- Set your camera up in the right position, facing the correct side depending on where the object is.
- If not already, make sure your camera is set to the correct settings: aperture open, shutter speed on B/ Bulb and a manual lens control.
- Attach your intervalometer if you have one
- Align the infinity mark on the lens, and ISO to either 800 and 1600. This can be changed easily if it’s off during your test run
- Test out the gear to make sure it works and your sample shot is in focus and has the appropriate exposure settings (20-30 seconds is the usual range)
- Wait for the event to kick-start your career in taking space photos and most importantly, enjoy this unique experience!

Bea is Nixplay’s Social Media Manager. She enjoys drinking coffee, reading about wars, and writing stories. Send her a message at beatrice.bisais@nixplay.com.
- 7Shares
7