Shelley Hanna is an executive creative director in the animal health field and a fine artist who paints still life and animal portraits using traditional oil techniques with brush and stylus on canvas and iPad.
She was recognized for her artistic abilities at an early age and was fond of portrait painting in acrylics, drawing in graphite and doing animal studies in scratchboard. After starting a career in advertising, art took a back seat for a couple decades. At the beginning of 2017, she picked up brushes again learning to paint in oil and is now enjoying a newfound interest in her first love – painting.
iPad Art by Shelley Hanna
Keep reading to learn more about these paintings!
What kind of artist are you?
I consider my style to be realism. This was somewhat unpopular when I went to university as the emphasis was on contemporary/abstract art. Because of this I struggled to find my artistic voice and tried many other styles that didn’t suit me. I lost my passion for art until I recently when discovered that realism had come back into favor.
I prefer portraits of people but also do a lot of pet portraits, which are basically furry people to me.
I’m finding a huge appreciation for still life which I never liked painting before and am also dabbling with landscape painting which is my biggest challenge.
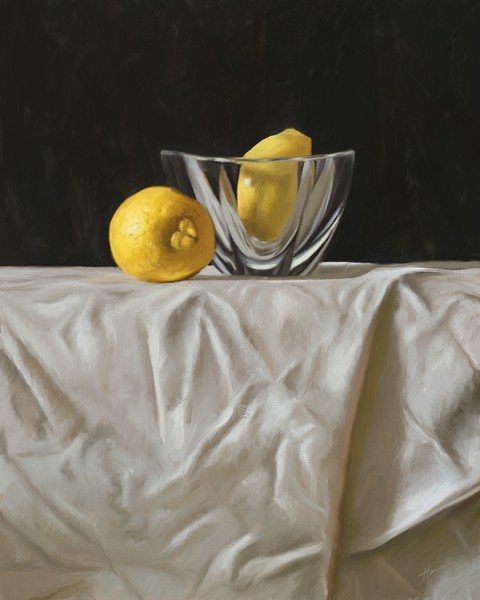
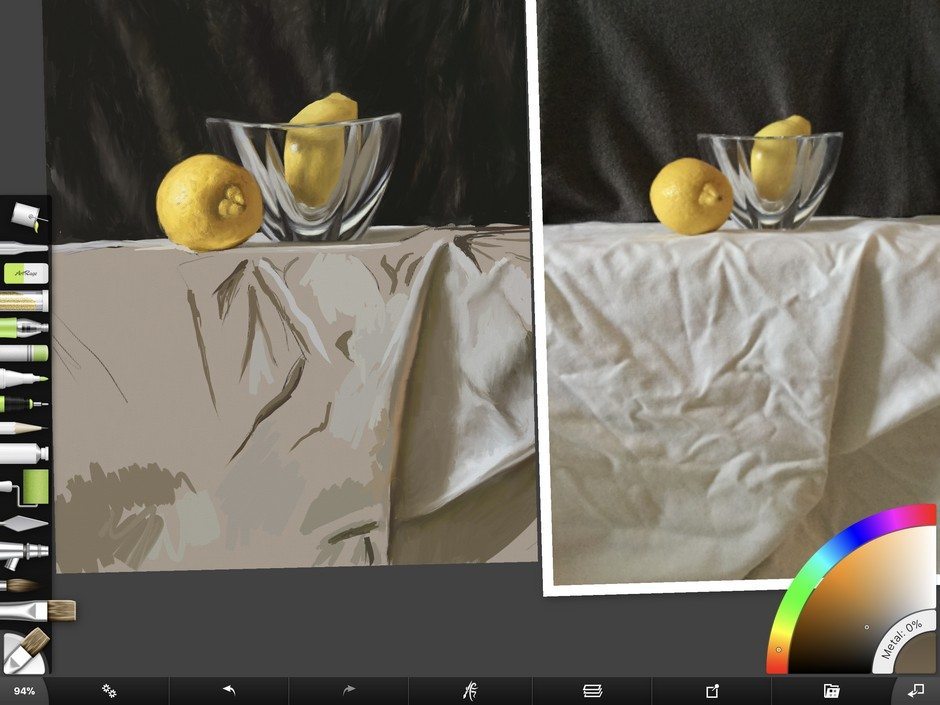
Lemon Study
This is a study for a still life I photographed and am planning to paint as a real painting in the future. I don’t know what the heck I was thinking setting the objects on such a wrinkled surface!
Website: www.shelleyhanna.com | www.shelleyhannafineart.com
Social Media: Facebook | Pinterest | Fine Art America | Instagram | Twitter
How did you discover ArtRage?
A coworker encouraged me to try out digital painting which I was resistant to because I didn’t think of it as “real painting”. Then I realized how incredibly biased I was and saw the advantages to being able to paint anywhere I went with my iPad.
I tried a different program first which I didn’t like at all and then saw Daniel Ibanez do a demo on YouTube with ArtRage and decided to give it a shot. With the program being only around $5 it seemed like like a no-brainer. I immediately took to the ArtRage program and loved the way the paint and colors could be worked using the alla prima style. My approach is traditional. I paint exactly the same in ArtRage as I do with a real painting. The big difference is that I don’t get paint all over myself using ArtRage (I’m a messy painter).
I only use the iPad application and have been salivating over the desktop version. I recently got my computer fixed so I’m sure I’ll be adding it to my software lineup in the future.
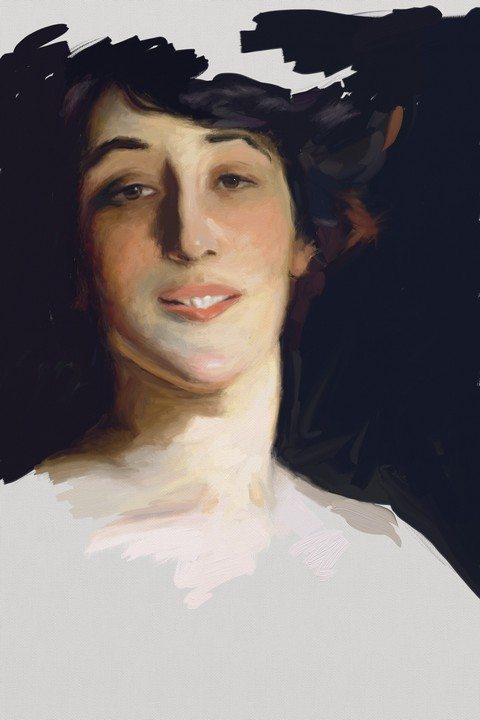
Daughters of Wortheimer Study
This is a study taken from a detail of John Singer Sargent’s “Ena and Betty, Daughters of Wortheimer” using ArtRage.This was my very first painting using the program and I was absolutely stunned by how easy it was to create an alla prima effect that really felt like I was painting even though I was using a digital program.
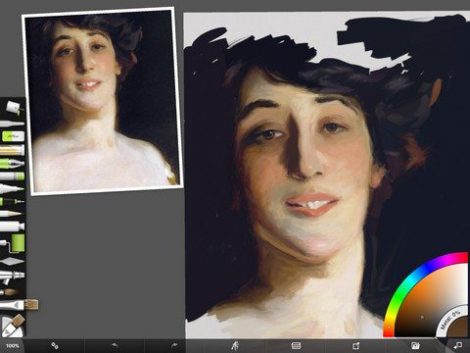
Left (Screenshot from ‘Daughters of Wortheimer’): Here is how I usually set up my work surface. While the reference image can take up quite a bit of space, it’s easy to move out of the way.
Most of the time I work on one layer only so my paint can blend together. Maybe I’m too disorganized to have layers because whenever I have tried it, I find myself painting on the wrong layer. Grrrrr.
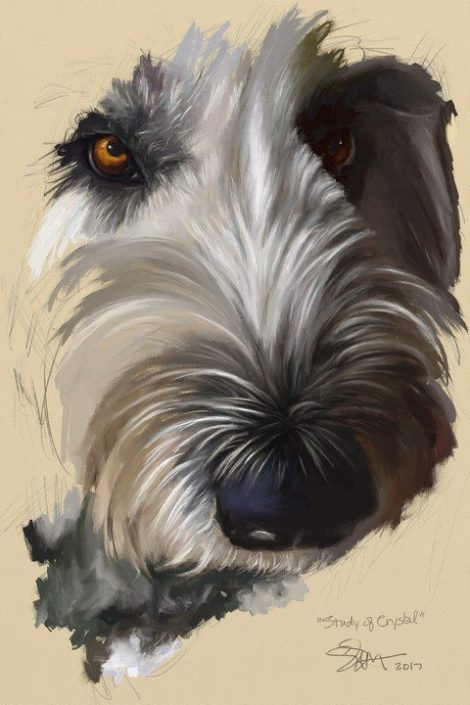
Crystal
How do I love dogs? Let me count the ways! I came across Crystal while taking a class in Paola, Kansas. She was just begging to be turned into a piece of art.The tools were very intuitive for me which I think which was key to having a successful first effort. If I couldn’t achieve a painterly effect easily that looked like my traditional paintings, I don’t think I would have continued with the program. It would have been too frustrating for me.
My next challenge after trying a portrait of a human was to see how I could achieve a decent effect in painting fur. If you look closely, you can see that I start out with a darker tone and then build the lighter values on top to create the fur. I then go in with the blending tool to get rid of any digital looking marks.
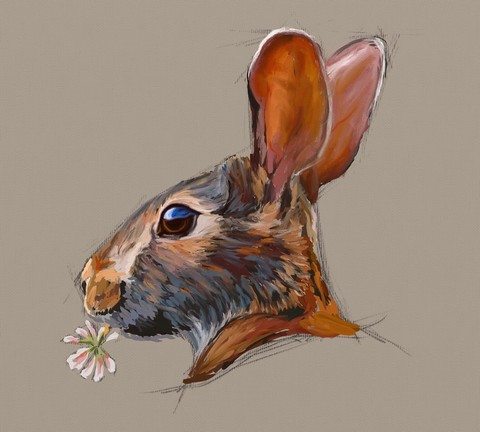
Rabbit Study
This rabbit study was a lot of fun to do and I’m still not sure if it’s finished or not. The good news is that I can make a copy of it – keeping it at this loose stage – AND do a more refined, finished version!
Why do you use ArtRage and how do you use it in your work?
I don’t use ArtRage for my “day job”, but am very open to finding ways to work that in for clients and have an idea I’m toying with for professional application. Since I’m pretty new to the program, the only way I’m using ArtRage currently is for studies – some of which I am now posting on Fine Art America for sale as prints.
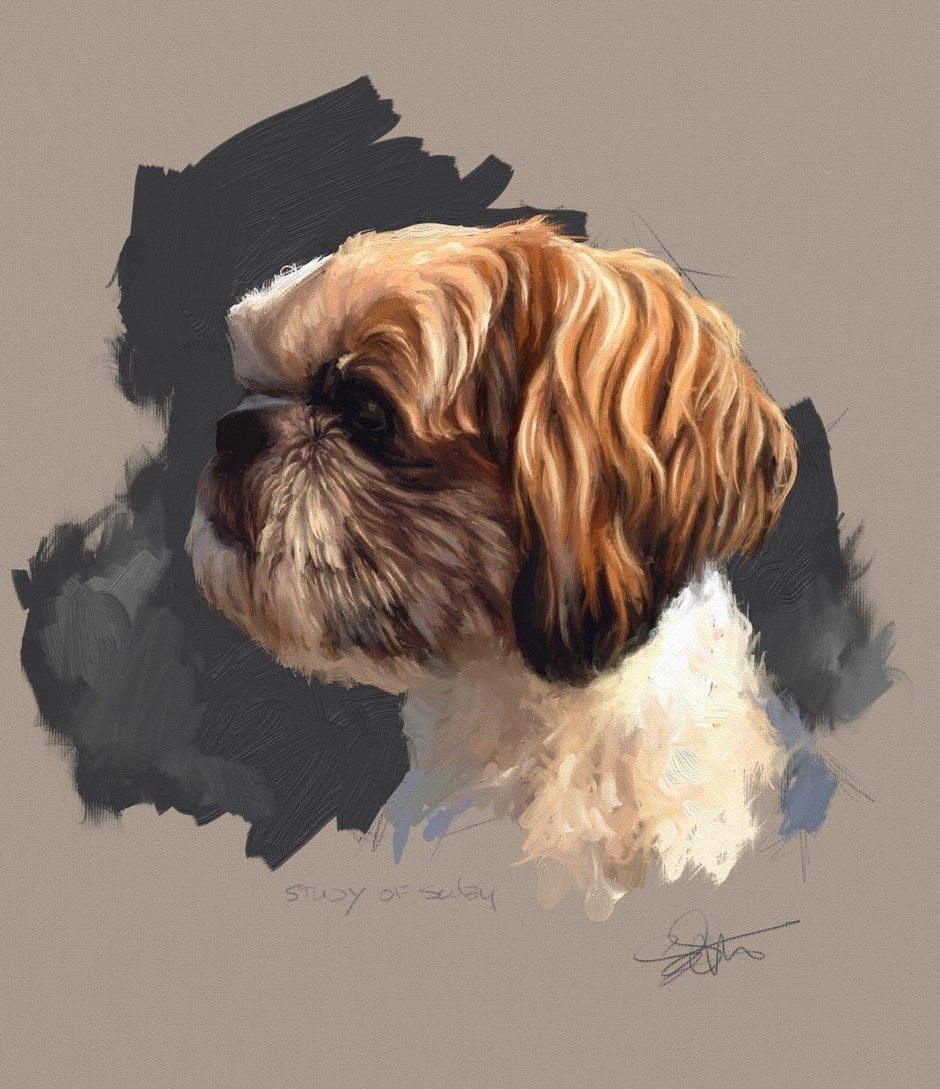
Scoby (below)
I did this painting of my friend’s dog. I took his picture while he was in a truck waiting for his daddy to reappear from going around the side of my house. The fur on Scoby’s face was pretty challenging, but I was very happy with the effect I was able to achieve. For this particular painting, I did do a separate layers for the canvas and background and then another for the rest of the painting. This was so I could have the image printed with a white background if needed.
What artwork are you particularly proud of that was created in ArtRage?
Oh boy, that’s a tough one. I think the painting which was the most fun for me to paint recently was the study after John Singer Sargent’s self portrait. I was able to paint that in just a couple of hours and I love learning techniques of other painters by studying their work.
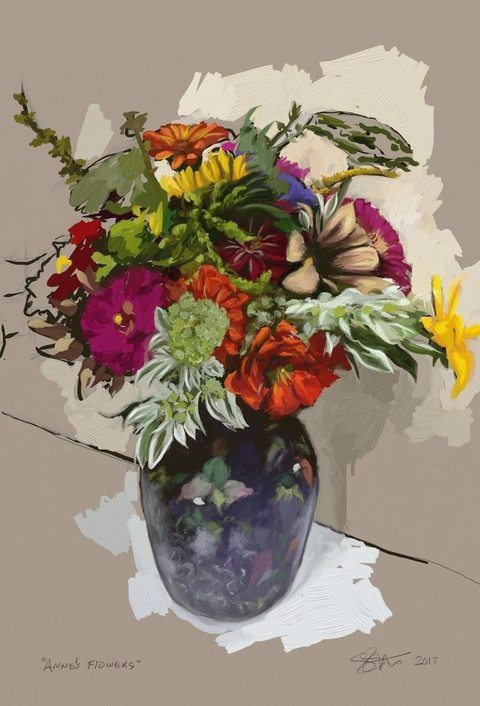
The most popular painting I’ve done according to Instagram was of the “Cohansey” glass jar. The painting to receive the most pins so far on Pinterest would be “Anne’s Flowers”.
I used the same tools for all of the paintings mentioned above. The pencil to sketch things out. The oil paint brush usually with the thick gloss setting fully loaded, The oil paint brush with zero loading for blending and then the knife tool for blending as well. I’ve also played around with the tube of paint and the roller to get a lot of paint down on the canvas quickly.
What was the inspiration or purpose of this art?
For me it’s to keep practicing and improving and getting better at “seeing” my subject. Plus, with anything in ArtRage, you can make mistakes or try new things without risk because of the “undo” feature. If only I could do that in a real painting! 😉Anne’s Flowers
An artist friend of mine, Anne Burkholder, posts the most beautiful market flowers every weekend during the summer on Facebook. This bunch had to be painted! This painting is my most pinned image on Pinterest.
What are your favorite tools and features?
I like the oil painting brush and the palette knife the most. I love painting in the alla prima style and find the paint mixes well in ArtRage – very similar to how it mixes as I paint in oil. A huge plus to ArtRage painting alla prima is that the paint never dries!
I’ve done a little playing around with the tube of paint for getting large quantities of paint on the canvas and the roller for covering a wide area since I’m limited on brush size.
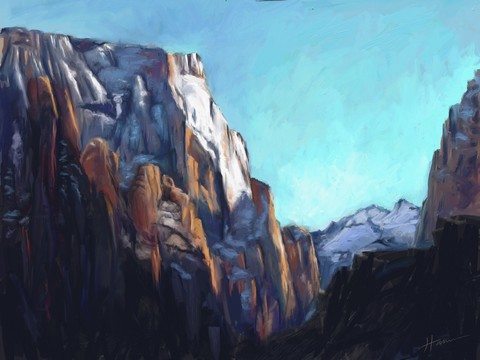
Blue Mountain
Landscape paintings are my biggest challenge so I thought I’d practice a little in ArtRage to hone my skills. Doing the work and getting in time to “art” is so easy with this program!
Do you have any favorite settings or techniques?
So far, I’ve been only using the oil brush and knife tools in the most simplistic way possible. I use the brush tool at the largest size most of the time fully loaded.
I will vary the palette knife from very small to create subtle blending, to quite large for blending out backgrounds. I’m careful with the palette tool when blending out large as I don’t like some of the finish marks it makes. Recently I’ve also been using the brush tool for blending without any paint loaded. I’m liking how the paint is blending when I use the brush this way.
Teatime
I had seen some beautiful paintings of teacups on Pinterest and wanted to give it a try. Why I chose such a complicated photo reference to work from is beyond me. I didn’t add in all the detail from the photo but kept enough to be representational of the source image.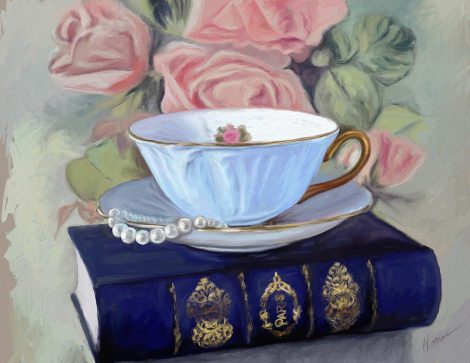
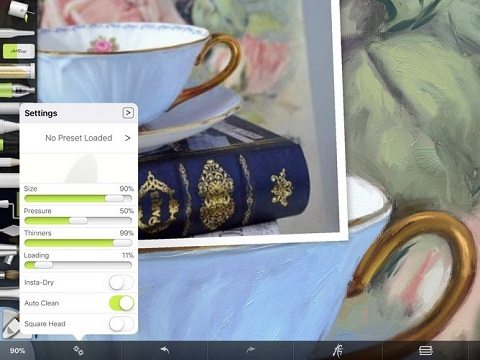
My favorite feature in ArtRage – hands down – is the ability to pin a reference photo off to the side of the canvas. As a representational artist I like having the image right next to my work surface.
This does take up quite a bit of room on the iPad but I’ve gotten used to it. I size down my canvas to the size of the photo periodically (also known as sight sizing) to check my work for differences which is very helpful.
Also, when I have the image next to my painting I can squint my eyes to check my values easily. When first starting out with realism, most people paint values too light and bright. By putting the reference image next to the painting, it’s easy to squint and quickly compare back and forth while continually asking “what is different?”
Left: Here you can see how I’ve reduced the loading on my brush to 11% so I can use it for blending.
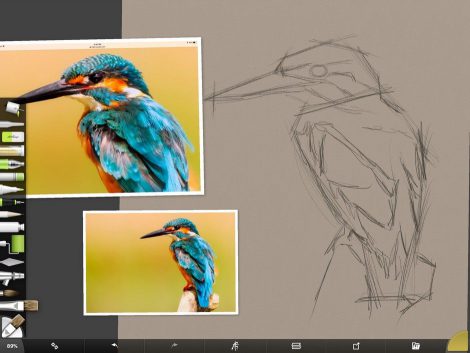
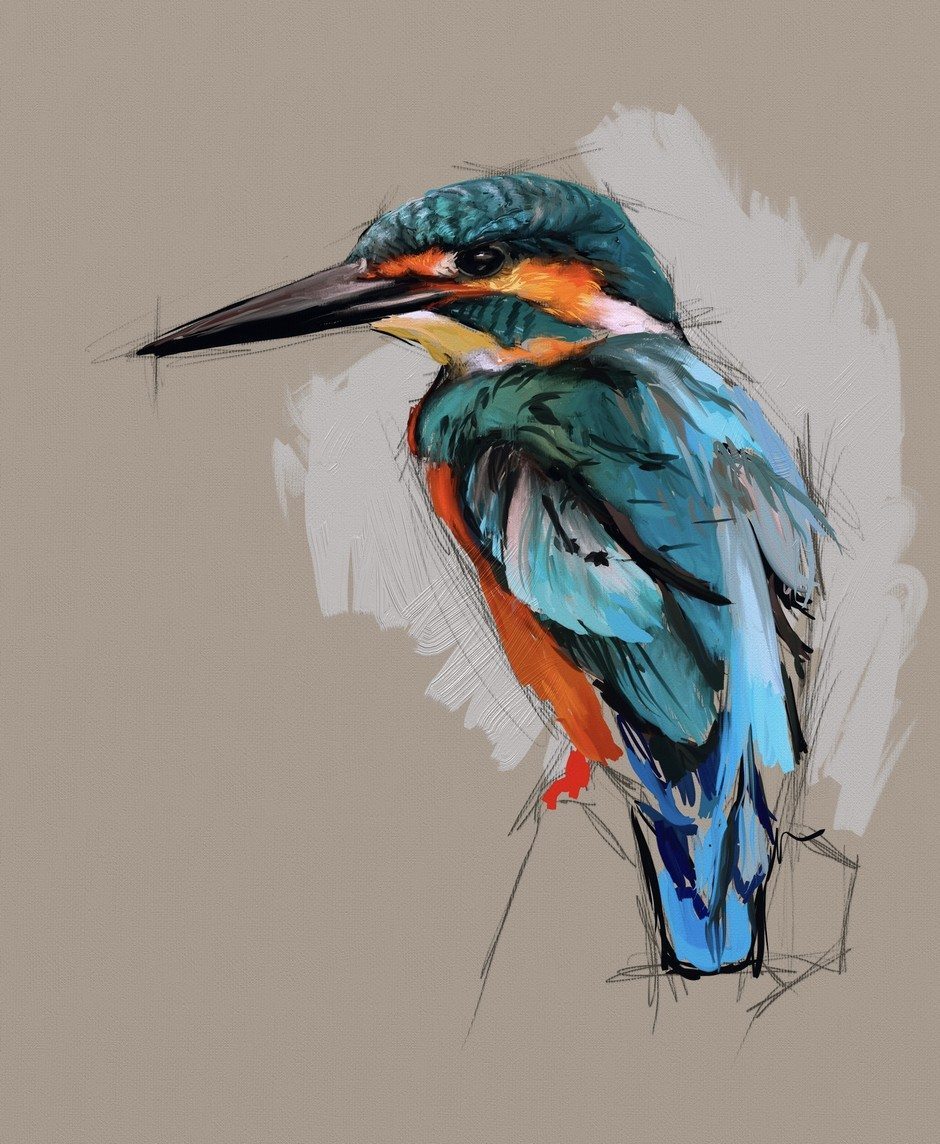
I found this photo of a kingfisher on a free stock site. I start with a quick sketch and a couple sizes of the reference photo. If I really want to see detail, I crop the original photo in significantly like I did with the head of this bird.
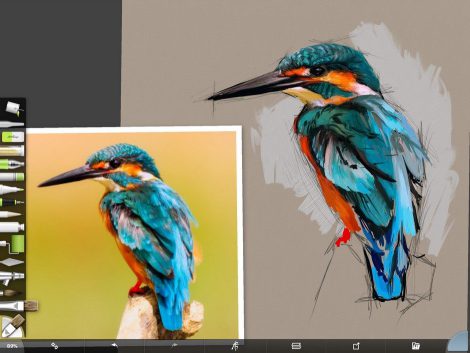
The top of the bird is pretty well finished in this screenshot. As you move down its body, you can see more of how I start off painting loosely before I start blending. I will always go back in periodically to reestablish my darkest areas. On this particular painting, I did a separate layer to play around with background color.
What does your workflow look like?
How would you go about planning and creating a painting?
I find a reference photo to start from. If I want to familiarize myself with a particular style, such as John Singer Sargent, I download a reference to one of his paintings using public domain images and do a study from that. I’ve done that a couple of times. I work from photos I’ve taken and also photos from royalty free photo sites. I’ve also done quick composition studies for real paintings.
I begin with a neutral toned canvas and do a sketch using the pencil tool. I then start with my darkest colors to block in and work my way from dark to light (or at least that is the plan – I can get very impatient and jump around).
I usually just dive in with a fully loaded brush but in my traditional work, I always start with an underpainting in burnt umber. Hmmmm, I should try this in ArtRage!
After getting my initial brushstrokes down I tend to switch to the palette knife to blend or smooth the brushstrokes out. I don’t necessarily like how some of the brushstrokes “finish” in the program, so messing with them a little as I go helps to achieve a more realistic effect.
Sargent Study
My finished study of John Singer Sargent’s Self-Portrait, 1907
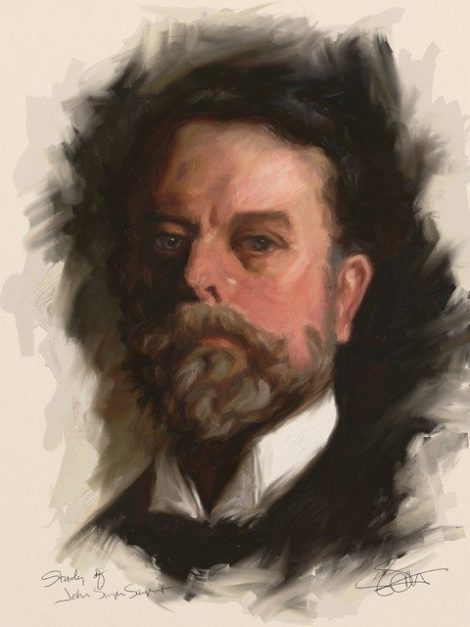
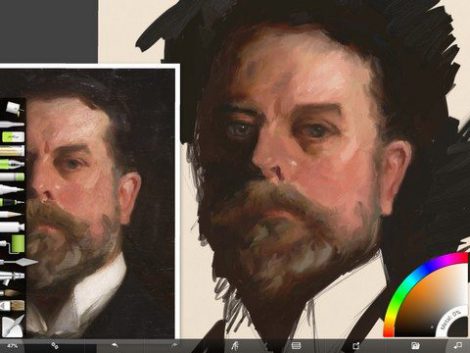
Left: I did this study of John Singer Sargent’s Self-portrait, 1907, very quickly. Again, always starting with my darkest values first and then working my way up to lighter values.
At this stage I was using the “sight sizing” method in ArtRage. This is where I dart my eyes back and forth looking for differences. You will also see me squinting a lot when I’m at this stage so I can check my values.
My knife is never loaded when I blend and I’m careful to not go too crazy with the knife. I don’t use a knife for painting in real life, so I use it strictly for blending out brushstrokes.
I’ve tried using layers while painting but end up being really confused as to which layer I’m on and then start painting on the wrong layer which I find frustrating. So I just keep everything all together. If I want to try out a different background color, I may do that on a separate layer to test it out. The exception to this is scratchboard simulations.
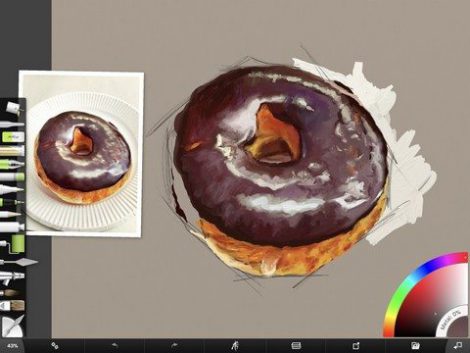
I’ve seen so many donuts on Instagram that I had to paint my own! I started with a quick sketch and then began building my donut. I did create a separate layer on this one to experiment with the background color.
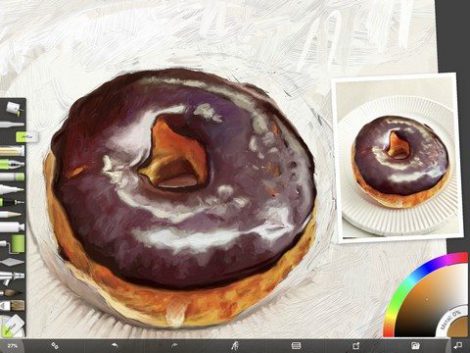
Here I was just having fun creating a very loose, more abstract background for my much more detailed donut to sit on.
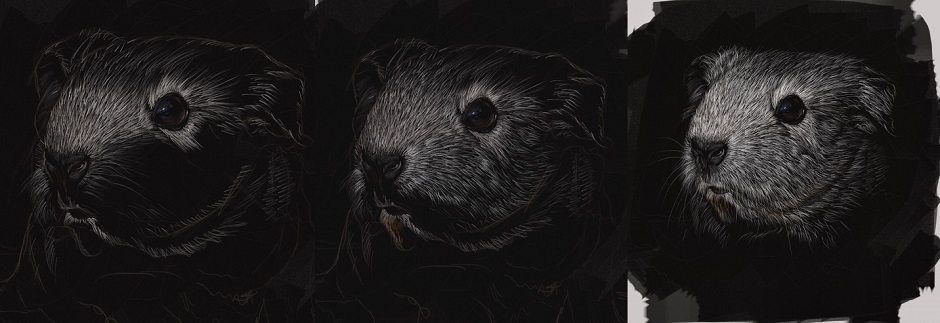
Scratchboard Guinea Pig
I kept finding old scratchboards I had done decades ago and really wanted to take it up again but found out the original scratchboard surface I liked working on had changed and wasn’t the same quality as it used to be. This got me curious to see if I could replicate the process in ArtRage.
I chose a guinea pig to be my guinea pig with this experiment. To achieve the “scratches”, I use the color pencil in white. Starting the canvas with a smooth surface is important when doing scratchboard in ArtRage. I’ll use one layer for “inking” with the roller tool and then use another layer for the scratchboard effect. Of course, I could simply start with a dark surface when setting up the piece but for some reason I didn’t do that.
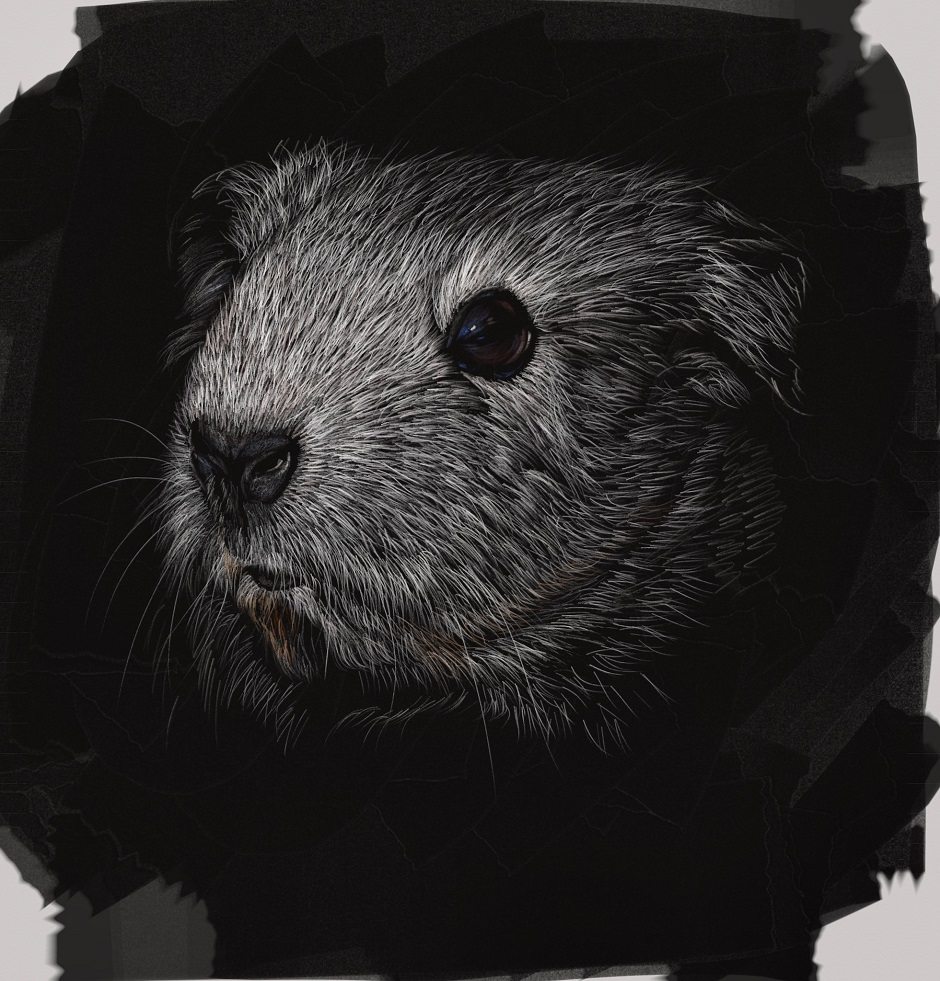
I used the roller to ink the background which was a smooth surface. I could have also just started with a black background and don’t know why I didn’t think of that to begin with, but hey – it was an experiment! I simply started drawing in the hairs with the pencil tool in various shades of light grey and white. Scratchboards are very time consuming, so I don’t know that I will ever finish this simulation, but at least I know I can do it!
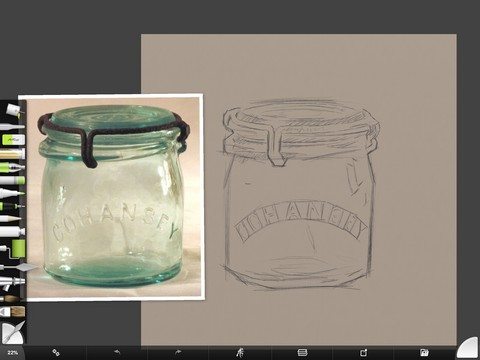
Cohansey Jar
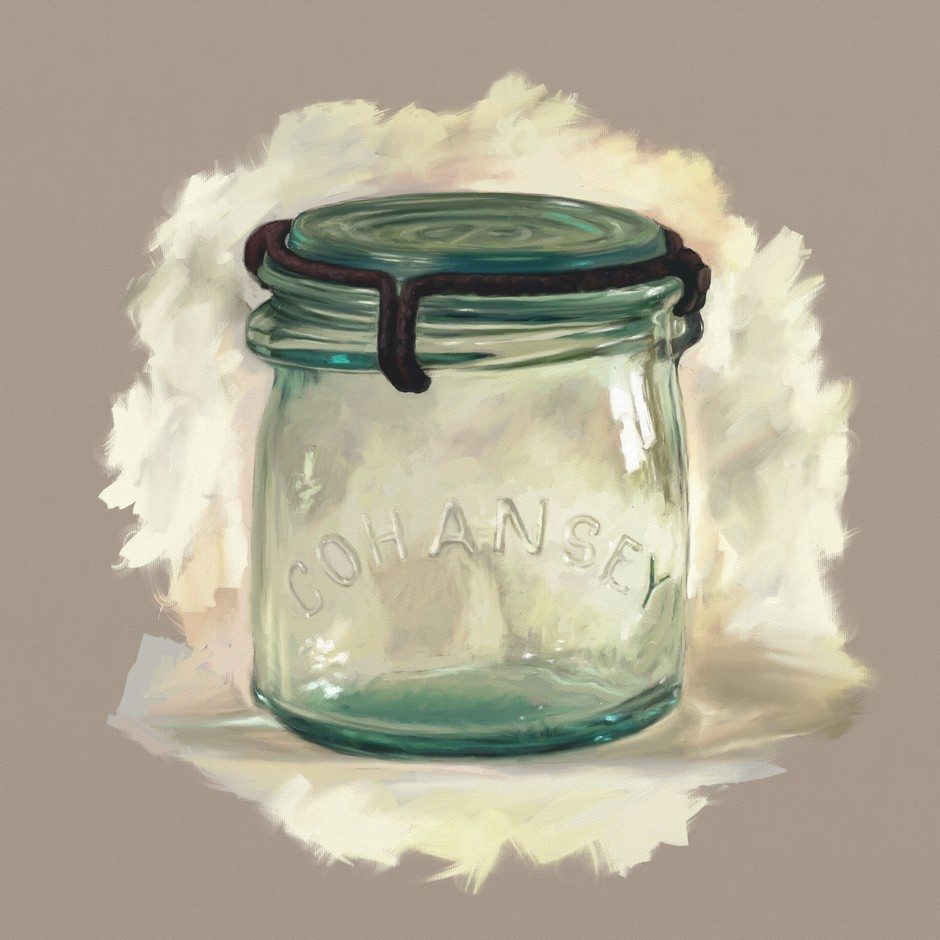
If you’re starting out or just want to get to painting straight away, you can always trace the image onto the canvas which is a great time-saving feature. Many master painters found ways to trace or transfer images onto canvases. Some think it’s taboo, I say do what you want.
I finished the jar and still haven’t decided if I’ll ever finish the background. This painting has been my most popular post on Instagram. I think people are fascinated by translucent objects.
Painting glass is very strange because you can’t tell it’s glass until you get your highlights in place. Many times I’ll start to add a few highlights so I have something to look at that makes sense to my eye.
Tool Settings
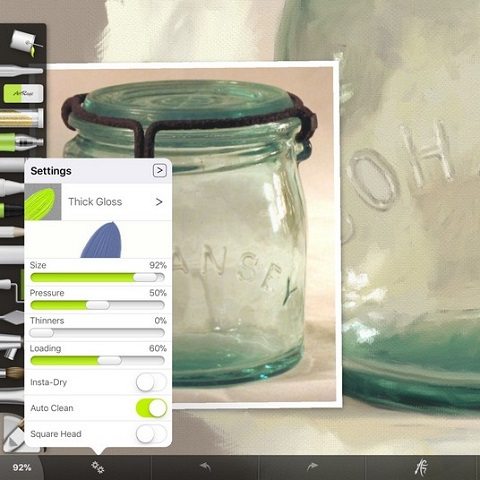
Thick Gloss Oil Brush Preset: Here is what I generally use for a brush. Sometimes I square off the tip. Many times I increase the pressure and load to 100%. If you want to blend with the brush, set loading to 0%.

Flat Palette Knife: The pop up panel is showing my typical knife setting that I use for blending smaller areas. It never shows which blending setting i’m using on the iPad app so I’m not really sure which one I used. I don’t switch it up very often. You have to find the blending tool that feels right to you.
What tips would you share with other artists?
I would encourage artists to start with a toned, neutral canvas and block in values with an underpainting (even though I’ve yet to do that myself, but I’ve been painting for a long time.) If you don’t have your values right the painting doesn’t work. This is the problem most artists have when they start out. They paint all of their colors too light or bright. In realism, the world is much grayer and darker than what your brain thinks it is!
An advantage to ArtRage is that you can sample colors from the reference photo, however I almost always change the color after I sample it and select a slightly darker color or change the color from cool to warm or vice versa depending on the color I want to achieve when the paints mix on the canvas.
I do think for beginning artists that sampling the color from the reference photo can help them “see” values and color more accurately. This can ultimately help them see values when approaching real painting.
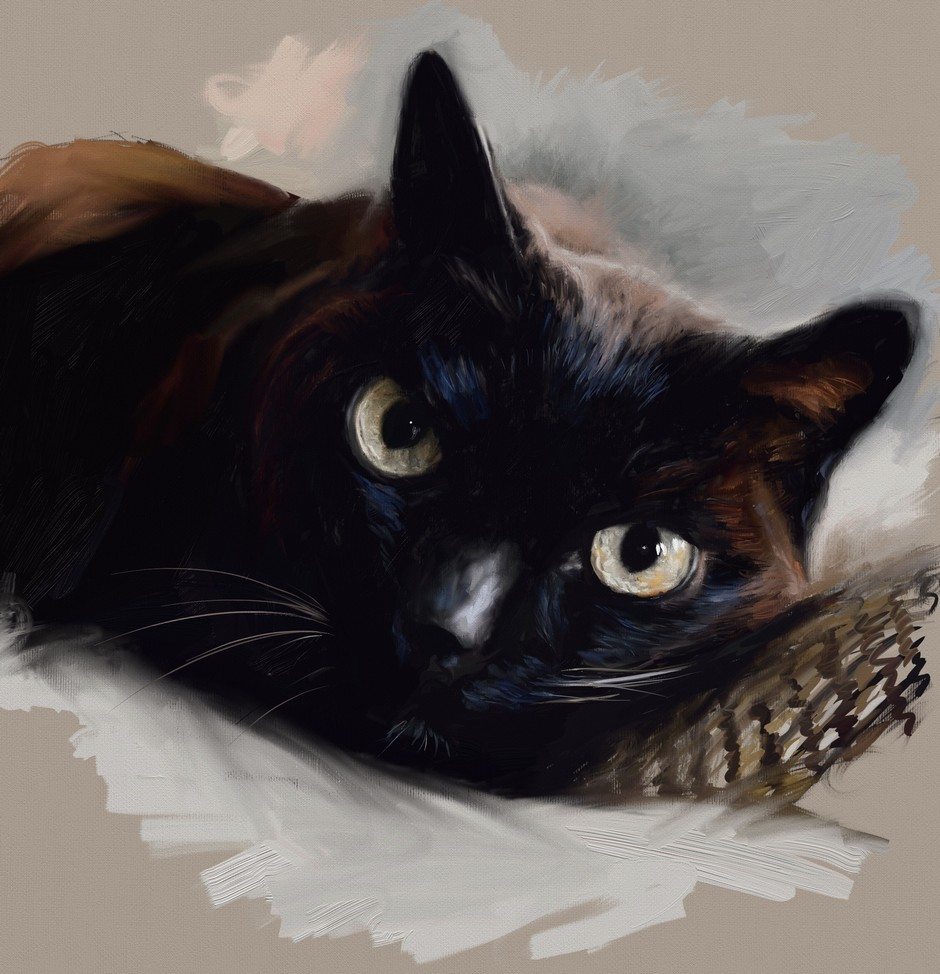
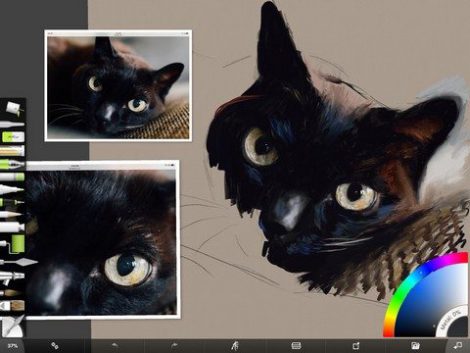
Another tip would be that if you have an area in the painting that requires detail – such as an eye – I would crop the reference photo right around that eye so it is as big as possible to paint from. I did this with the Black Cat painting I did (above). The eyes are so magnetic and I wanted to get them as realistic as possible. Working from the overall reference photo was too small to see detail so having another cropped image to pull up was incredibly helpful.
Right: I had painted so many dogs that I needed to get a cat painting under my belt. Once again I’ve used a free stock photo image as my source. Here I am using a cropped reference image to see detail as I work.
You can see that I started with a very quick sketch and kept everything pretty loose in the painting except for the eyes. I wanted them to be the focal point and contain the most detail.
Name: Shelley Hanna
Country: Bettendorf, Iowa USA and grew up along the Mississippi river.
Job: Fine Artist, Executive Creative Director for animal health
Art Style: Realism, Traditional Oil techniques, Still Life and Animal Portraits.
Background: Traditional Art
See more of Shelley’s work at www.shelleyhannafineart.com and follow her on Facebook , Twitter, and Instagram