Open
the parrot file in Maya which
was saved in the previous part of the tutorial.
Open Maya
Step 2
In the panel
menu bar, click on Shading menu and
check on Wireframe on shaded, X-Ray and Z-Raw Joints options one by one.
Shading Menu
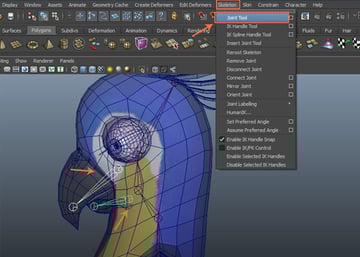
Step 3
Change the
working mode of Maya in Animation.
Click on Skeleton menu and select Joint Tool.
Animation
Step 4
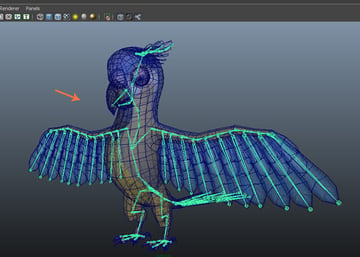
With
the help of joint tool, create 14 joints starting from the right arm to hand as
shown in the following image.
Create 14 joints
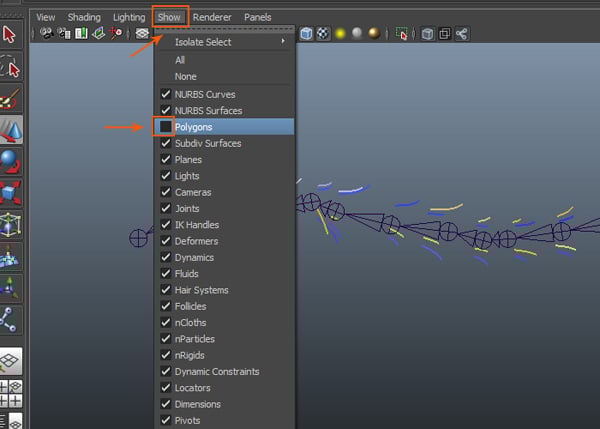
Step 5
With
the parrot mesh selected, go to Show
> Polygons and check off the option box to hide the parrot’s mesh.
Show > Polygons
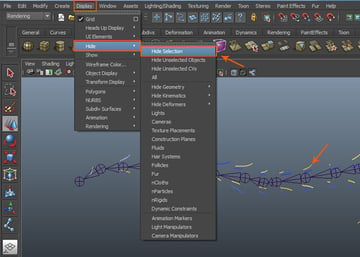
Step 6
With the fur
selected, go to Display >Hide > Hide Selection to hide the fur
also.
Display > Hide > Hide Selection
Step 7
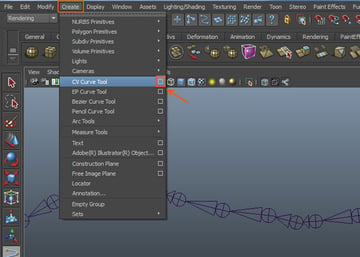
Go to Create >CV Curve Tool and click on its option box.
Create > CV Curve Tool
Step 8
In the CV
Curve Tool settings option, turn on Curve
Degree1 Linear radio button.
Curve Degree 1 Linear
Step 9
With the CV Curve Tool selected, press and hold V key to point snap and then first
click on arm start joint and then click on elbow joint to draw a straight line
as shown in the following image.
CV Curve Tool
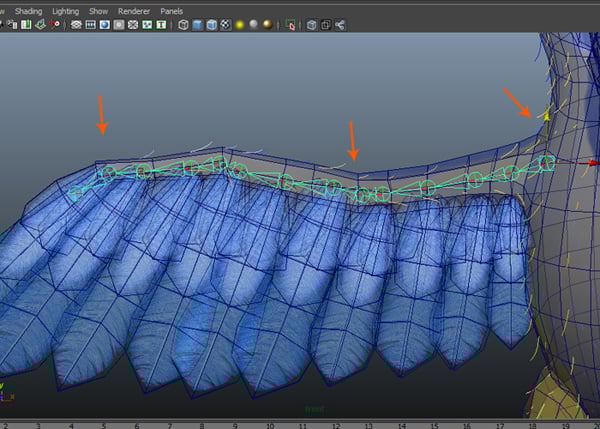
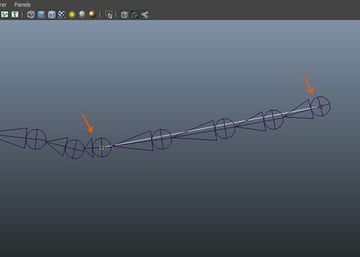
Step 10
In the same
way, create curve lines at every joint as shown in the image below.
Create curve lines
Step 11
Press and
hold C key for curve snap. Select
every joint one by one in sequential order. Keep D key pressed so that it does not affect the child bone.
Curve snap
Step 12
In this way,
all joints have been aligned according to the curve line.
Curve line
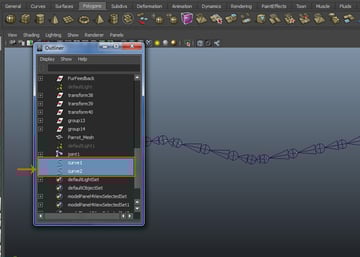
Step 13
Go to Window >Outliner. In the Outliner
window, delete the curves as these are not required anymore.
Window > Outliner
Step 14
Unhide the
parrot’s mesh. Place the joints inside the right arm of the parrot mesh.
Unhide the parrot’s mesh
Step 15
For
hierarchy selection of the joints, first select the arm’s root joint. In the MEL script text box, write select-hi command and press Enter key to select the hierarchy of
joints.
MEL script
Step 16
With the
hierarchy of joints selected, go to Display
>Transform Display >Local Rotation Axes to display the local
axis of the joints as shown in the following image.
Display > Transform Display > Local Rotation Axes
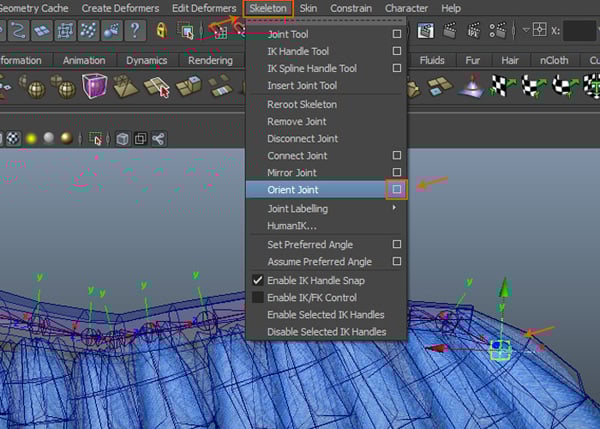
Step 17
You will
notice that all joints’ local axes have same orientation except the end joint. So,
you have to orient only end joint for orientation. Therefore, with the end
joint selected, go to Skeleton >Orient Joint andclick on itsoption
box.
Skeleton > Orient Joint
Step 18
In the Orient Joint Options window, turn on None radio button and then click on Orient button.
Orient Joint Options
Step 19
Now you can
see all joints orient in the same local axis.
All joints orient
Step 20
It’s time to
turn off the display of local rotation axes. So, with the hierarchy of joints selected,
go to Display >Transform Display>Local Rotation Axes
to turn off display of local axes.
Display > Transform Display > Local Rotation Axes
2. Inserting Root Joints
Step 1
Go to Skeleton >Insert Joint Tool.
Skeleton > Insert Joint Tool
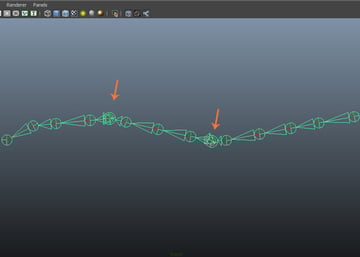
Step 2
With Insert Joint Tool selected, first click
on elbow start joint. With the elbow joint selected, scale down the joint to
keep the different ratios of the joints for easy selection.
Insert Joint Tool
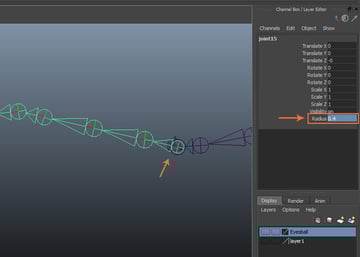
Step 3
With the new
created joint selected, increase the radius value as 0.6 in the channel editor box.
Increase the radius value
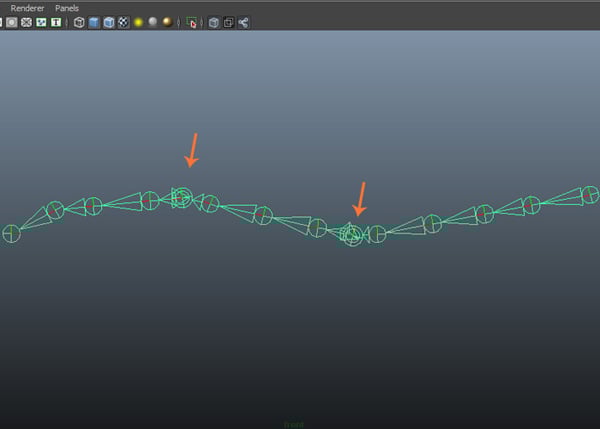
Following
the same way, insert all section joints roots as shown in the image below.
Insert all section joints roots
3. Renaming Joints
Step 1
I have
renamed all created joints as R_bn_Shoulder_Root01,
R_bn_Shoulder_a01, R_bn_Shoulder_b01, R_bn_Shoulder_c01, R_bn_Shoulder_d01,
R_bn_Elbow_Root01, R_bn_Elbow_a01, R_bn_Elbow_b01, R_bn_Elbow_c01,
R_bn_Elbow_d01, R_bn_Wrist_Root01, R_bn_Wrist_a01, R_bn_Wrist_b01,
R_bn_Wrist_c01, R_bn_Wrist_d01, and
R_be_Wrist_a01.
Renaming Joints
Step 2
With R_bn_Shoulder_Root01 selected, press Ctrl-G key for making a group of the selected root joint. Rename it
as R_Joints_grp01.
Renaming Joints
Step 3
After making joints group in the channel editor, select all transform
properties. With Right Click on the selected
transform properties, select Lock and
Hide Selected command in the popup menu.
Lock and Hide Selected
Step 4
Using Lock and
Hide Selected command, you can see only
Visibility is apperaing in the channel
editor.
Lock and Hide Selected
4. Creating Feather Joints
Step 1
Go to Skeleton > Joint Tool.
Skeleton > Joint Tool
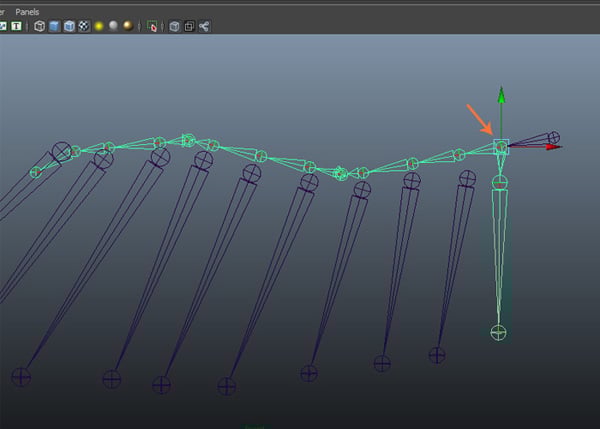
Step 2
With the
help of Joint Tool, draw 12 joints
according to the feathers’ size.
Joint Tool
Step 3
With all
root joints selected, place them inside the feathers mesh.
Place the joints inside the mesh
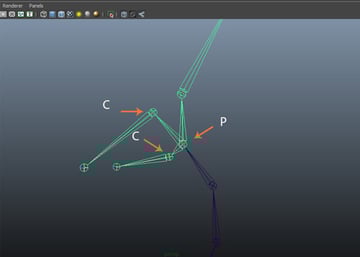
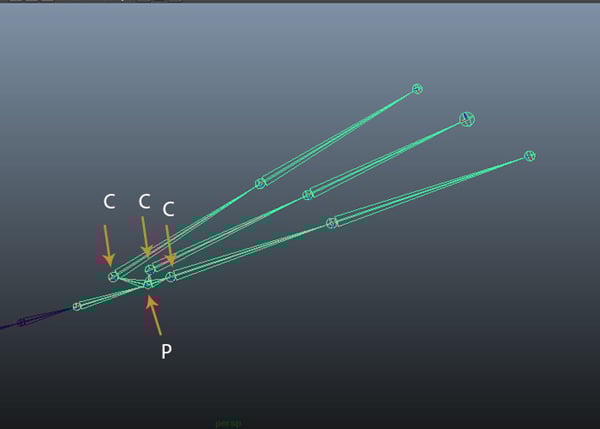
5. Creating Feather Joints
Step 1
First
select feather root joint and then
select R_bn_Shoulder_a01 and press P key. Hence, R_bn_Shoulder_a01 joint becomes the parent.
Feather root joint
Step 2
Following
the same way, I have connected all new feathers joints with the arm joints.
Connect all feathers joints
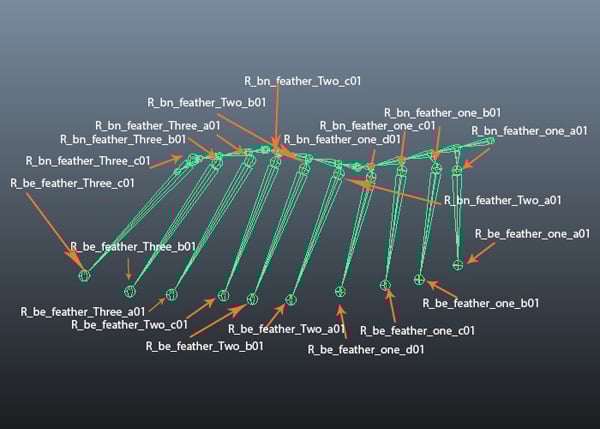
Step 3
I have
renamed all feathers joints as R_bn_feather_one_a01,
R_be_feather_one_a01, R_bn_feather_one_b01, R_be_feather_one_b01,
R_bn_feather_one_c01, R_be_feather_one_c01, R_bn_feather_one_d01,
R_be_feather_one_d01, R_bn_feather_Two_a01, R_be_feather_Two_a01,
R_bn_feather_Two_b01, R_be_feather_Two_b01, R_bn_feather_Two_c01,
R_be_feather_Two_c01, R_bn_feather_Three_a01, R_be_feather_Three_a01,
R_bn_feather_Three_b01, R_be_feather_Three_b01, R_bn_feather_Three_c01, and
R_be_feather_Three_c01 respectively.
Rename all joints
6. Mirroring Joints
Step 1
After completing
the right side’s feathers joints, it’s time to mirroring for the left side feathers
joints. With the right side’s joint root selected, go to Skeleton >Mirror Joint
and click on its option box.
Skeleton > Mirror Joint
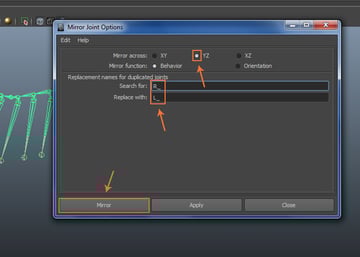
Step 2
In the Mirror Joint Options window, turn on Mirror across radio button of YZ axis. In the Searchfor text box, write
R_ and in Replace with text field, write L_.
Click on Mirror button to apply Mirror command.
Mirror Joint Options
Step 3
You can see,
all left side’s joints names start with prefix L_ in the Outliner
window.
Outliner window
7. Creating Body Joints
Step 1
With the
parrot body selected, go to Skeleton
> Joint Tool.
Skeleton > Joint Tool
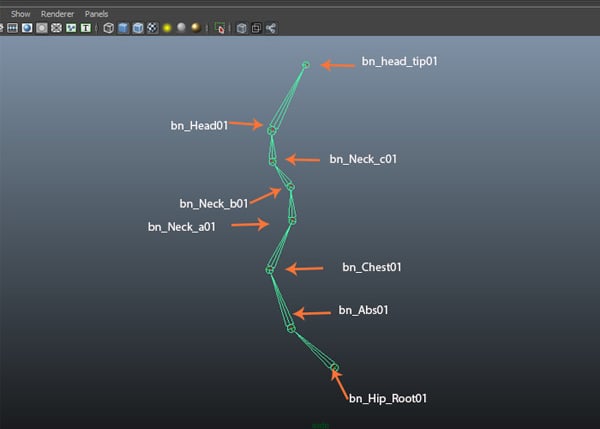
Step 2
With Joint Tool selected, start drawing the
joint from the parrot’s leg’s center area and finish up to the head with 7 Joints as shown in the following image.
Joint Tool
Step 3
Hide the
parrot’s mesh. Rename all joints as bn_Hip_Root01,
bn_Abs01, bn_Chest01, bn_Neck_a01, bn_Head01, bn_Neck_b01, and bn_head_tip01.
Rename all joints
8. Creating Beak Joints
Step 1
Go to Skeleton >Joint Tool. Draw two separate bones for upper beak and lower beak.
Skeleton > Joint Tool
Step 2
Rename these
bones as bn_upper_beak_01,
be_upper_beak_01 and bn_Lower_beak_01,
be_Lower_beak_01.
Rename all beak joints
Step 3
First select
bn_upper_beak_01 and bn_Lower_beak_01 followed by bn_Neck_c01 respectively. Press P key to make the neck bone as the parent
of the beaks bones.
Parent joints
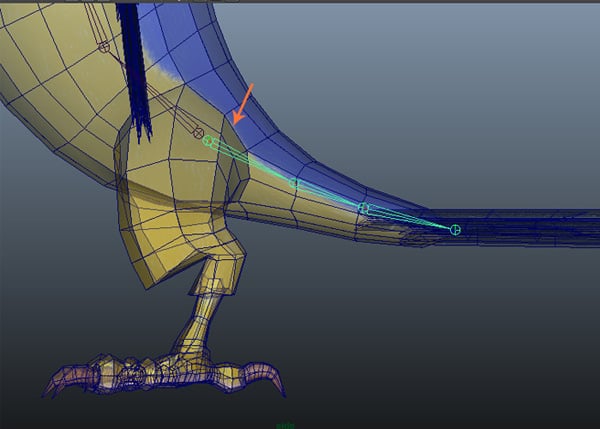
9. Creating Tail Joints
Step 1
With the
help of Joint Tool, create three
joints around the tail area as shown in the following image.
Tail joint
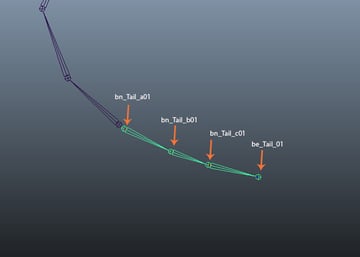
Step 2
Rename these
joints as bn_Tail_a01, bn_Tail_b01,
bn_Tail_c01 and be_Tail_01.
Rename tail joints
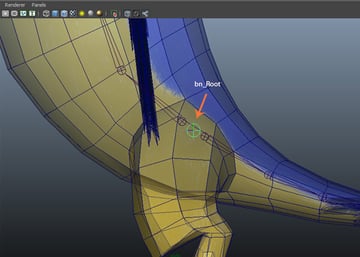
10. Creating Global Root Joint
Step 1
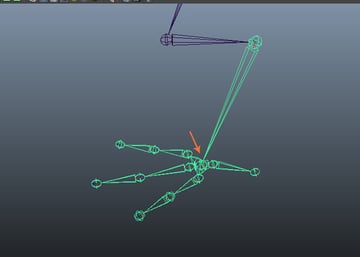
To control
all joints together, I need to make a global root joint. Hence, I have created
one joint and kept it between the tail and the body joints. I have renamed it
as bn_Root.
Global joint
Step 2
First select
bn_Hip_Root01 and bn_Tail_a01 and then select bn_Root. Press P key to make it as the parent joint.
Parent joint
10. Creating Tail Feathers Joints
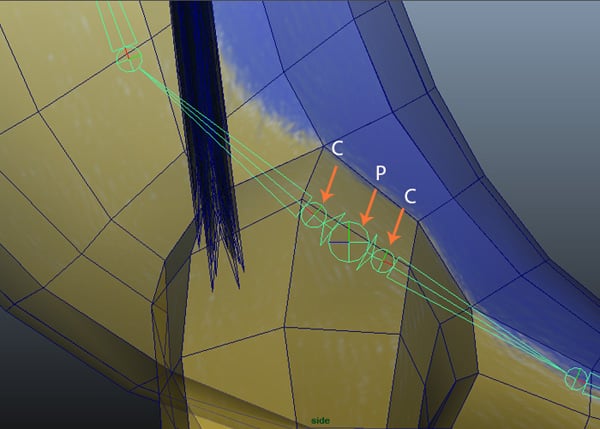
Step 1
Jump in the
top viewport. Press 4 on the keyboard
to display the mesh in the wireframe mode.
Wireframe mode
Step 2
With
the Joint Tool selected, create
joints for the left side’s three feathers as shown in the following image.
Create joints
Step 3
With all three tail joints selected, move and place them inside
the tail meshes.
Place the joints inside the tail mesh
Step 4
Put the tail
bones according to the tail feathers.
Place the joints inside the tail mesh
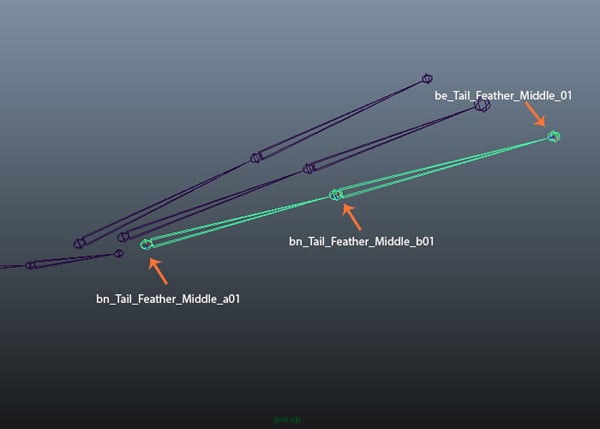
Step 5
Rename the first tail bones as bn_Tail_Feather_Middle_a01,
bn_Tail_Feather_Middle_b01 and be_Tail_Feather_Middle_01.
Rename tail joints
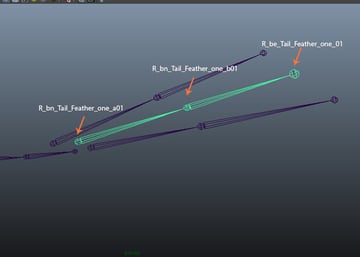
Step 6
Rename the middle tail bones as R_bn_Tail_Feather_one_a01,
R_bn_Tail_Feather_one_b01 and R_be_Tail_Feather_one_01.
Rename the middle tail bones
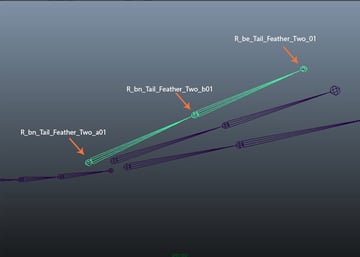
Step 7
Rename the
last tail bones as R_bn_Tail_Feather_Two_a01,
R_bn_Tail_Feather_Two_b01 and R_be_Tail_Feather_Two_01.
Rename the last tail bones
Step 8
For
parenting the joints, first select R_bn_Tail_Feather_Two_a01,
R_bn_Tail_Feather_one_a01 and bn_Tail_Feather_Middle_a01
and then select be_Tail_01. Press P key.
Parenting joints
11. Mirroring Joints
Step 1
For mirroring
the joints, first select R_bn_Tail_Feather_Two_a01.
Go to Skeleton >Mirror Joint and click on its option
box.
Skeleton > Mirror Joint
Step 2
In the Mirror Joint Options window, turn on Mirror across YZ radio button. In the Search for text field, write R_, and in the Replace with text field, write
L_. Click on Mirror
button to apply mirror command.
Mirror Joint Options
11. Parenting Arm's Joints
Step 1
For
parenting the arms joints, first select L_bn_Shoulder_Root01
and R_bn_Shoulder_Root01 joints and
then select bn_Chest01 joint. Press P key.
Parenting Arm's Joints
12. Creating Crown Feathers Joints
Step 1
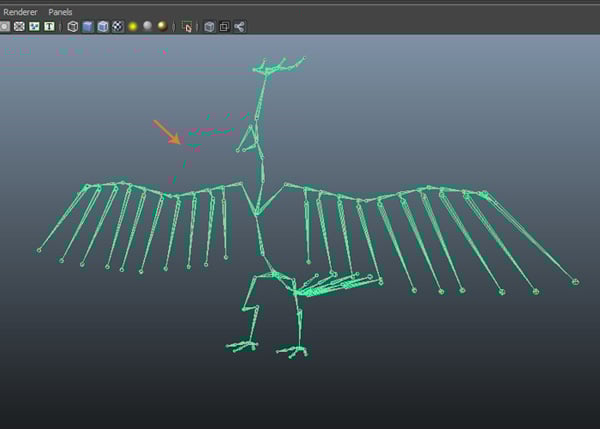
Create three
joints inside the crown feather. Rename
the joints as bn_Head_feather_middle_a01,
bn_Head_feather_middle_b01, bn_Head_feather_middle_c01 and be_Head_feather_middle_01.
Create three joints inside the top feather
Step 2
Following
the same way, create the second joints chain and rename as R_bn_Head_feather_a01, R_bn_Head_feather_b01,
R_bn_Head_feather_c01 and R_be_Head_feather_01.
Rename the joints
Step 3
Mirror the
joints for the left side and parent them with the head tip joint.
Mirroring the joints
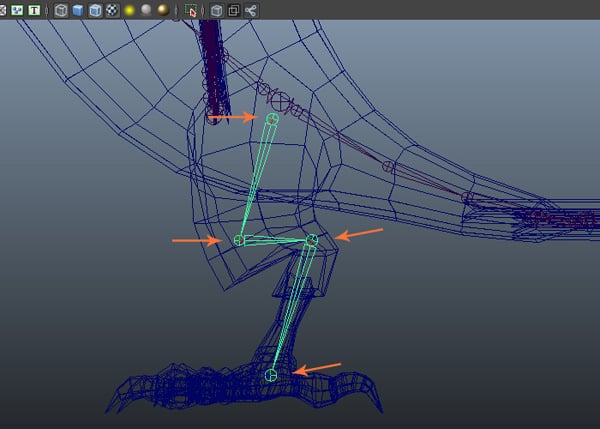
13. Creating Leg Joints
Step 1
With the Joint Tool selected, jump in the left
viewport.
Jump in the left viewport
Step 2
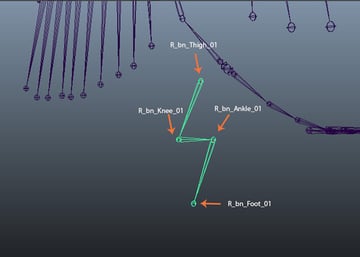
Create three
joints as per the leg shape as shown in the following image.
Create three joint
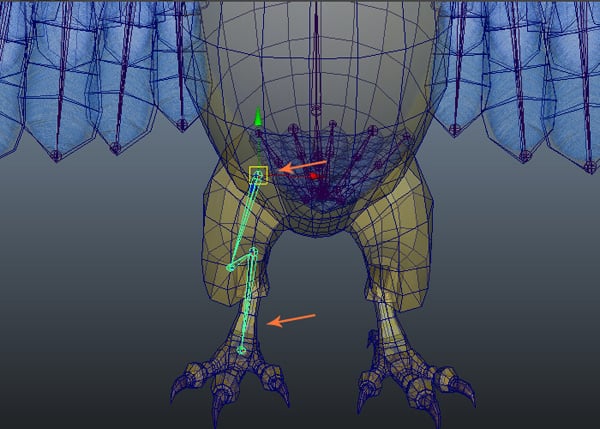
Step 3
Check in the
front viewport also and put the joints inside the right side leg mesh properly.
Place the joints inside the leg mesh
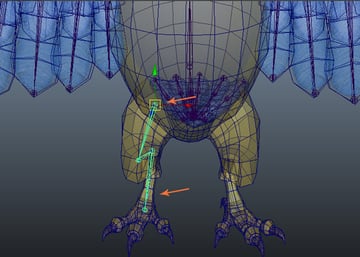
Step 4
Rename the
joints as R_bn_Thigh_01, R_bn_Knee_01,
R_bn_Ankle_01 and R_bn_Foot_01.
Rename the joints
14. Creating Claws Joints
Step 1
With the
help of Joint Tool, create two
joints inside the claw.
Create claw joints
Step 2
Being in the
perspective viewport, place the joints inside the middle claw mesh.
Place the claw joints inside the mesh
Step 3
Press Ctrl-D key to duplicate the claw joints
for other claws. Place them all inside the rest claws respectively and
properly. You may have to rotate the joints to fit properly.
Duplicate the claw joints
Step 4
After
creating the claws joints, rename these as R_bn_finger_middle_a01,
R_bn_finger_middle_b01, R_be_finger_middle_a01; R_bn_finger_Left_a01,
R_bn_finger_Left_b01, R_be_finger_Left_a01; R_bn_finger_Right_a01,
R_bn_finger_Right_b01, R_be_finger_Right_a01 and R_bn_finger_Back_a01, R_be_finger_Back_a01 respectively.
Rename the claw joints
Step 5
Parent all
claws joints with the leg joint.
Parent all claws joints
Step 6
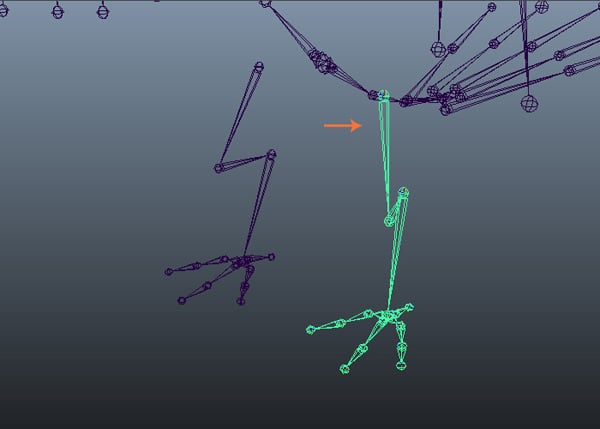
Now, mirror
the right side’s joints for the left leg mesh. Rename the joints accordingly.
Mirroring the claw joints
Step 7
Finally, with
R_bn_Thigh_01 and L_bn_Thigh_01 joints selected, select bn_Root joint and press P key.
parent the claw joints
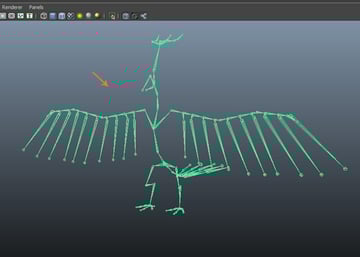
Step 8
Hence the
complete rigging of the parrot mesh is done.
Rigging is doneFinal structure
Conclusion
In the next
part of the tutorial, I will show you how to do skinning of the parrot’s mesh
with the joints.
Subscribe below and we’ll send you a weekly email summary of all new Design & Illustration tutorials. Never miss out on learning about the next big thing.