
You’ve probably seen VR, IS, OIS or a variety of names on
the side of a lens or camera, all essentially meaning that is has a form of
image stabilisation. Let’s look at what exactly this means for your images and
when and how to use it.
What is Image Stabilisation?
Image stabilisation, vibration reduction, and optical image stabilisation are technologies that reduce the negative effects of motion and shake on photographic images. Though particular technologies vary in how they achieve the shake reduction, they all fundamentally do the same thing. I’ll use the abbreviations VR and IS interchangeably throughout the article.
If you use a longer lens, or photograph in low light, chances
are you’ve experienced camera shake. Even with shorter lenses, unsteady hands can cause a slight blurring of the image. All photographers, even the
most calm among us, struggle not to introduce motion when holding a long lens.
Stabilisation systems have been around for many years now. When used properly, they are an effective way to stop camera shake
and reduce the likelihood of blur in your photographs. Using IS features can let you hand-hold at much slower shutter speeds than you’d normally be capable of, depending on the lens and type of IS you have.
Different Types of IS and How They Work
The different types of IS are worth knowing so that you can make decisions based on what suit you best.
Shutter Speed and Sensitivity
This is actually a bit of a cheat because it’s not really IS/VR at all. It’s often billed as ‘anti-shake’ or ‘anti-blur’ and is nothing more than bumping up the sensitivity. A cheap and easy solution for camera manufactures, this method has the camera compute which shutter speed and focal length on will result in a sharp image, and limits you to those settings. If there isn't enough light or the lens is too long to stop motion blur, the camera increases the ISO to compensate (and chooses a faster shutter speed).
This is also a
decision that you could make yourself, and it’s often not
worth letting the camera do it automatically. By increasing the ISO you
risk the possibility of introducing noise to your images, which is a choice that's usually best to make yourself, not leave up to the whims of your camera.
In any case, increasing the sensitivity of your camera a little bit in low light situations is actually a smart move, even with IS available, as higher sensitivity helps all of the methods below function better.
Lens Based
This is probably the type of IS you’ll come across most. You’ll know whether a particular lens has it by the VR/IS logo (or whatever is appropriate for your make of lens) stamped on the side.
Here’s the science:
There are two sensors in the lens, one for pitch (up and down movement) and one for yaw (side to side movement). These measure the type of movement made and then tell a processor which works out the adjustment needed by the lens group to compensate. Parts of the lens towards the back shift up and down to changes the angle of refraction so that the light hits the sensor in the correct place.


The image above represents your camera when still. Light enters, goes through the aperture and hits the sensor.


When you shake the camera, there is a discrepancy caused by movement. The red triangle represents camera shake (this is a bit exaggerated, to illustrate).


With an IS/VR lens, the internal elements are moved by
electromagnets (represented by the red arrows) to create a suspension system allowing the camera to absorb
camera shake and shift the path of the light so that the relationship between the image on your sensor and the scene it represents remains constant.
In-Camera or Sensor Based
This works on the same principle as the lens-based, only
with the sensor physically moving instead of the lens elements. The sensor is
mounted on a platform and moves based on information it gathers from your other
settings. In-camera stabilisation means you don’t need IS within the lenses: you can use any lens. This is the least expensive, smallest and lightest way to achieve shake reduction.
A disadvantage, however, is that you have another moving part within
the camera itself. This ups the potential for things to go wrong, and potentially limits the life of your camera.
Why is Image Stabilisation So Helpful?
I mentioned IS being handy in a longer lens, due to more pronounced camera shake at longer focal lengths, but it’s also useful in low light conditions too. You should, with the use of VR, be able to shoot at slower shutter speeds than usual and still get a sharp image. If you have a very light camera, you might struggle to hold it steady in the wind, so even in good light conditions vibration reduction can come in very useful.
One common misconception with IS though, is that this will help you freeze fast moving images. It won’t. In fact, it may actually make them look worse as there can be a slight delay due to the IS, meaning your fast shutter speed won’t be as fast as you think.
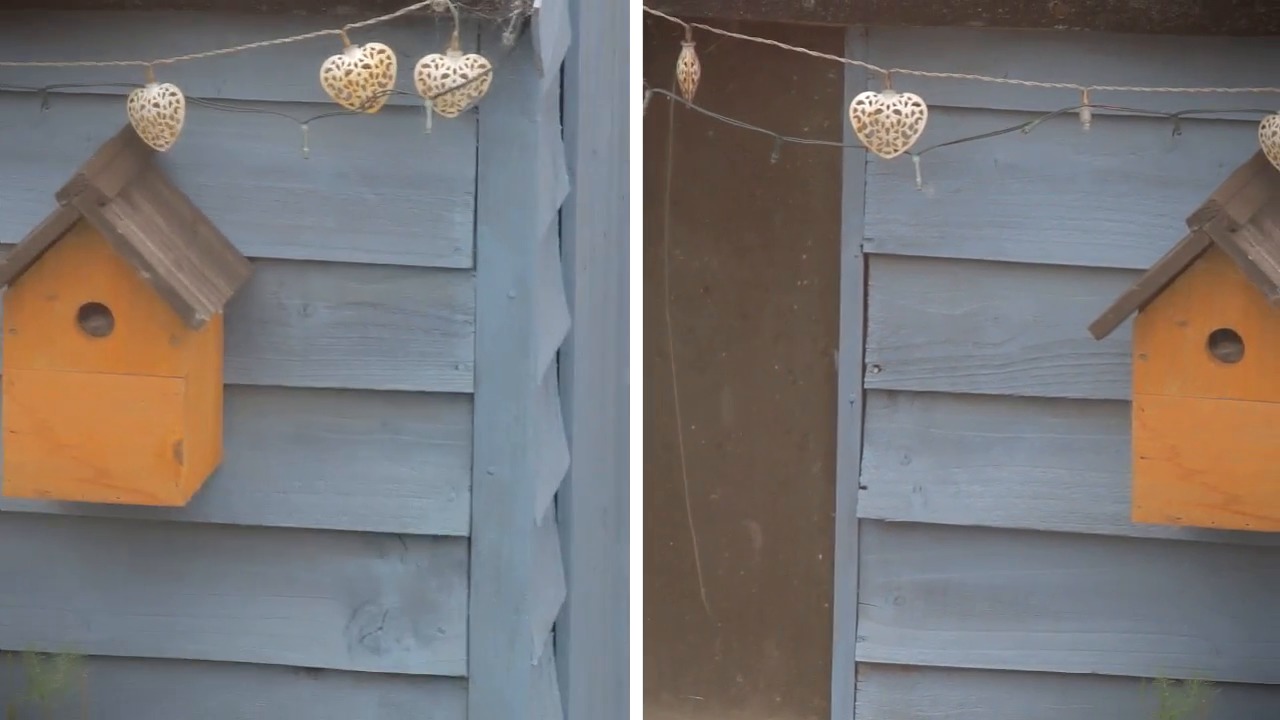
VR is really great for shooting video hand-held for ‘run and gun' filming, when setting up a tripod might not be possible. If you’re deliberately filming hand-held to get that particular look, then it will help to make it more subtle and watchable rather than inducing motion sickness in the viewer. We’ve come a long way since The Blair Witch Project.
In the video at the top of this tutorial you can see the difference in filming with VR off (left) and VR on (right) is staggering. This was filmed using a long lens (55-250mm) at 250mm so the camera shake is really pronounced.
When Not to Use VR
We’ve already discussed VR not being appropriate to ‘freeze’ moving images, so if you’re shooting fast moving objects like cars or animals then you’ll probably want to switch VR off. The fast shutter speeds you’d be using to capture rapidly moving objects would cancel out any accidental shake, anyway. Another time VR wouldn’t be appropriate is if you’re deliberately trying to create blur, again most likely in an action shot.
If you’re using a tripod then VR becomes redundant and you’ll just be fighting against it. Some cameras can sense this and automatically switch it off, but chances are you’ll need to do this yourself. If you don’t switch it off and your camera is unable to auto kill it, then you might create a feedback loop, where the camera detects its own vibrations and tries to compensate; basically making your pictures blurry.
If you’re filming and panning the camera on a tripod then
you’ll end up with the camera trying to compensate for that movement. Initially, when you start to film, the camera sees a static image (no physical
movement to the camera), but once you begin to pan, it will immediately try to
compensate for that. Continue the movement, and most modern DSLRs and
camcorders will realise the movement is deliberate and stop fighting it, but
you’ll still have that initial lag that means you’re not seeing what you’re actually
filming and your video might be a bit jumpy in a weird, lagging way.
It’s worth noting that as IS is electronically controlled, it does chew up your battery life, particularly with larger sensors (especially if you have sensor-based IS) or big lenses. If you don’t really need it then it might be better to switch off!
Conclusion
Vibration reduction or image stabilisation, whatever your manufacturer calls it, is a great invention which now comes at comparatively little cost than it used to. These features are almost standard now, but it’s still worth checking the specs carefully to see exactly what VR gives you for that particular lens. Beware the ‘anti-shake’ or ‘anti-blur’ labels too: these are often specs masquerading as vibration reduction, but all they’ll do is crank up your shutter speed and ISO.
With a good VR enabled lens, you could be looking at up to an extra four stops of light in flexibility. This will really make all the difference if you’re shooting in low light or with a long lens, or both! If you’re lucky enough to have an image stabilising sensor then you don’t need a lens with it in at all, so you can generally pick up lenses and part with less cash.
Nothing can ever give you the guaranteed rock-steadiness of
a tripod, so it’s unfair to compare VR to using one. When you do have time to
set up and use a tripod then you’re always going to get easier (I’m loath to
say ‘better’, every time) results. Remember to turn off your VR if you’re
mounted on a tripod though, or it could make your pictures blurry, which sort
of defeats the point!


