13218231805_b7d098f243_o

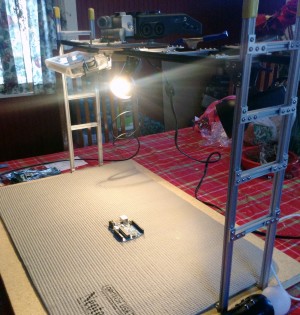
I needed to shoot some workbench videos, with a camera facing down at my hands that could be filming while I played with wires and electronic components. To accomplish this I built a POV rig with MicroRax aluminum t-slot beams, so I could focus on my work while still being able to see what I was recording. My rig consists of a wooden board with a gantry made out of aluminum beams, upon which the camera, mic, and lights are mounted. The board has an anti-static mat on it as well.

There are a couple of factors that you need to keep in mind before you size your project. You can make everything the way I did, but you aren’t guaranteed to get the results you want unless you take two measurements into consideration:

1) The size of the workspace. I based the size off of an antistatic mat I wanted to use with the POV rig. It’s an Op/Tech P/N 3611162 16″×24″ mat

2) Bear in mind the focusing characteristics of the camera, it may focus too close or far away from the surface, and positioning it at a certain height may offer better results than others.

I used an iPhone 4S, and the rig height I selected reflects this. I suggest taking some test videos with the camera positioned at various heights, and choosing the one that looks the best.

Project Steps

Cut the base

Use a table saw to cut a base. It should be larger than the width of the gantry, and big enough to give you plenty of room to work. I made my base out of ¾” MDF, measured 27″×18½”.

Build vertical supports

Next, build one of the vertical supports. I began with 500mm lengths of MicroRax (it’s measured in Metric!) and added 80mm cross-beams with the help of nut-plates, L-brackets, and M3 screws.

Put 90° brackets on the bottoms of the beams, with one leg horizontal to the wooden board —they’ll eventually be attached to the wooden base. Use nut plates and M3 screws to attach them.

Put vinyl caps on the tops of the beams.

Now, build a second vertical support just like the first one!

Build horizontal gantry

Build the horizontal gantry that connects the two vertical supports. This consists of two 640mm MicroRax beams with 80mm cross-braces, assembled as before with L-braces, nut plates, and M3 screws.

Attach the gantry to the two vertical supports using more of the M3 screws and the triangular connector plates.

You should be careful at this point that you attach the horizontal structure at just the right height. For me it was 17″, a full 3″ below the top of the beams. It’s good to give yourself some extra room, in case your needs change!

Attach the aluminum beams to the wooden base

Screw the metal framework to the wooden base using the #8 screws. You’ll probably want to drill some pilot holes.

Adding the AV electronics

Next you’ll want to attach your camera and microphone to the rig. I used an Optrix iPhone case and screwed it onto a 6×4″ plywood board with the #6 screws.

Next, I added the microphone. I had a loaner Zoom H6 that I attached the board with the 0.25″ bolt, which goes into the tripod connector on the mic. Drill a hole in the board to accommodate the bolt.

(This is the part of the project were you will have to make changes to conform to your AV hardware!)

Note that after this project was done I noticed a 0.25″ mounting plate on the MicroRax site that can mount a camera. Curses!

Add lights

Attach the lights. They clamp on to the MicroRax and plug into your house current. I used two of the Hampton Bay lights with pieces of paper (index cards) taped over them to diffuse the light.