

Self Timer to the Rescue!
When I tried to buy a remote for my D800 I was staggered
that a genuine Nikon one would cost me over £100. I could buy a third-party model but in the meantime a seemingly obviously alternative
hit me: self-timer! I wondered why I hadn’t thought of it before.
In this quick tutorial you'll learn how your self-timer can replace many uses for a remote trigger release.
How to Use the Self-Timer
Look for the symbol circled above; that’s your self-timer. I have a Nikon but it's the same symbol on all makes and nearly all cameras have some sort of self-timer function, even many old point-and-shoots from film days.
Once you’ve got the self-timer function dialed in you’ll need to adjust your settings in your menu.
This is how I did it on the D800:

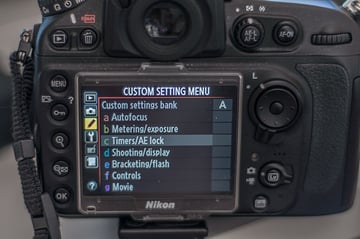


The options you choose will depend why you’re using the timer.
For Long Exposures
For this, I use a 2 second delay because that’s all I need to press the button and move my hand away so that I’m not touching the camera (and causing vibration) when it takes the shot. You still need a tripod (or still surface), but this is an excellent alternative to using a remote release. Be aware that you wouldn’t be able to use this method in ‘bulb’ mode though as you’d have to press the shutter again to stop the exposure, resulting in camera shake.
For Self-Portraits and Group Shots


Sick of always being behind the camera and not being in snaps? While I was taking pictures on holiday I used this method to get pictures of myself and my partner. It was great to have both of us in the shot and not just be our heads with one long arm where we’re holding the camera. If you change your number of shots to 2 or 3 you maximise the chance of getting a good shot of everyone in the picture too!
For Low Light
In low light situations, camera shake is a real pain. Same premise as the long exposure section really; find a steady place and take advantage of the self-timer to extend your shutter speed without needing a remote.
Conclusion
Now I’m not saying don’t buy a remote release: they are really useful and it means you don’t have to fiddle with your self-timer settings each time. If you’re looking for an affordable alternative and you don’t need bulb mode, or you've left your remote at home, then using the timer in place of it works very well and is a real a shot-saver.


