Guide to Life: Hold and Shoot a Handgun Properly

You hope to never be in situation where you have to use a firearm. But if it happens, you should be prepared to do it properly to save your life or that of someone you love, or both.

how-to-hold-and-shoot-a-handgun-properly-gear-patrol-lead-full Amos Kwon

Using a firearm doesnโ€™t make you tough, and itโ€™s not glamorous. Frankly, weโ€™re appalled by movies and TV shows (except for 24 with Kiefer Sutherland, who appears to have been trained very well by an expert) that have not only criminals but also police using firearms like idiots โ€” holding it next to their heads for effect (like going deaf?) or one-handed and sideways (canโ€™t hit the side of a barn). All humor aside, you hope to never be in situation where you have to use a firearm. But if it happens, you should be prepared to do it properly to save your life or that of someone you love, or both.

Before we dive in, a few caveats: (1) Mechanics and technique are second to situational awareness and judgement. Just because you know how to hold and fire a handgun doesnโ€™t mean you know when to use it and when not to; (2) never use a firearm to threaten anyone. Itโ€™s not meant to intimidate or injure. Itโ€™s an instrument of death and should only be drawn and aimed when the situation requires its use; (3) just because you read this article doesnโ€™t mean you are trained. Take a safety course to get educated and practice regularly; (4) stay out of harmโ€™s way if at all possible and contact law enforcement first. If you canโ€™t, then employ the following techniques.

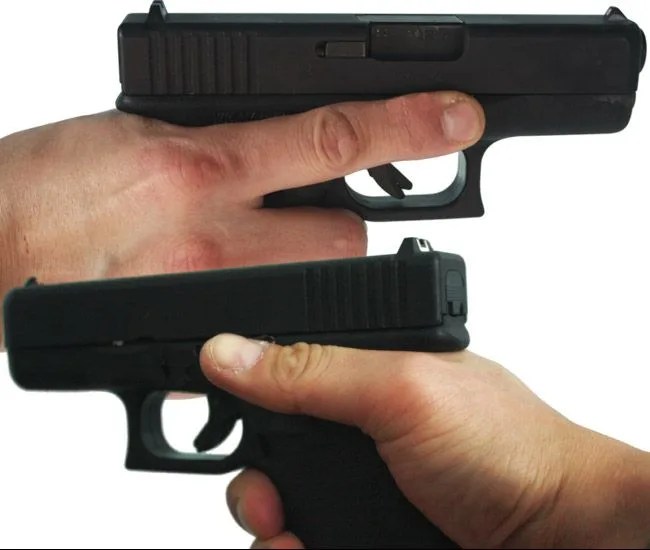
For the purposes of simplicity, our firearm of choice is a compact semi-automatic handgun, similar to a Glock 30 (.45 ACP), as opposed to a revolver. The Glock is an ambidextrous handgun since the safety is on the trigger.

Note: the author is a former federal law enforcement officer, so the information comes from a reliable source.

issue-650×100

1 Always assume a gun is loaded, and always have it pointed in a safe direction. If youโ€™re at the range, which we highly recommend for practice and skills improvement, then that direction is always down range. Even if there is no magazine in the gun and the slide is pulled back, still treat it like itโ€™s loaded; even when you set it down and itโ€™s empty, point it down range, and always away from people (including yourself). The following steps should be performed in โ€œdry fireโ€ mode, meaning the gun is not loaded.

2 Make sure the gun is clear by removing the magazine (not the โ€œclipโ€) and setting it down. Pointing the gun down range, rack (move forward and backward) the slide a few times to make sure thereโ€™s no round in the chamber. Lock the slide back so the ejection port is open and you can see light through the magazine well to show that itโ€™s empty. Remove all rounds from the magazine and then re-insert the magazine in the gun. Send the slide forward. Your handgun is now ready to dry fire.

8

3 The dominant hand grip. Shooting effectively should always be done with two hands when possible, because a two-handed grip is always more stable and therefore more accurate. First, hold the gun with your dominant hand and place it high on the grip. The Glock 30 curves inward at top and back of the grip, so the webbing of your hand between your thumb and index finger should terminate there (Fig 1). This provides the greatest degree of security when firing. Wrap your last three fingers (middle, ring and pinky) around the base of the grip, just underneath the trigger guard. Keep them as close together as possible and donโ€™t overlap (Fig 2). Also, do not use a โ€œdeath gripโ€ โ€” simply hold firmly. Keep the index finger of your dominant hand extended and against the frame of the gun (the bottom portion of the gun that doesnโ€™t move when fired) (Fig 3). Your shooting finger should never be on the trigger unless you are aimed and prepared to fire. Your thumb should be wrapped around the other side and held against the other side of the frame, near the top.

1

4 Next, place the heel of your non-dominant hand in the exposed portion of the grip so that it completely fills the space (Fig 4). The thumb of your non-dominant hand should be right underneath and slightly forward of your dominant handโ€™s thumb and against the frame. Wrap your other four finger (index, middle, ring and pinky) firmly around the base of the grip, just underneath the trigger guard and around your dominant hand on the other side of the grip. Grip tightly.

5

5 This two-handed grip will feel completely unnatural, much like holding a golf club for the first time. The key is to fill open spaces around the grip because the gunโ€™s recoil moves everything toward the path of least resistance, and staying in control is the name of game. When you look down on the top of the gun while holding it properly, everything should fit together neatly, with each side nearly mirroring the other (Fig 5). If you still feel the urge to use one hand and shoot sideways like a character from The Wire, then put the gun down and walk away.

6 Assume a proper shooting position with your feet shoulder width apart and your knees slightly bent. Donโ€™t lock out your knees and donโ€™t flex your leg muscles, but establish a grounded base with the lower half of your body. Square your shoulders and lean forward slightly with your torso. Draw the gun from your holster with your dominant hand and grip the gun according to the aforementioned method, keeping your trigger finger off the trigger and along the frame of the gun. Keep it in whatโ€™s called the ready position (Fig 6), holding the gun close to your body in front of your abdomen and pointed toward your target.

4

7Determine your dominant eye. When shooting a target thatโ€™s farther than a few yards away, youโ€™ll depend on your dominant eye. Donโ€™t assume it matches your dominant hand. You can figure out which eye is dominant by extending your arm and holding your index finger just below an object in the distance while looking at it with both eyes. Close one eye. If the object moves from its original position when both eyes were open, you are looking through your non-dominant eye. If the object does not move from its original position, you are looking through your dominant eye.

8 Now, from the ready position, extend your arms out in front of you and prepare to aim in on your target with your dominant eye (Fig 8). Your arms should be extended but not locked. Keep a very slight bend in your elbows with your shoulders still square to the target. To do not โ€œbladeโ€ your body sideways.

6

9 Aim. The Glock 30 has a small rectangular front sight with a rear notched sight. When looking down the top of the gun, keep your dominant eye on the front sight so that it rests in the middle of the rear notched sight. What youโ€™ll see is three squares with the tops aligned and even amounts of light on both sides of the front sight. That front sight should be on your target (and will cover the target almost entirely at longer distances).

10 Pulling the trigger. Properly firing the gun with accuracy and preparing yourself for the next shot involves excellent trigger management. In fact, contrary to popular belief, you shouldnโ€™t just pull the trigger โ€” itโ€™s much more of a well-modulated press. Youโ€™ll want the center of the first part of your index finger (whatโ€™s known as the distal phalanx) to come in contact with the entire trigger. Looking down on the top of the gun, the portion of your trigger finger closest to your knuckle (proximal phalanx) should be as close as possible to parallel to the frame of the gun (Fig 9). If youโ€™re off center with your distal phalanx, the gun will want to pull or push to the left or right. Press with direct pressure, but donโ€™t jerk. Keeping both of these trigger finger position principles in check will help you shoot consistently.

11 Firing (dry). Now that youโ€™re aimed in properly and ready to fire (dry), make sure your front sight is clear and on the target. You will experience some movement with the front sight (it tends to move in a figure eight, side to side), but with time, practice and over-familiarity, youโ€™ll develop muscle memory to decrease this movement. The next part is crucial to accuracy. Donโ€™t anticipate the shot. Instead, focus on your aim and technique. You should always be surprised by the sound of the gun firing. Anticipating the shot means you tend to drop your front sight to see where the bullet lands. Itโ€™s like lifting your head after a golf swing to see where the ball has landed. Press the trigger in a controlled manner and focus on your front sight. Be surprised by the sound of the shot (or the โ€œclickโ€, since youโ€™re in dry fire mode). Rack the slide again and keep practicing dry firing until you feel comfortable.

12 Now, youโ€™re prepared to shoot with live ammunition. Donโ€™t forget to always wear proper eye protection and ear protection when practicing. Remember, treat every gun as if itโ€™s loaded โ€” down range and in a safe direction. Load the magazine completely and load the gun. Rack the slide. A round is now chambered. Hold the gun using the two-handed method described above and keep your finger off the trigger until you are aimed in on your target.

13 Keep your dominant eye focused on the front sight and make sure youโ€™re on the target. Take a few deep breaths and hold. Press the trigger firmly and be surprised by the sound of the round discharging. Repeat. Fire through the whole magazine without concerning yourself where the rounds land. With a semi-automatic handgun like the Glock, there is a point when the trigger moves forward after firing where the firing pin resets. You can feel a slight click. Itโ€™s about 2/3 of the way forward. You wonโ€™t need to send the trigger all the way forward once you know where this point is. You can start firing as soon as it resets and youโ€™re properly aimed in. This will help you stay on target and reduces the amount of trigger travel required on the next shot. Take your time when practicing; itโ€™s more about developing proper and consistent technique than impressing yourself or your friends. Once youโ€™re out of rounds, the slide will lock back and you can now make the gun โ€œsafeโ€ by removing the magazine with the gun pointed down range, racking the slide a few times, locking the slide back and performing a finger check in the chamber and the magazine well. Set the gun down.

14 Continue to practice the above techniques, leaving out nothing. Grip, stance, ready position, target acquisition and aiming, trigger pull, trigger reset, and not anticipating the shot: all of these factors play a role in shooting effectively. Above all else, always remember to practice safety.