
More Best Practices


I built my first home for a customer back in 2000, I’ve learned a lot since then. One of the areas I’ve learned the most is in building tightness. These days I’m working more as an energy auditor than a builder. Conducting code-compliance blower-door testing on new homes and conducting energy audits, some with blower door testing, on older homes. I get lots of chances to see where homes leak.
I live in Climate Zone 7. With 10,000 heating degree days and usually fewer than 500 cooling degree days, builders in my area get away with using polyethylene sheeting as both an air and vapor control layer. Most new homes I blower door test achieve a 2-2.5 air changes per hour at 50 Pascals (ACH50). Our houses survive because of a requirement for balanced mechanical ventilation. Take the poly away, and most builders will struggle with passing the blower door test. Though we can do it, not every home needs to be passive house tight (.6 ACH50). Getting air tightness to around 2ACH50 for the majority of new construction is perfect. How can we get there? Well, here are my suggestions:
- Determine the location of the air control layer that best suits the project. Sometimes that can be inside, often it’s better outside. Maybe it’s both. The projects I work on, I try to make it both—a belt-and-suspenders approach. I do like using the exterior as the main air control layer. To me, it’s the easiest to detail.
- Make sure the air control layer will be continuous. The red pen test is a good way to determine if you’ve missed something. Take a red pen and trace around any section drawing of the house—the pen should never leave the paper as you outline the location of the air control layer. How is the foundation sealed to the wall? The wall to the window or door? The wall to the roof or ceiling? And so on. If you can’t name the materials that are keeping the air barrier continuous at any given point, you have a potential air leak.
- Set a goal for a tightness. Many areas of Climate Zones 3-7 have adopted a code minimum of 3ACH50. If the code is not enforced in your area, 3ACH50 should still be your goal. And keep in mind, air sealing needs to be verified with a blower door test, even if not required by your local building official. The lower the blower door test result, the more efficient, comfortable, and healthy the home becomes. Another reason for a tight home is the possibility of reducing the size of the heating and cooling equipment. One piece of information needed for an accurate heat loss calculation is the air infiltration rate. Set a goal and communicate with your HVAC contractor early in the project so that equipment is sized correctly. Try to better the blower door test results with every home.
Consider all of these critical areas
Air sealing doesn’t require any exotic materials, though some can be used if you want (some of the European tapes are awesome). The essentials are a good quality tape, acoustical caulking, and canned spray foam. There are a few areas I really like using closed-cell spray foam, but you can get by without it with a little extra attention paid to these areas. When planning an air sealing strategy, I start at the foundation and move up in the assemblies. I work my way through the structure just as I would if I were building it.
1. The foundation-to-wall connection
Homes in my climate, especially in the heating months, leak low and high. The stack effect draws cold air into the home at the lower levels and exhausts warm air out at the higher levels. The larger the difference between indoor and outdoor temperatures, the stronger the stack effect, I’ve experienced 120°+F differences in my climate. Sealing the bottom plate is critical. I’ve talked with many builders who only use an adhesive such as PL400 for the connection between the concrete to the treated sill plate. This is not only a poor air-seal, it is not an effective measure to prevent capillary action or drawing moisture from the concrete up into the wall framing. There are some great methods for this making this connection; I like to keep it simple. Install sill seal between the concrete and bottom plate. Seal the exterior with a tape or liquid flashing that will bond to both the wall sheathing and whatever material is below. This could be concrete, wood, or foam insulation. Next, seal the inside concrete wall, slab, or subfloor to framing using an acoustical caulking right before the vapor control layer or drywall is installed.

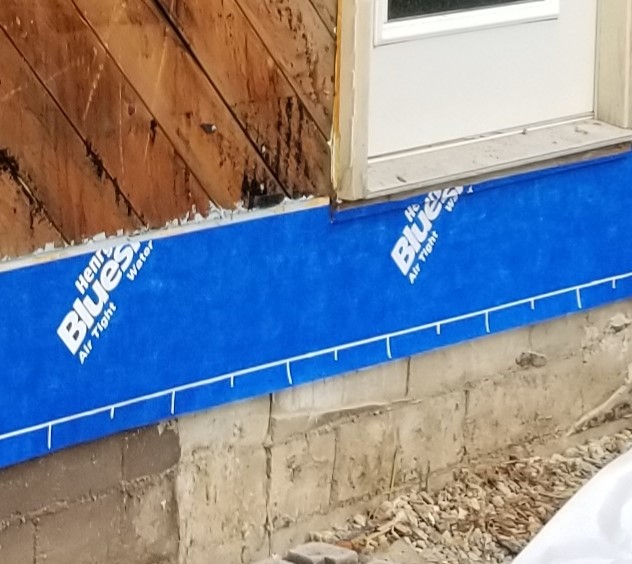
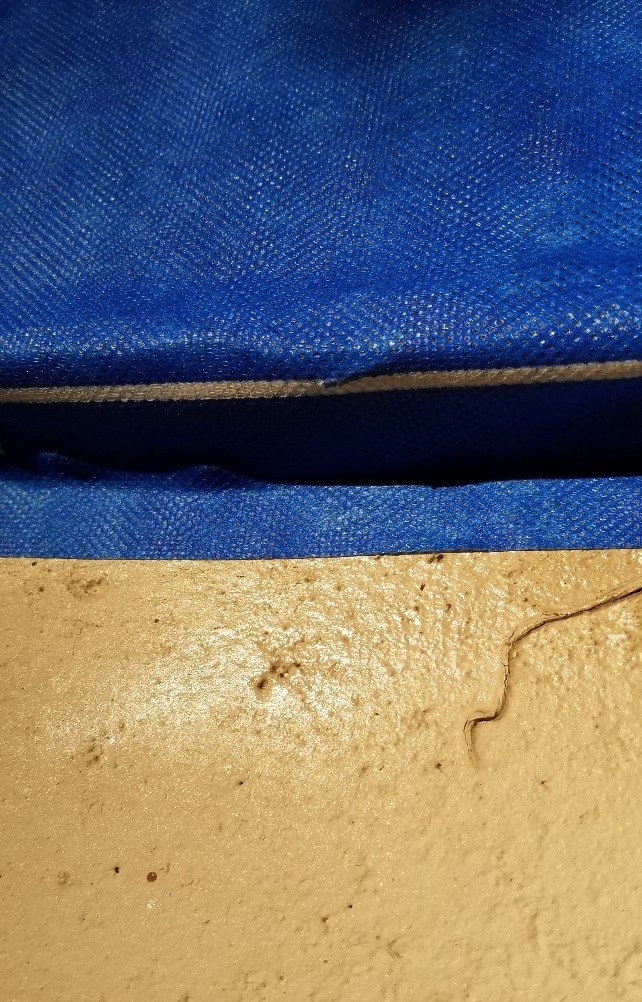
The following pictures are how I addressed this connection at my own home (a 1952 Cape). I used Henry Blueskin VP100 and wrapped the self-adhered membrane onto my foundation. I increase the adhesion by priming the concrete with Henry Blueskin Prep, a spray adhesive. It’s now been in place for a year, I still can’t pull the Blueskin from the concrete foundation. I also seal the inside of the wall to floor connection using a large bead of acoustical caulking. I wait to install this bead until right before the vapor control layer or drywall is installed. Acoustical caulking is sticky stuff and tends to be messy. Waiting to install until right before it’s covered will keep any sub-contractors working on the job from being mad at you.

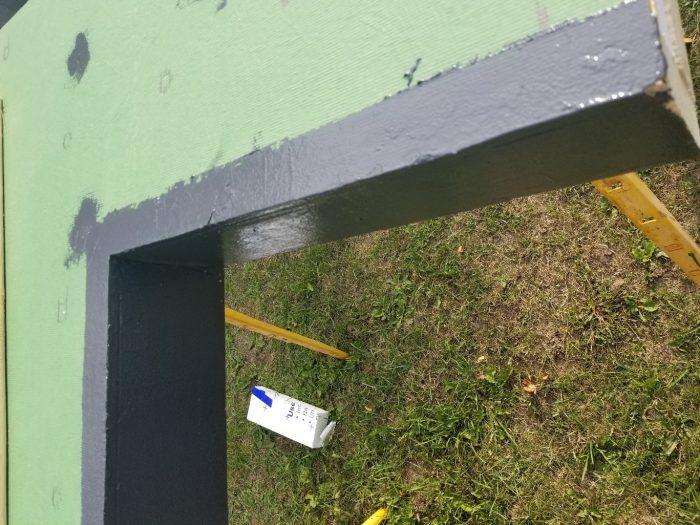
This process could also be accomplished by using a fluid-applied sealant. Because of the irregular surface that needed to be both water and airtight, shown below, Prosoco’s Fast Flash was chosen. We were able to work it into the nooks and crannies of the ICF/concrete transition and the wall sheathing.
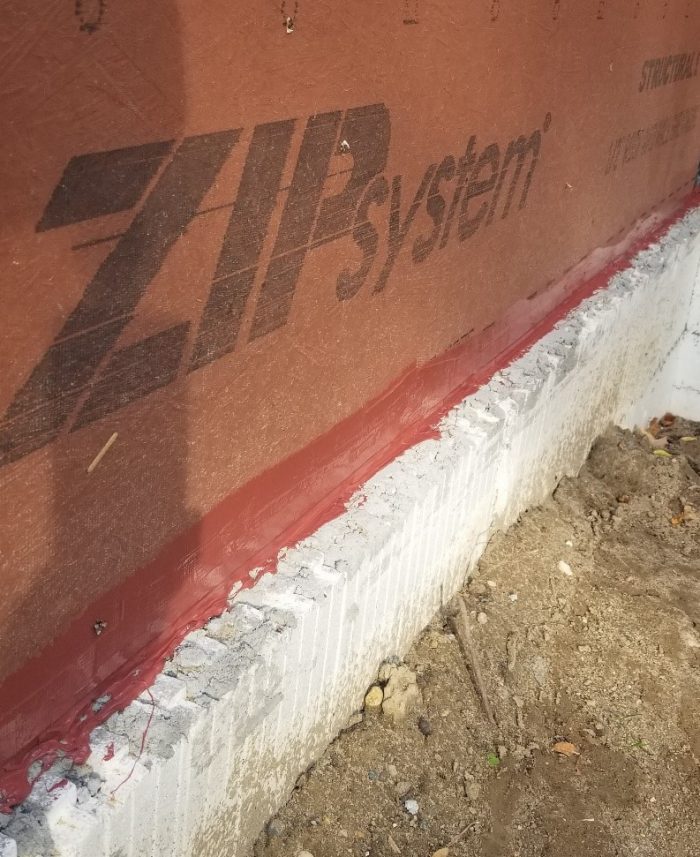
 If using a sheathing with an integral water-resistive barrier, such as Huber’s Zip or LP’s Weatherlogic, you will be using their tapes to create a water and air-tight seal. What if you are using standard OSB or plywood? You could also tape those seams before covering the sheathing with your choice of housewrap or other WRB. Follow the manufacturers installation instructions for the rest of the WRB installation.
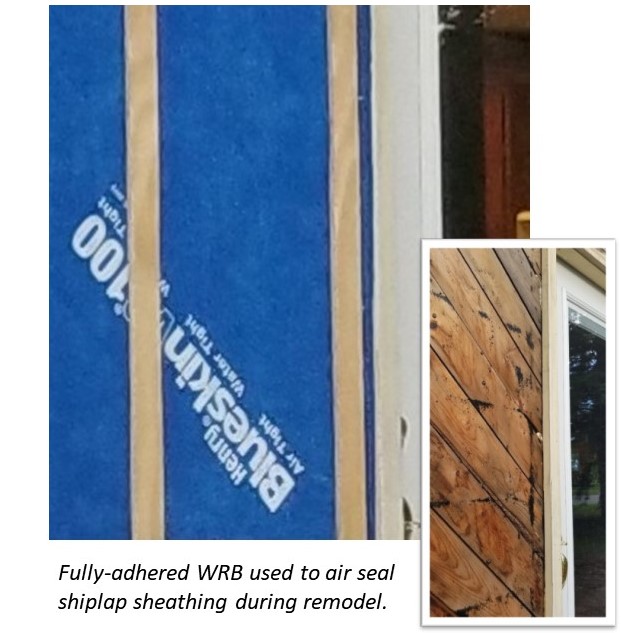
Because the foundation to sheathing connection has already been treated by tape or a fluid applied product, do not seal the bottom of the WRB. If any bulk moisture should end up behind the WRB, it should freely drain out the bottom. If you’re using a fully-adhered or liquid-applied WRB, those products will provide air sealing. My personal home, still a work in progress, has many more wood joints than the typical new build of today. The home is sheathed with individual boards or shiplap. I decided to use a fully adhered WRB for air sealing (photo above right).
3. The top plate
The next detail to consider is how to keep the exterior air barrier continuous at the top of the exterior wall. If your building the “perfect wall” where rafter tails will be added after a layer of continuous exterior insulation, the air control layer will simply follow up the roof at the sheathing layer. Most homes being built today have rafter tails cut as part of the rafters or as part of the trusses. This forces us to move the air control layer to the interior ceiling. This can be accomplished by either a tape, or a mechanically-fastened or fully-adhered WRB, connected to the exterior wall WRB. Extend the product up and over the top plate and seal to the interior ceiling air barrier.

This interior air control layer might be drywall, installed airtight. If the budget will allow, it could also be a smart vapor retarder such as Siga’s Marjex, Pro Clima’s Intello or Certainteed’s MemBrain. In my climate, I’m not afraid to use a 6-mil poly on the ceilings as long as the space above is an unconditioned and vented attic. With cathedral ceilings and unvented attic assemblies, I would choose one of the other mentioned methods.
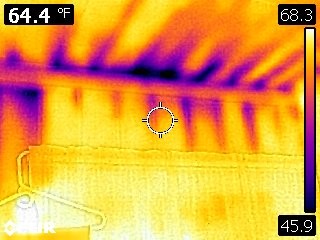
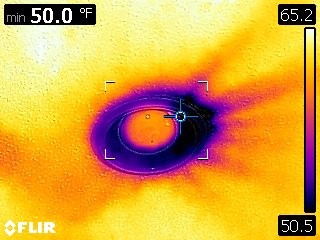
The connection where the wall meets the ceiling along with interior ceiling penetrations is where I see the most problems during blower door testing. I have hundreds of thermal images I could show where air is leaking into the home. In my very cold climate, the stack effect moves warm air out those holes and into attic spaces. Best case scenario is some lost heat; worse case, moisture with the air leak is unable to clear the vented attic space and finds a condensing surface. The frost that forms melts during warmer weather. I’ve heard this process called “attic rain.” Never a good sign when moisture is dripping from the ceiling inside the home.
4. Windows and doors
The biggest holes in the air control layer are windows and doors. These first need to be integrated into the WRB. Controlling water is more important than controlling air. The installation method will depend on the chosen WRB. When using an exterior air control method, it’s important that the product is extended into the window or door opening. Air can easily move through framing connections around the opening. Extending the tapes or fluid applied sealants through the opening will allow for a continuous air control layer after the window is installed. A minimally expanding spray foam or backer rod and caulk applied from the interior will complete the continuity of the air seal with the window.
5. Exterior penetrations
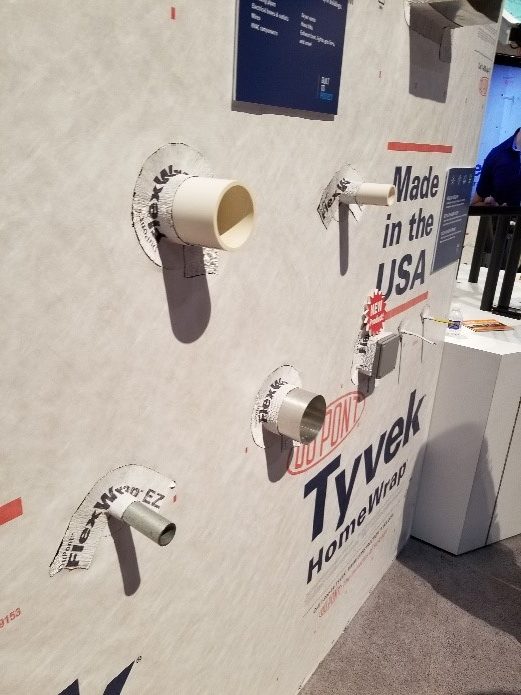
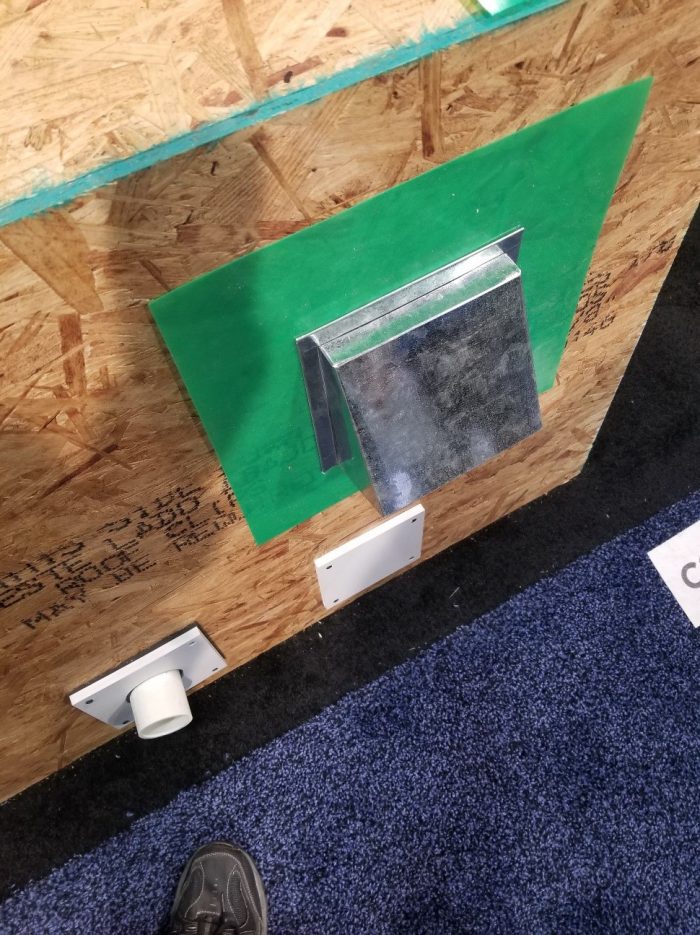
Electrical wires, water spigots, and HVAC vents can all punch holes through the air control layer. There are a lot of different methods that can be used to seal these. Tapes, gaskets, fluid-applied sealants, and caulks can all be used. I like products that don’t have to be reapplied in the future. My first choice is a quality tape. If there may be some movement of the material penetrating the air barrier, such as a PVC vent for a high efficiency heating appliance, I would choose a gasket.
Electrical wires can present a different challenge. There are often many wires for exterior lighting and outlets poking out. Jake Bruton has a great solution, one hole, one wire. It’s hard to make a good air seal around multiple wires in the same hole. One hole, one wire, is the best solution.
6. Interior penetrations
Another area I see air leakage during blower door tests are penetrations through the air control layer on the interior. Electrical boxes, plumbing pipes, and HVAC ducts can all be a problem in both walls and ceilings. All penetrations leading from the conditioned space of the home into an unconditioned attic or crawlspace need to be sealed. Back to the Jake Bruton method, one wire, one hole. I typically use canned, expanding spray foam, but caulks and other sealants can be used.
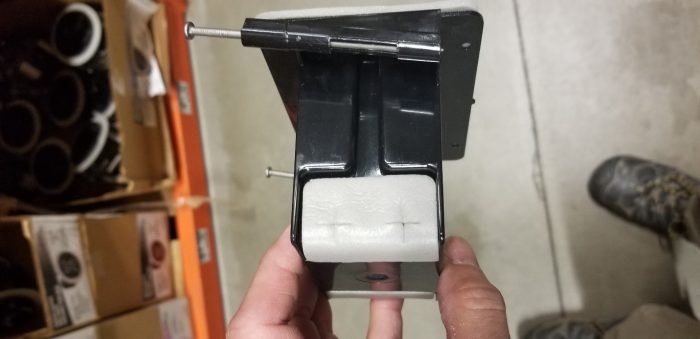
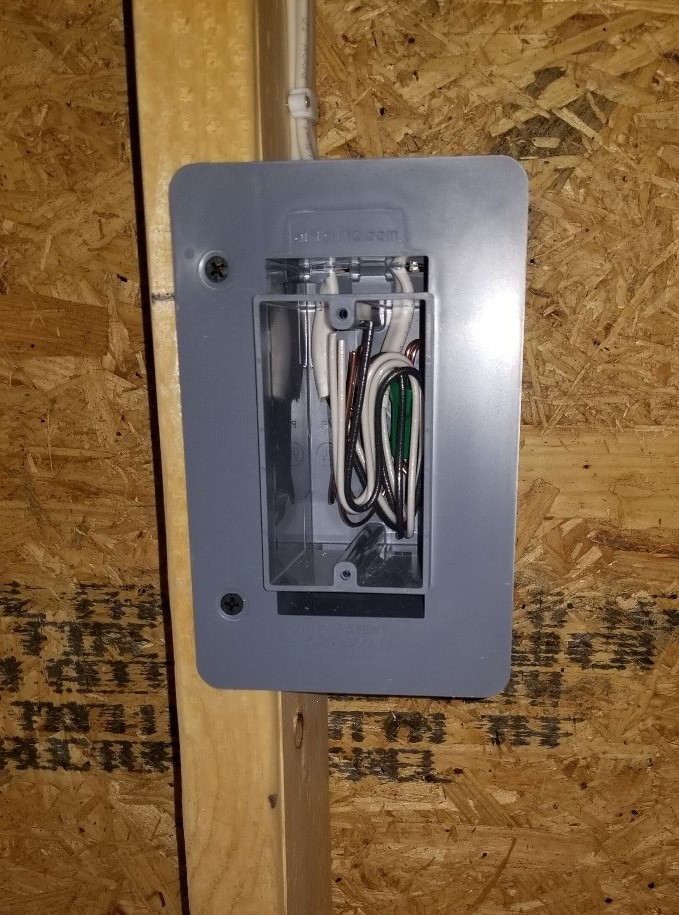
Using airtight electrical boxes with a foam gasket provide some reduction in air movement. Most airtight boxes don’t have a good air seal where the wires enter the box. Often this area is sealed with caulking or expanding spray foam. I recently used an airtight box that had a chamber where the wires entered which could be spray foamed shut. A nice option.
Stay away from traditional recessed can lights in ceilings. Even though many have improved the air tightness of the can, the connection to the ceiling air control layer still requires good execution. And then there’s the insulation that is being displaced. There are much better lighting options available.
I’ve never been a fan of running ductwork in unconditioned attic spaces. How the ductwork gets into the space and how the distribution boot is sealed to the air control layer make all the difference. Often the air sealing around ducts and boots aren’t effective and can be seen while blower door testing. My suggestion, find a way to keep the duct work inside the conditioned space.
Lastly, plumbing pipes. Typically, these are PVC vent pipes that extend through the top plates and into the attic space. Using caulking or spray foam to seal between the pipe and the framing is usually effective at stopping air. I still occasionally find these are a problem in new construction.

Roll the tape!
One piece of advice I did not mention in this article is how to properly install tapes. All tape manufacturers require the tape to be either rolled or other mechanical pressure applied to “wet” the tape. This forces the adhesive of the tape into all the small voids of the surfaces being taped. Depending on the location, this may also be a critical step in keeping water out of the home. Hand pressure isn’t enough.
Bottom line
I’ve definitely seen improvements in blower door test results from the homes built in the 1950s, such as mine and the new homes of today. My home tested at 12.5ACH50. Homes from the 1980s, when polyethylene sheeting on the warm-in-winter side of the wall and ceiling assemblies began to be widely used in my area, often test less than 5ACH50. The average new home I test today is closer to 2ACH50, and I’ve tested several at 1ACH50. Only one of the homes tested at 1ACH50 I would consider to be a “high performance” home. As we continue to gain experience in how to improve the tightness of a home, we also need to challenge ourselves. If your homes are testing at 2ACH50 now, make an effort to get to 1.5ACH50. I believe the codes will eventually begin to force lower blower door numbers, there will be less of a struggle if you’re already achieving a low level of air tightness.
This article has been about basics of air sealing. Two additional points need to be considered when building a tight home. First is controlling interior moisture levels and improving indoor air quality with proper ventilation and second is the possible need for an exterior rainscreen detail, depending on the type of siding used.
-Randy Williams has worked as an electrician and builder and currently works as an energy auditor and performs blower door tests for code compliance. You can find him on Instagram @northernbuiltpro and on his blog www.northernbuilt.pro. Photos courtesy of the author.
Weekly Newsletter
Get building science and energy efficiency advice, plus special offers, in your inbox.


8 Comments
Can we please stop making unconditional statements about tighter homes being healthier?
Such as this one, "The lower the blower door test result, the more efficient, comfortable, and healthy the home becomes."
This statement is almost certainly correct about comfort and efficiency. However, there are a lot of unmentioned "...if..." statements required to make them true in the case of 'healthy'.
Is there any data showing that 1 ACH is detectably more comfortable than 2 ACH?
1 ACH is more energy efficient, but it may not be more $ efficient.
Wouldn't that largely depend on where the air leakage occurs? A 2ACH house might well more comfortable that one with half the air-leakage if that air leakage was all concentrated in areas which produced drafts on the occupants.
Agreed. For the sake of the question, let's assume in all the places.
It's an interesting question for sure. At what point do other things become influential than air-leaks in terms of comfort? Like maybe the radiant heat loss due to excessive or p0orly performing glazing? I know when I'm in an uncomfortably leaky house, but have no idea what that is in terms of ACH.
Going the other way, I wonder if anyone could tell the difference between a 1 ACH house and one even ten times as tight?
Excellent point. Tight homes can be very unhealthy if poorly ventilated. And downright hazardous if the home is chock-full of offgassing foams, has lots of carpet/cheap flooring, formaldehyde-laced Chinese drywall etc etc. 'Tight is right' needs a massive asterisk.
The focus should be on a healthy, durable home. Eliminate foams/formaldehyde (plywood vs OSB, tile vs carpet, solid vs laminated).
Thanks for these tips. When you describe sealing the foundation-to-wall bottom plate, you use tape or liquid flashing from the sheathing to the foundation material. If you are not fully renovating an older home but wish to make an improvement, is liquid flashing viable caulked along the seam? For instance, I have a 20's home with mortared fieldstone foundation and original shingle siding.
How do these self-adhering WRBs do over old painted wood?
Log in or create an account to post a comment.
Sign up Log in