blog
Single Host Networking for MySQL Containers on Docker

Networking is critical in MySQL, it is a fundamental resource to manage access to the server from client applications and other replication peers. The behaviour of a containerized MySQL service is determined by how the MySQL image is spawned with “docker run” command. With Docker single-host networking, a MySQL container can be run in an isolated environment (only reachable by containers in the same network), or an open environment (where the MySQL service is totally exposed to the outside world) or the instance simply runs with no network at all.

In the previous two blog posts, we covered the basics of running MySQL in a container and how to build a custom MySQL image. In today’s post, we are going to cover the basics of how Docker handles single-host networking and how MySQL containers can leverage that.
3 Types of Networks
By default, Docker creates 3 networks on the machine host upon installation:
$ docker network ls
NETWORK ID          NAME                DRIVER
1a54de857c50        host                host
1421a175401a        bridge              bridge
62bf0f8a1267        none                null
Each network driver has its own characteristic, explained in the next sections.
Host Network
The host network adds a container on the machine host’s network stack. You may imagine containers running in this network are connecting to the same network interface as the machine host. It has the following characteristics:
- Container’s network interfaces will be identical with the machine host.
- Only one host network per machine host. You can’t create more.
- You have to explicitly specify “–net=host” in the “docker run” command line to assign a container to this network.
- Container linking, “–link mysql-container:mysql” is not supported.
- Port mapping, “-p 3307:3306” is not supported.
Let’s create a container on the host network with “–net=host”:
$ docker run
--name=mysql-host
--net=host
-e MYSQL_ROOT_PASSWORD=mypassword
-v /storage/mysql-host/datadir:/var/lib/mysql
-d mysql
When we look into the container’s network interface, the network configuration inside the container is identical to the machine host:
[machine-host]$ docker exec -it mysql-host /bin/bash
[container-host]$ ip a
1: lo:  mtu 65536 qdisc noqueue state UNKNOWN group default
    link/loopback 00:00:00:00:00:00 brd 00:00:00:00:00:00
    inet 127.0.0.1/8 scope host lo
       valid_lft forever preferred_lft forever
    inet6 ::1/128 scope host
       valid_lft forever preferred_lft forever
2: eth0:  mtu 1500 qdisc pfifo_fast state UP group default qlen 1000
    link/ether 00:0c:29:fa:f6:30 brd ff:ff:ff:ff:ff:ff
    inet 192.168.55.166/24 brd 192.168.55.255 scope global eth0
       valid_lft forever preferred_lft forever
    inet6 fe80::20c:29ff:fefa:f630/64 scope link
       valid_lft forever preferred_lft forever
3: docker0:  mtu 1500 qdisc noqueue state DOWN group default
    link/ether 02:42:93:50:ee:c8 brd ff:ff:ff:ff:ff:ff
    inet 172.17.0.1/16 scope global docker0
       valid_lft forever preferred_lft forever
    inet6 fe80::42:93ff:fe50:eec8/64 scope link
In this setup, the container does not need any forwarding rules in iptables since it’s already attached to the same network as the host. Hence, port mapping using option “-p” is not supported and Docker will not manage the firewall rules of containers that run in this type of network.
If you look at the listening ports on the host machine, port 3306 is listening as it should:
[machine-host]$ netstat -tulpn | grep 3306
tcp6       0      0 :::3306                 :::*                    LISTEN      25336/mysqld
Having a MySQL container running on the Docker host network is similar to having a standard MySQL server installed on the host machine. This is only helpful if you want to dedicate the host machine as a MySQL server, however managed by Docker instead.
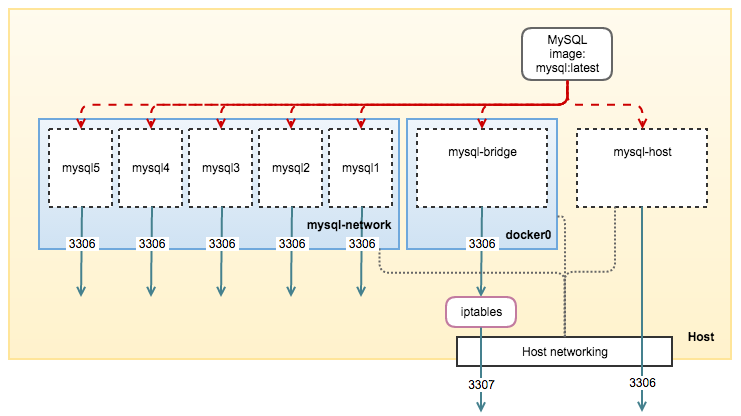
Now, our container architecture can be illustrated like this:
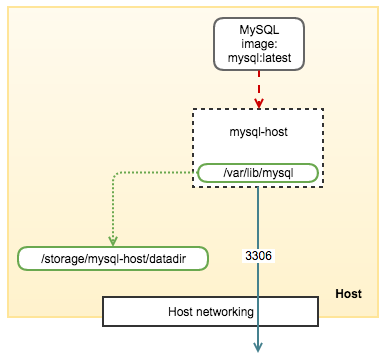
Containers created on host network are reachable by containers created inside the default docker0 and user-defined bridge.
Bridge Network
Bridging allows multiple networks to communicate independently while keep separated on the same physical host. You may imagine this is similar to another internal network inside the host machine. Only containers in the same network can reach each other including the host machine. If the host machine can reach the outside world, so can the containers.
There are two types of bridge networks:
- Default bridge (docker0)
- User-defined bridge
Default Bridge (docker0)
The default bridge network, docker0 will be automatically created by Docker upon installation. You can verify this by using the “ifconfig” or “ip a” command. The default IP range is 172.17.0.1/16 and you can change this inside /etc/default/docker (Debian) or /etc/sysconfig/docker (RedHat). Refer to Docker documentation if you would like to change this.
Let’s jump into an example. Basically, if you don’t explicitly specify “–net” parameter in the “docker run” command, Docker will create the container under the default docker0 network:
$ docker run
--name=mysql-bridge
-p 3307:3306
-e MYSQL_ROOT_PASSWORD=mypassword
-v /storage/mysql-bridge/datadir:/var/lib/mysql
-d mysql
And when we look at the container’s network interface, Docker creates one network interface, eth0 (excluding localhost):
[machine-host]$ docker exec -it mysql-container-bridge /bin/bash
[container-host]$ ip a
1: lo:  mtu 65536 qdisc noqueue state UNKNOWN group default
    link/loopback 00:00:00:00:00:00 brd 00:00:00:00:00:00
    inet 127.0.0.1/8 scope host lo
       valid_lft forever preferred_lft forever
    inet6 ::1/128 scope host
       valid_lft forever preferred_lft forever
4: eth0:  mtu 1500 qdisc noqueue state UP group default
    link/ether 02:42:ac:11:00:02 brd ff:ff:ff:ff:ff:ff
    inet 172.17.0.2/16 scope global eth0
       valid_lft forever preferred_lft forever
    inet6 fe80::42:acff:fe11:2/64 scope link
       valid_lft forever preferred_lft forever
By default, Docker utilises iptables to manage packet forwarding to the bridge network. Each outgoing connection will appear to originate from one of the host machines’s own IP addresses. The following is the machine’s NAT chains after the above container was started:
[machine-host]$ iptables -L -n -t nat
Chain POSTROUTING (policy ACCEPT)
target     prot opt source               destination
MASQUERADE  all  --  172.17.0.0/16        0.0.0.0/0
MASQUERADE  tcp  --  172.17.0.2           172.17.0.2           tcp dpt:3306

Chain DOCKER (2 references)
target     prot opt source               destination
DNAT       tcp  --  0.0.0.0/0            0.0.0.0/0            tcp dpt:3307 to:172.17.0.2:3306
The above rules allows port 3307 to be exposed on the machine host based on the port mapping option “-p 3307:3306” in the “docker run” command line. If we look at the netstat output on the host, we can see MySQL is listening on port 3307, owned by docker-proxy process:
[machine-host]$ netstat -tulpn | grep 3307
tcp6       0      0 :::3307                 :::*                    LISTEN      4150/docker-proxy
At this point, our container setup can be illustrated below:
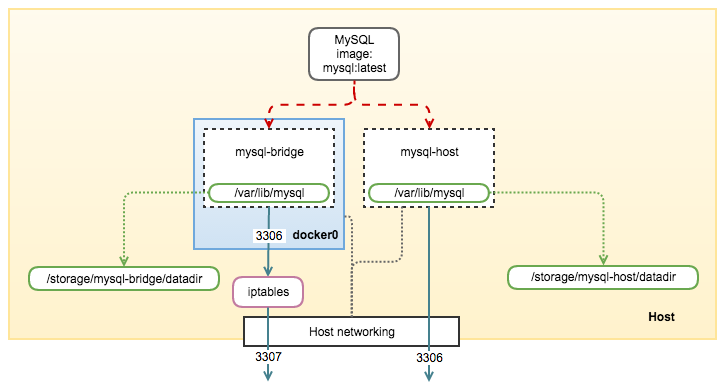
The default bridge network supports the use of port mapping and container linking to allow communication between containers in the docker0 network. If you would like to link another container, you can use the “–link” option in the “docker run” command line. Docker documentation provides extensive details on how the container linking works by exposing environment variables and auto-configured host mapping through /etc/hosts file.
User-Defined Bridge
Docker allows us to create custom bridge network, a.k.a user-defined bridge network (you can also create user-defined overlay network, but we are going to cover that in the next blog post). It behaves exactly like the docker0 network, where each container in the network can immediately communicate with other containers in the network. Though, the network itself isolates the containers from external networks.
The big advantage of having this network is that all containers have the ability to resolve the container’s name. Consider the following network:
[machine-host]$ docker network create mysql-networkThen, create 5 mysql containers under the user-defined network:
[machine-host]$ for i in {1..5}; do docker run --name=mysql$i --net=mysql-network -e MYSQL_ROOT_PASSWORD=mypassword -d mysql; doneNow, login into one of the containers (mysql3):
[machine-host]$ docker exec -it mysql3 /bin/bashWe can then ping all containers in the network without ever linking them:
[mysql3-container]$ for i in {1..5}; do ping -c 1 mysql$i ; done
PING mysql1 (172.18.0.2): 56 data bytes
64 bytes from 172.18.0.2: icmp_seq=0 ttl=64 time=0.151 ms
--- mysql1 ping statistics ---
1 packets transmitted, 1 packets received, 0% packet loss
round-trip min/avg/max/stddev = 0.151/0.151/0.151/0.000 ms
PING mysql2 (172.18.0.3): 56 data bytes
64 bytes from 172.18.0.3: icmp_seq=0 ttl=64 time=0.138 ms
--- mysql2 ping statistics ---
1 packets transmitted, 1 packets received, 0% packet loss
round-trip min/avg/max/stddev = 0.138/0.138/0.138/0.000 ms
PING mysql3 (172.18.0.4): 56 data bytes
64 bytes from 172.18.0.4: icmp_seq=0 ttl=64 time=0.087 ms
--- mysql3 ping statistics ---
1 packets transmitted, 1 packets received, 0% packet loss
round-trip min/avg/max/stddev = 0.087/0.087/0.087/0.000 ms
PING mysql4 (172.18.0.5): 56 data bytes
64 bytes from 172.18.0.5: icmp_seq=0 ttl=64 time=0.353 ms
--- mysql4 ping statistics ---
1 packets transmitted, 1 packets received, 0% packet loss
round-trip min/avg/max/stddev = 0.353/0.353/0.353/0.000 ms
PING mysql5 (172.18.0.6): 56 data bytes
64 bytes from 172.18.0.6: icmp_seq=0 ttl=64 time=0.135 ms
--- mysql5 ping statistics ---
1 packets transmitted, 1 packets received, 0% packet loss
round-trip min/avg/max/stddev = 0.135/0.135/0.135/0.000 ms
If we look into the resolver setting, we can see Docker configures an embedded DNS server:
[mysql3-container]$ cat /etc/resolv.conf
search localdomain
nameserver 127.0.0.11
options ndots:0
The embedded DNS server maintains the mapping between the container name and its IP address, on the network the container is connected to, as in this case it is mysql-network. This feature facilitates node discovery in the network and is extremely useful in building a cluster of MySQL containers using MySQL clustering technology like MySQL replication, Galera Cluster or MySQL Cluster.
At this point, our container setup can be illustrated as the following:
Default vs User-Defined Bridge
The following table simplifies the major differences between these two networks:
| Area | Default bridge (docker0) | User-defined bridge |
|---|---|---|
| Network deployment | Docker creates upon installation | Created by user |
| Container deployment | Default to this network | Explicitly specify “–net=[network-name]” in the “docker run” command |
| Container linking | Allows you to link multiple containers together and send connection information from one to another by using “–link [container-name]:[service-name]”. When containers are linked, information about a source container can be sent to a recipient container. | Not supported |
| Port mapping | Supported e.g, by using “-p 3307:3306” | Supported e.g, by using “-p 3307:3306” |
| Name resolver | Not supported (unless you link them) | All containers in this network are able to resolve each other’s container name to IP address. Version <1.10 use /etc/hosts, >=1.10 use embedded DNS server. |
| Packet forwarding | Yes, via iptables | Yes, via iptables |
| Example usage for MySQL | MySQL standalone | MySQL replication, Galera Cluster, MySQL Cluster (involving more than one MySQL container setup) |
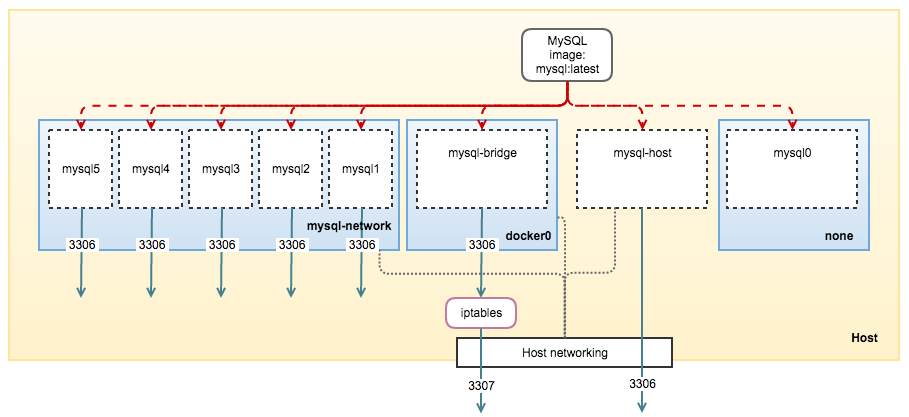
No Network
We can also create a container without any network attached to it by specifying “–net=none” in the “docker run” command. The container is only accessible through interactive shell. No additional network interface will be configured on the node.
Consider the following:
[machine-host]$ docker run --name=mysql0 --net=none -e MYSQL_ROOT_PASSWORD=mypassword -d mysqlBy looking at the container’s network interface, only localhost interface is available:
[machine-host]$ docker exec -it mysql0 /bin/bash
[mysql0-container]$ ip a
1: lo:  mtu 65536 qdisc noqueue state UNKNOWN group default
    link/loopback 00:00:00:00:00:00 brd 00:00:00:00:00:00
    inet 127.0.0.1/8 scope host lo
       valid_lft forever preferred_lft forever
    inet6 ::1/128 scope host
       valid_lft forever preferred_lft forever
Container in network none indicates it can’t join any network. Nevertheless, the MySQL container is still running and you can access it directly from the shell using mysql client command line through localhost or socket:
[mysql0-container]$ mysql -uroot -pmypassword -h127.0.0.1 -P3306
mysql: [Warning] Using a password on the command line interface can be insecure.
Welcome to the MySQL monitor.  Commands end with ; or g.
Your MySQL connection id is 6
Server version: 5.7.13 MySQL Community Server (GPL)

Copyright (c) 2000, 2016, Oracle and/or its affiliates. All rights reserved.

Oracle is a registered trademark of Oracle Corporation and/or its
affiliates. Other names may be trademarks of their respective
owners.

Type 'help;' or 'h' for help. Type 'c' to clear the current input statement.

mysql>
Example use cases to run MySQL container in this network are MySQL backup verification by testing the restoration process, preparing the backup created using, e.g., Percona Xtrabackup or testing queries on different version of MySQL servers.
At this point, our containers setup can be illustrated as the following:
This concludes today’s blog. In the next blog post, we are going to look into multiple host networking (using overlay networks) together with Docker Swarm, an orchestration tool to manage containers on multiple machine hosts.