Hello friends, I hope you are enjoying the content I’ve been creating. This week, well, this will be my final weekly post, I am going to change up my posting schedule a bit and focus on creating more original content and stories. I’ll possibly even make some videos too. Who knows?
Why the change?

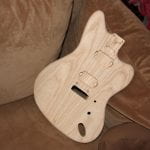
Finished Sanded Guitar Body
Well, for one, my social media analytics class is wrapping up over the next week or so, and I need to have time to create content.
This week I am going to talk about a great brand of finishing products. I know I’ve done con
tent on finishing a guitar already, but this time I am going to dig out some photos from the archive and recount my first every build. Sometime in 2013 or 2014, I was chatting with my father-in-law about wanting to get a new guitar, knowing my tastes in instruments, budget, and expenses I was going back and forth on how I was going to afford something “nice.” I say nice because a nice guitar is a relative term. I’ve played low-end squires and Epiphones that play better than some of their more expensive cousins, and come on. This blog is called tinkering with tone, you know I’m all about changing component parts. Anyway, my father-in-law, who is way more mechanically inclined than myself, looked me square in the eye and said why don’t you just build a guitar. That way, you can spread the expenses out over a more extended period and make it as you can pay for it. So that is what I did.
What does this have to do with finishing, well, nothing? But in my quest to build my first guitar, I came across a company called Wudtone. They have a really easy to apply finishing system and man, I’ve used it a few times now. I highly recommend it. Why? Well, the user community and a lot of fantastic reference materials to help you achieve the finish you want.
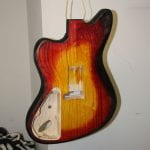
After deciding on what I wanted to build, acquiring the parts, getting ready to assemble I just started painting. Being more inclined to start as difficult as possible, I chose to do a three-color burst. All you fender fans know the vintage tri-color burst. Well, I decided to put my own stamp on it using the Wudtone system. (Note: Wudtone offers a burst system, you can choose your colors. However, I don’t believe they offer a three-color solution, and I made my own.)

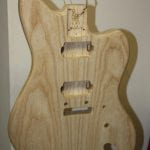
Getting ready for paint
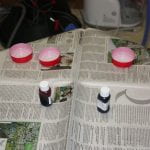
Basically, what I did was take my Warmoth chambered swamp ash Jazzmaster style body and sand it down to about 400 grit. Wudtone works great and recommends sanding to at least 320 grit. My body came sanded to about 320, with sealer applied, so I took it down to 400 to get as much of the sealer off that I could. Starting with what was a pretty smooth and clean surface, I simply started hand applying the stain. Waiting for about 24 to 48 hours between coats. Seriously, this stuff is so easy to use, pour out about a dime-size amount of the finish into a clean jar lid or disposable cup. Then apply the color as if it were a stain using a soft rag. I used an old T-shirt material.
Why is the Wudtone system so easy to use? Well, their products come in a paint by numbers system. Their products come in a sequentially numbered system with a base, mid-coat (sometimes), and topcoat system. Apply until the wood doesn’t take anymore finish. One

Getting my stains ready
done, you apply the clear. Between each coat, use 0000 steel wool or a similar 3m finishing pad to knock down high spots. Follow the grain of the wood. You will also need to wipe the area clean with a soft cloth and some Naptha to get any left behind dust. Seriously that easy.
With my first build specifically, I started on the back, so I could figure out the best way to apply the three colors to achieve the finish I wanted. Why the back, well typically so don’t see that as much so anything you don’t like won’t show. It also gives you a chance to tweak your strategy before moving to the front. I hope this helps you understand some finishing steps. But if not, here how I approach my finishing projects.
- Come up with a plan.
- Layout how you want your colors to look on paper
- Choose your colors.
- Sand smooth, depending on the wood, you may want to go beyond 400 grit.
- Clean and prep the surface per any finishing instructions on your paint/stain
- Apply the coats in thin and even fashion working to avoid any drips/runs
- Wait 24-48 hours before a light sanding between coats
- Clean the surface again and apply the next coat.
- Repeat until the desired colors.
When it comes to the topcoat, Wudtone recommends 48 hours between coats and letting it cure for a few weeks to achieve the correct “hardness” to protect the stain below.
-
- Finished Sanded Guitar Body
-
- Getting my stains ready
-
- Getting ready for paint
-

- Applying Black
-

- Applying Black 2
-

- Black and Red Applied
-
- Turned out pretty good
-

- Ready for Clear
-
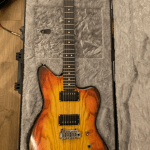
- Home built Jazzy goodness
The great thing about Wudtone is you get to choose how thick the finish is; I typically go thin, so it wears quicker to my playing style. Seriously though, Wudtone is pretty cool. There are similar products and processes out there, but my preferred choice, so happy finishing my friends.
Check out my other posts and comment below if you have ideas.
where can i get this template online ?