In this tutorial you will learn how to square-off eyeshadow application and how to apply the extreme winged eyeliner look influenced by the witch Rowena on Supernatural.
This look is all about the winged eyeliner and the eyeshadow colors are really the background for it. You will need five basic colors: a pearl cream, a taupe, a medium brown, a dark brown, and basic black. (Four of the five colors chosen above are by Stilazzi.)
Defining and dividing the Eye Area
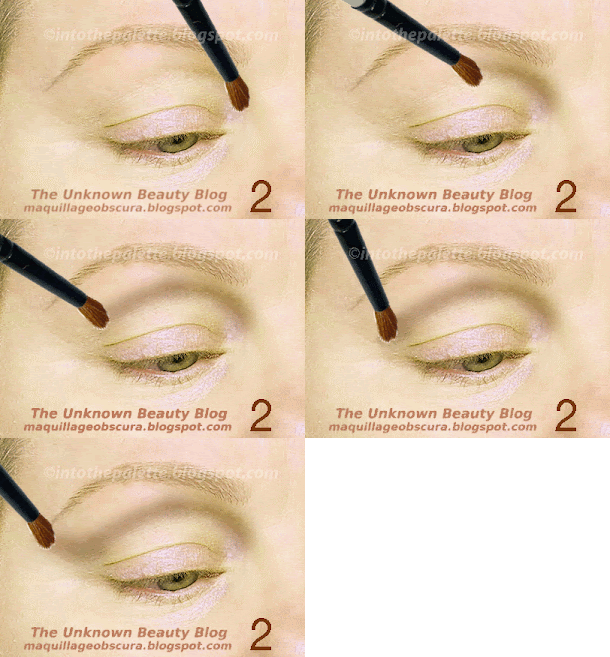
1- Start with a prepped eye. 2- Start with the matte taupe. 3- First, define the orbital ridge with the taupe shadow.
4- With the same taupe, apply a soft line on the bottom lash line and meet it with the top. 5 & 6- The shadow from different views. The taupe helps to divide the eye area and defines the orbital ridge. You can see where the lid area is and applying taupe not only contours, it gives the an eye open look.
Coloring the Lid
7 - Medium brown eyeshadow. 8- Apply the eyeshadow onto the lid and spread up to the orbital ridge bone. The color will slightly darken due to the difference of the texture of the shadow hitting bone. 9- Finished application.
Highlighting the Lid
10- Shimmer pearl cream eyeshadow. 11- Apply onto the fleshy part of the lid. 12- The finished application will lighten the medium brown shadow beneath.
Enclosing the Lid
13- Dark brown. 14- Shown without the other eyeshadows for clarity. Apply the dark brown from the inner corner of the bottom lash line and follow the fleshiness all the way around to the top outer end of the lid and just until it hits the orbital bone.
15- Different angle. The eyeshadow should not hit the bone area on the side of the eye. You are just enclosing the lid or darkening the corner of the eye to hide the gap the winged eyeliner will leave as you will see soon. 16- The finished application.
Highlighting and the Browbone
17- Shimmer pearl cream eyeshadow. 18 & 19- This step is really illuminating the eye area. Apply the pearl shadow from about the third of the nose down then follow the curve of the bridge of your nose to your browbone and continue until you hit the side (temple). 20- Do the same highlighting on the bottom by starting at the side of the nose and up to the temple.
Squaring off the Eyes
Sometimes, to balance the eyes, it is important to shape the shadows to make the eyes look open rather than drawn back, the winged eyeliner will do that instead. This is where squaring-off the eyeshadow will help.
21- With the same pearl shimmer, apply it up on the bone area only from the bottom outer end of the eye straight up in line usually with the end of the natural brow. This is actually just making the eyeshadow frame smaller without looking tiny because the taupe beneath has already created a shadow or a contour. 22 & 23- How it looks.
The Winging of Eyeliner
24- Matte black eyeshadow. If you choose to use an eyeshadow as your eyeliner, I suggest mixing it for better staying power as I show in this post. 25- Again, shown for clarity without the other eyeshadows. Apply a smudged line on the bottom lash line but don't let it meet with the top. Just line the bottom and stop! 26- How the the eye looks so far.
Finding the Intersection
This winged eyeliner is the extreme version.
27, 28, & 29- You need to find the intersection of the orbital ridge and the side of your eye socket. Sometimes, you will feel an indentation which is located more to the side; ignore that for now. In simplified terms, you are searching for the width of your eye. By following the angle of your eye from the bottom lash line and following the orbital ridge, you will find where "x" marks the spot.
The Wing
30- Where the "imaginary" lines intersect, lightly apply a dot with the black eyeshadow. 31- The second dot should be located right after the "bulge" of the eye. This is where the lid usually turns into the side of the lid. Apply a second dot right before your lash line it curves completely downward. 32- Connect the dots as shown.
33- Color in the triangle. 34 &35 - Different angle.
36 & 37- Start at the inner corner and just meet up with the triangle that you drew. 38- Fill in the color as you see fit.
39- Sometimes, you want the wing tip to be more exaggerated or to peek out a bit. This is where it should let it follow the indentation of your eye. 40- From the front, the eyeliner will look like a thick line because the wing is hidden on the lid. 41- Add mascara and/or false lashes. Finish the brows by elongating them.
Finished Look
Here are the before and afters.
Practice is really the only method of winged eyeliner even if you decide to use some kind of template or guide. A template may be easier but if you don't know the area best suited for the "lifting" of the eyes, then it is pretty much useless. Free hand, it takes practice and can be done. Just remember, if the winged eyeliner stays on the lid, it will always lift the eyes!
Here is Aldona in all her beautiful glory!
XOXO,
*Special thanks to Aldona. xoxo*


