Heading out the door? Read this article on the new Outside+ app available now on iOS devices for members! Download the app.
From opening the body to stabilizing a pose, there are many ways the wall can assist you in your yoga practice. Discover 8 ways to modify, deepen, and explore poses with this prop everyone has at home.
Let’s take a minute to talk about the wall. It’s a yogi’s best friend—there to catch your heels when you kick up into Handstand and support your legs when you need to rest and restore in Viparita Karani. From opening the body to stabilizing a pose, there are many ways the wall can assist you in your yoga practice. Even better, it can be a great teacher in your home practice.
Here, discover 8 ways to modify, deepen, and explore poses with this prop everyone has at home.
Forward Fold Against a Wall
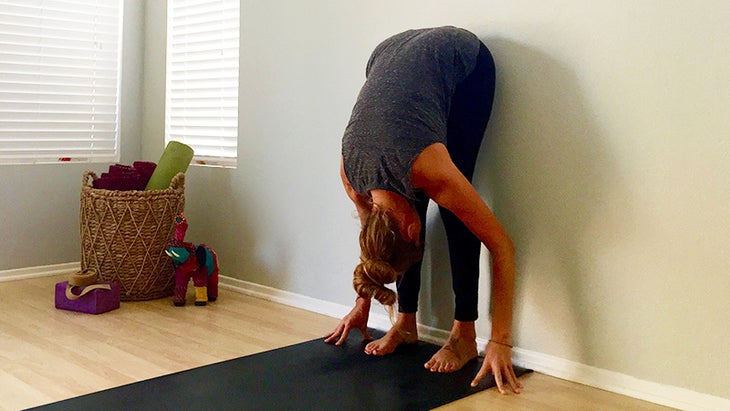
Think you’ve just about reached your limit in Standing Forward Bend? Then it’s time to take your butt to a wall and explore new depths in your Uttanasana.
Standing in front of a wall, facing away from it, come into a forward fold with your feet hip-width apart and knees bent. Bring your butt against the wall. Press down through the inner edges of your feet, as you begin to lift your sitting bones higher up the wall to straighten your legs. To go deeper, step back until your heels are touching the baseboard.
Another way to deepen your Uttanasana: Face the wall and fold forward, walking your upper back against the wall to coax your chest closer to your legs. Engage your leg muscles, press down through your inner feet to lift your sitting bones higher, and lengthen your sternum toward the tops of your feet.
See also 10 Creative Ways to Use Props in Your Practice
Revolved Hand-to-Big-Toe Pose with Top Foot Anchored
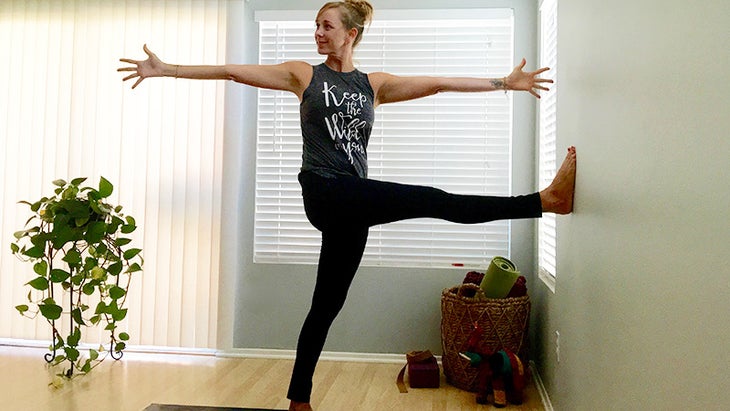
A combination of balancing and twisting that requires a decent amount of hamstring length to perform, Revolved Hand-to-Big-Toe is a complicated pose. Stabilizing your top foot against a wall allows you to experience and explore the pose in all of its nuances, while receiving all of the same benefits.
Coming into the pose with the lifted foot flat against the wall can be tricky, but once you’re there you’ll love the stability it gives you to stand tall and twist. Stand facing the wall at about a leg’s length away from the wall with your feet outer hip-width apart. With your hands on your hips, bend both knees and bring the ball of your right foot up onto the wall as high as you can get it. Then start to straighten both legs, pulling back through the outer edge of your lifted right hip as you press your heel into the wall. Reach your arms up overhead, press down through your bottom heel and lift up through your spine. Exhale and twist right, bringing your right arm back and left arm toward the wall (don’t worry about touching your left fingers to the wall). Drop down through your outer right hip as you lengthen your side bodies and twist over your right leg.
See also Prevent Yoga Injuries: 3 Risky Poses You Can Make Safer
Twisted Half Moon Pose with Top Foot Anchored
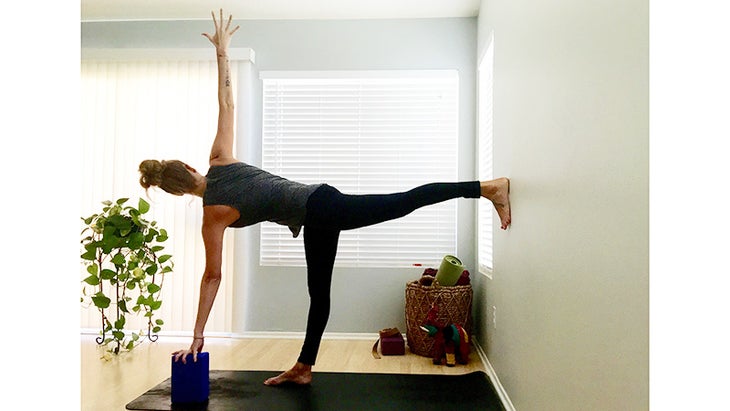
This is the same idea as Revolved Hand-to-Big-Toe Pose. Stabilizing the lifted leg in Twisted Half Moon Pose is going to allow you to experience and explore the pose more deeply—giving you a much better idea of what it takes to do it away from the wall.
With two blocks, stand about a leg’s length away from the wall with your back to it and feet parallel and inner hip-distance apart. Bend your knees and fold forward into Uttanasana. Inhale, straighten your arms, lengthening halfway out until your back is flat. Place your hands on blocks directly beneath your shoulders. Lift your left leg back and up, placing the foot on the wall behind you parallel to the floor, as best you can. Check that your left toes are pointing straight down and not out to the left. With your left hand on the block under your left shoulder, bring your right hand to your outer right hip. With your right hand press your outer right hip back toward the wall behind you. Inhale and lengthen your sternum forward; exhale and slowly begin to twist right, taking your right shoulder further back. When you’re ready take your right arm up to the sky. Push your back foot into the wall and practice lifting your torso up away from the floor and leaning back away from your standing leg. Take a few breaths and bring your lifted food to the floor to return to a forward fold.
See also 5 Modifications for Students with Low Back Pain
King Arthur’s Pose
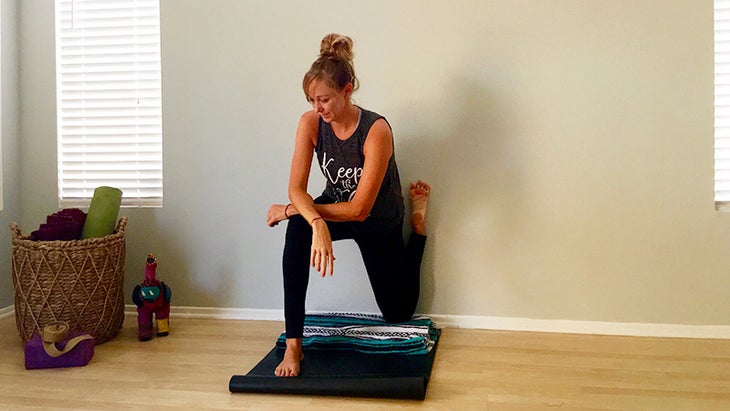
Need a deeper thigh stretch? Look no further — King Arthur’s Pose (only done at the wall) is indeed the ruler of intense quad openers.
Be nice to your knees and place a folded blanket or mat down on the floor at the base of a wall for padding. Then come onto your hands and knees with the soles of your feet against the wall behind you. Bring your right knee to the base of the wall, pointing your right foot and shin straight up it. Step your left foot outside your left hand on the floor in front of you, coming into a Low Lunge with your left heel flat and left knee stacked over ankle. (If you have tighter hips try coming into the pose with your hands on a pair of blocks instead of the floor.) Bring your elbows up onto your front knee. Press your hips back toward the wall. As you’re ready, pull your waistline back and begin to lift up through your chest, placing your hands on your left knee and straightening your arms. Lengthen down through your tailbone as you lightly lift your low belly and extend up through your spine.
To deepen the stretch, bring your butt all the way back to the wall behind you with the inner edge of your right foot outside your outer right hip before bringing your torso upright. Root down through your front heel, as you use your hands against your front knee to press your shoulders back to the wall. If the shoulders touch the wall, extend your arms overhead and press the backs of both hands into the wall. Lengthen your tailbone and draw your low ribs in. Breathe.
See also 5 Ways to Creatively Sequence a Yoga Class
Side Plank Variations with Bottom Foot Wedged Against Baseboard
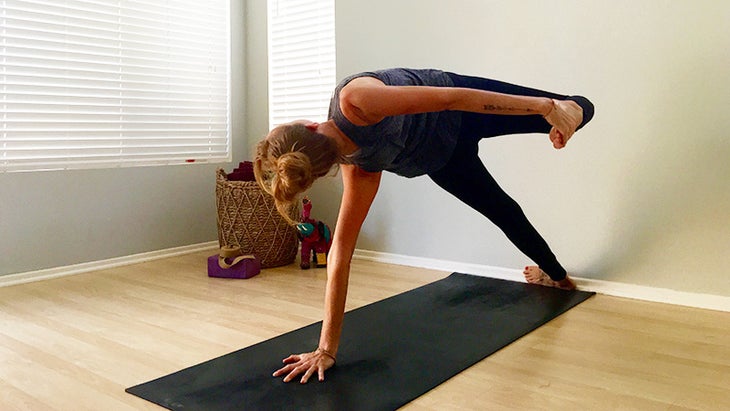
Whether you’re working on Kapinjalasana, full Vasisthasana, Visvamitrasana, or any number of Side Plank Pose variations, letting the wall support and stabilize your bottom foot can be a game changer. Allow the rest of the pose to unfold from there.
To keep things simple, let’s try a modified version of Kapinjalasana (Partridge Pose). With the short edge of your mat against a wall, come into Downward-Facing Dog with your heels up the wall. Bring your left leg over to touch your right. Spread your fingers, root down through the inner edge of your right hand, pointing your right index finger straight forward or slightly to the right. Roll to the outer edge of your right foot, coming into a Side Plank with both feet on the wall. Continue to root down through the inner edge of your bottom hand and lift your right chest up toward your chin. Lift your hips up away from the floor and back toward the wall. Press the sole of your right foot firmly into the wall and play with lifting your left leg up and grabbing your foot behind you with your left hand. Root down through your bottom hand and foot as you press your left foot into your left hand, bowing open.
See also 5 Basic Yoga Poses Modified for Knee Pain
Core Work in L-Shape
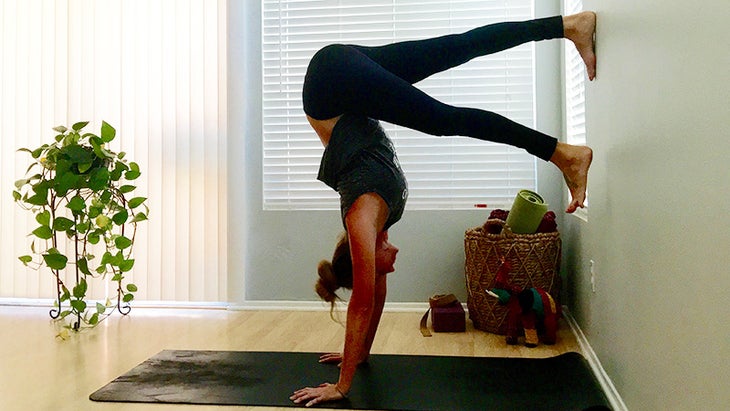
While we promised no handstands, I had to sneak in this killer core workout on your hands in L-Shape (technically still not a Handstand).
For those not familiar with L-Shape here’s how you set it up: Come onto all fours with your hands under shoulders, knees under hips and the soles of your feet pressing into the base of the wall. Tuck your toes under on the floor and straighten your legs, coming into a shortened version of Down Dog at the wall. Then take one foot up the wall with your toes curled under at about the height of your hips. Begin to straighten the raised leg, pressing the sole of your foot into the wall, and sending your hips over your shoulders as you bring the second leg up to join the first. Once you’re comfortable in L-Shape with your hands, shoulders, and hips stacked, draw your floating ribs in toward your core and slowly begin to lift one leg toward the ceiling, stopping when your heel is directly over your tailbone. Keeping your lifted leg straight, lower your leg back down, pulling back through your core and brushing the sole of your foot along the wall on its way down. Now bend your top knee and tap your bottom toes on the floor before taking the leg all the way back up to the sky. Press down strongly through your inner palms, move slow, and stay integrated. Repeat three 3 on each leg before come down.
See also7 Steps to Defy Gravity and Balance In Handstand
See also So You Graduated Yoga Teacher Training—Now What?
Monkey Pose with Back Foot Anchored

Anchoring your back foot against a wall in Hanumanasana does two things: (1) it helps stabilize your pelvis by keeping your back leg internally rotated; and (2) it gives you a boundary to press into, which in return helps you deepen the pose.
Fold a mat in half and place it on the floor at the base of the wall with a flatly folded blanket directly in front of it. Come into a Low Lunge with your left knee on the mat, left foot pressing into the wall behind you, and your right heel on the blanket. Slowly start to press your front heel forward, deepening into the pose. Then pause and reorganize. Spread your right toes, press forward through the mound of the big toe as you pull back through the pinkie-side of your front foot and draw your outer right hip back. Press the inner edge of your back foot into the wall with your heel pointing straight up, as you turn your outer left hip forward and down, and slowly press your front heel forward, lengthening out toward Hanumanasana. Pay attention to your back foot and leg, keeping an internal rotation to your back leg and outer left hip forward. Once you’ve come as far down into the pose as you’d like, keep pressing through the inner edge of your back foot and strongly draw back through your front heel and outer right hip. Take 5 breaths and slowly pull back through your front heel to exit the pose.
See also 5 Tips For Choosing Continuing Education Credits
King Cobra with Shins Up the Wall
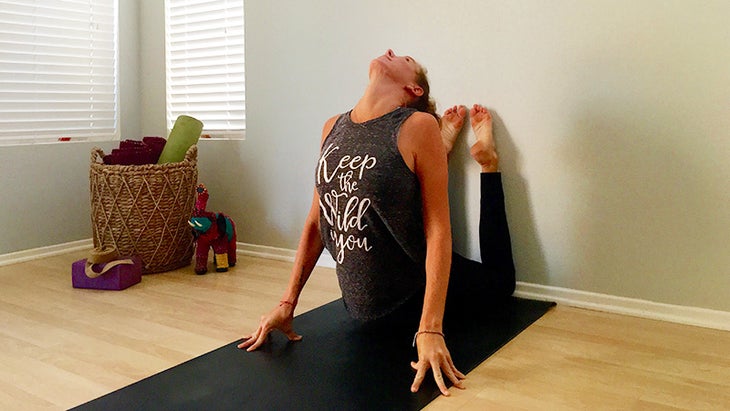
Dream of dropping your head back onto your toes in King Cobra Pose? Then head to a wall with your mat and learn what it takes to stabilize, lengthen, lift, and curl into this deep backbend—and make the seemingly impossible possible.
Start lying facedown with your knees inner hip-distance apart at the base of the wall and shins straight up the wall, bringing your legs as close to 90 degrees as possible. Place your palms flat on the mat beneath your elbows on either side of your low ribs. Spreading your fingers, press your palms down and draw the heads of your arm bones away from the floor. At the same time, push your thigh bones down into the floor and shin bones into the wall behind you, helping to stabilize your low back. Keeping all of that, begin to press down and resist back against the mat with your palms as your lift your chest away from the floor. Push down through your knees and lightly draw your pubic bone in and up, and lengthen your spine. Lifting up through the sides of your chest, broaden your collarbones, engage the bottom tips of your shoulder blades down your back and forward through your heart center, curling your sternum forward and up. Lengthen the sides of your neck as you bring your head back toward your feet. Take a few breaths. If you experience any pain in your low back, gently come out of the pose. To release bring your head back up to neutral, gazing straight ahead, and slowly begin to re-bend the elbows along the sides of your body as you lower your torso back to the floor.
See also 5 Things You Think About Yoga Events—Proven Wrong
About Our Writer

Meagan McCrary is a 500 E-RYT and writer with a passion for helping people find more comfort, clarity, compassion, and joy on the mat and in life. She’s the author of Pick Your Yoga Practice: Exploring and Understanding Different Styles of Yoga, an encyclopedia of modern yoga systems, as well as a contributor at yogajournal.com. Living in Los Angeles, Meagan teaches at various Equinox Sports Clubs and at Wanderlust Hollywood.