Home » News » Intermediate Navigation - beyond the Basics
in Navigation

This is a second article in a trio of interviews with Ian Corless, TalkUltra, about Navigation for Ultra Runners & more.
In the first interview we covered the Basics of Navigation, this encompassed maps, compasses, setting your map & how to set a bearing.
The second interview was moving into intermediate navigation & it consisted of the following information & techniques:
So lets start with:
1) Magnetic Declination or Magnetic Variation:
There are 3 points at which north is seen. 1) True North, 2) Grid North & 3) Magnetic North. We are concerned with Grid North & Magnetic North.
Grid North is what is detailed on a map, its where the North/South grid lines show us the direction of north, according to the grid lines printed on the map. This is almost the same as True North, so we will group True North & Grid North the same. These are fixed points & do not move.
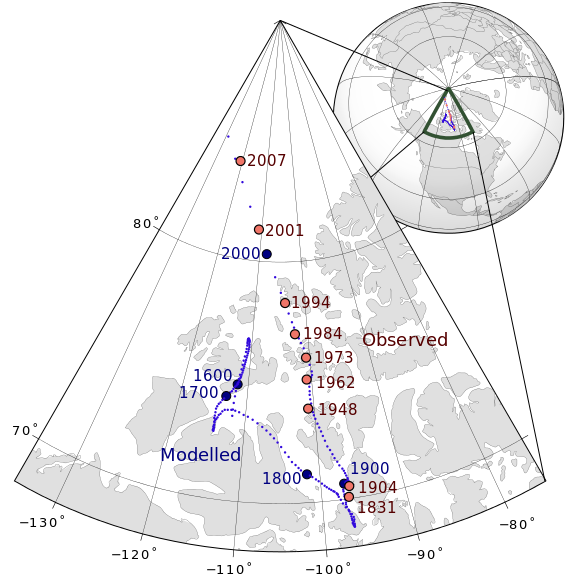
Magnetic North is what your compass needle points towards, being magnetised & this is not a fixed point, it moves over time. Magnetic North is explained as so:
"The North Magnetic Pole is the point on the surface of Earth's Northern Hemisphere at which the planet's magnetic field points vertically downwards (in other words, if a magnetic compass needle is allowed to rotate about a horizontal axis, it will point straight down). There is only one location where this occurs, near (but distinct from) the Geographic North Pole and the Geomagnetic North Pole.
The North Magnetic Pole moves over time due to magnetic changes in the Earth's core.[1] In 2001, it was determined by the Geological Survey of Canada to lie near Ellesmere Island in northern Canada at 81.3°N 110.8°W. It was situated at 83.1°N 117.8°W in 2005. In 2009, while still situated within the Canadian Arctic territorial claim at 84.9°N 131.0°W,[2] it was moving toward Russia at between 34 and 37 miles (55 and 60 km) per year.[3] As of 2012, the pole is projected to have moved beyond the Canadian Arctic territorial claim to 85.9°N 147.0°W.[2]"
Because we have a variance between True North & Magnetic North, we therefore need to use something called the Magnetic Variation. This is described as follows:
"Magnetic declination or variation is the angle on the horizontal plane between magnetic north (the direction the north end of a compass needle points, corresponding to the direction of the Earth's magnetic field lines) and true north (the direction along a meridian towards the geographic North Pole). This angle varies depending on position on the Earth's surface, and changes over time."
It is also explained more formally, Bowditch defines variation as “the angle between the magnetic and geographic meridians at any place, expressed in degrees and minutes east or west to indicate the direction of magnetic north from true north. The angle between magnetic and grid meridians is called grid magnetic angle, grid variation.
Depending on which country you reside in will then depend on what the Magnetic Variation actually is. For example, if you live in the UK then the Magnetic North is 1.5 degree's at the start of 2014 west of True North. The reason it is west is that we sit to the east of the Agonic Line or line of Zero Declination where Mag North & True North are the same. There are several points where this occurs around the world. Its a bit technical, but all you need to remember is that the Mag Variation is printed on all maps in the UK to advise what the Mag Variation is at what ever year the map was printed.
In order to correct your bearing to take into account the Mag Variation, you must adjust the compass 1.5 degrees east of the bearing you have taken, or more easily remembered, add 1.5 degrees on to your compass bearing you have just taken from the map. To make life even more confusing, the Mag Variation in 2015 is 0, therefore Mag Variation need not be corrected for that year, so it is almost not worth making this correction for the next year & certainly if your navigation is broken down into small legs. It really only comes into play right now, if you are travelling over large expanses of land, without any catching features, hand rails etc.
Transversely, if you are using the Mag Variation, remember when making a sighted bearing, whilst relocations, you might want to subtract 1.5 degree's off your bearing in order to get an accurate bearing when you place the compass on the map. It all depends how accurate you need the bearing to be? Are you looking at a mountain summit? If so, is your bearing really that accurate anyway.
So Mag Variation in the UK is not really necessary right now.
If you are in Europe or other parts of the world like the US, then your Mag Declination/Variation will be different. It should be on the map you are using, if not consult a website like Wiki for more information.
North & South of the Equator.
If you buy your compass in the northern hemisphere, then it is not set to work in the southern hemisphere & visa versa. Silva produce 3 types of compasses to work in 3 different magnetic zones. The best piece of advise is if you are traveling, then buy a compass for use in the zone which you are traveling. Best to contact a company like Silva to get the right compass.
Can I set the declination on a compass, so I can forget about the Mag Variation?
Yes is the answer, but they don't come at a small price. Most compasses, of reasonable value, like Silva 2NL-360 Explorer will have a Declination Scale on the bevel base plate, this can be used for quick adjustment. If you want to set the mag declination, then you need to purchase a compass capable of doing this, like the Silva 15T-360/6400 Green military compass. Its not really necessary for general use, especially in the UK right now.
Ok, so the confusing Mag Declination/Variation is done. Use at will, just remember to check on the country you are in as to what the variation is & apply it if necessary. Its list on the map you have in your hand, or at least the one you will be using.
2) Grid Numbers & Plotting a Grid Reference
Grid numbers are applied to the grid lines. These are a squared matrix applied to the whole country to divide it into different sections. They are laid out to make squares 100k by 100k, these squares are then broken down to have a further matrix applied giving squares of 1km by 1km. These are the lines/squares printed on your map. The lines running from east to west are numbered from south to north, these are the 'northings', the lines running from north to south are numbers west to east, these are called the 'eastings'. A grid reference is made up of these printed numbers.
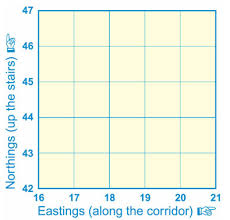 So on the image pictured to the left, we have Eastings along the bottom & Northings running up the side. In order to find a certain grid we need 4 of these numbers. This a 4 figure GR.
We are always given the Eastings first & the Northings second. A 4 figure GR would read as 17 45
Once we understand this we can move to a 6 figure GR. This is done by breaking down each of the squares into a further 10 divisions on either scale, making 100 squares inside the existing square and will allow us to pin point a location to within a 100m square on the ground. A 6 figure GR would be something like 175 454.
This can be taken into a further pin point of 10m squares by using the same logic & so on.
A roamer on your compass can be of great help here to pin point 6 figure GR's.
Not following? Book on a course....
3) Back Bearings.
Very useful in either re-locating yourself or using a feature to make sure you are looking at what you think your looking at. A back bearing is taken by using a sighting of an identifiable feature, be it a path, summit, building or large reentrant & applying it to the map. This can help you do one of 2 things. 1 - re-locate yourself on a line feature (its hard to relocate with this technique exactly, but it can help your judgement or give you a rough location) or 2 - help you to make sure the feature you are looking at is the same one you are looking at on the map.
Remember that when taking a back bearing, you might need to subtract the Mag Variation to make sure its correct.
 To take a back bearing, line the direction of travel arrow at the front of your compass with the feature, make it as exact as possible. Then swivel the rotating bevel so that you line the red end of the needle in the red house/shed, remember the Red in Shed. This is now your bearing set. Next put the compass on the map & line the front side up with the feature you think you are looking at, and move the compass until your orienting lines on the base plate match with the N/S Grid Lines on the map. You should now be able to locate yourself somewhere along the side of the compass.
A back bearing works best if you are already located on a line feature, as this bearing will then cross the line feature at some point, giving you a rough location of where you are on that line feature.
4) Re-Orienting/Re-Locating.
A very necessary skill, used to either make sure you are where you think you are, or as it sounds, to actually re-locate. Once you are adept at this skill, it should be used throughout the day, as you progress through your race or just through the mountains to keep a check on your position, but of course if you are thumbing the map, then it will be a whole lot quicker & easier. When you're really good at it you will re-locate whilst on the move.
Clients on a recent OMM Mountain Skills Day relocating on Place Fell, Eastern Lakes

How to do it:
Use everything at your disposal. This means look for all the identifiable features you can see, summits, paths, streams, woods, walls, buildings, ruins, sheepfolds etc. Orientate your map, if it is not already! Now match the features on your map to the ground, or visa versa. If your still not sure, then use a back bearing by locating a summit or other feature & take a bearing from it by following what was discussed above.
If you are not on a line feature you will then need to start really assessing the contours & because you have studied your contours well at home, you have a good handle on how to interpret what you are looking at to the features/contours on the ground. Are you in a reentrant, or is there one close by. Is the valley in the right place in front of you in relation to the map.
Re-Location requires lots of practice, the more you do, the better you will get until you can re-orientate whilst on the move.
5) Thumbing the map.
Thumbing the map with compass in hand
A very simple, but very useful technique. Once you start to get a handle on navigation, map reading & compass work you will be able to fold your map smaller, so not needing so much of it in view. The smaller you can have your map folded, the easier it is to thumb the map. By doing this we mean, fold your map in half, half again and so on until you have a manageable size to hold in your hand. Obviously make sure you can see the area you are in. Now, knowing where you are on the map, put your thumb over this location. Having the map oriented correctly in your hand is very important. As you walk/run along your chosen courses/bearing, you simply move you thumb small increments to keep up to date with your progress.
Why is this useful?
Because you need to be able to locate your rough position on the map at a split second or whilst on the move. When you want to check your surroundings against the map, just pull it up to have a look & your thumb will be placed near to where you are, you can then re-locate very quickly & keep a track of your progress from map to land or the other way round. This is how you will learn to re-locate whilst on the move!
6) Hand-railing.
It is as it sounds, using a handrail to help you on your way as you travel across the land. So what is a handrail? It a feature on the map that allows you to use it as a hand-rail. It is always a line feature & can be as simple as a path, or as obscure as a blind ridge line (by blind I mean rounded & not obvious). Once you have established the handrail is going in the direction of travel you want you can walk/run along it until you need to make your next decision.
Examples of Hand Rails
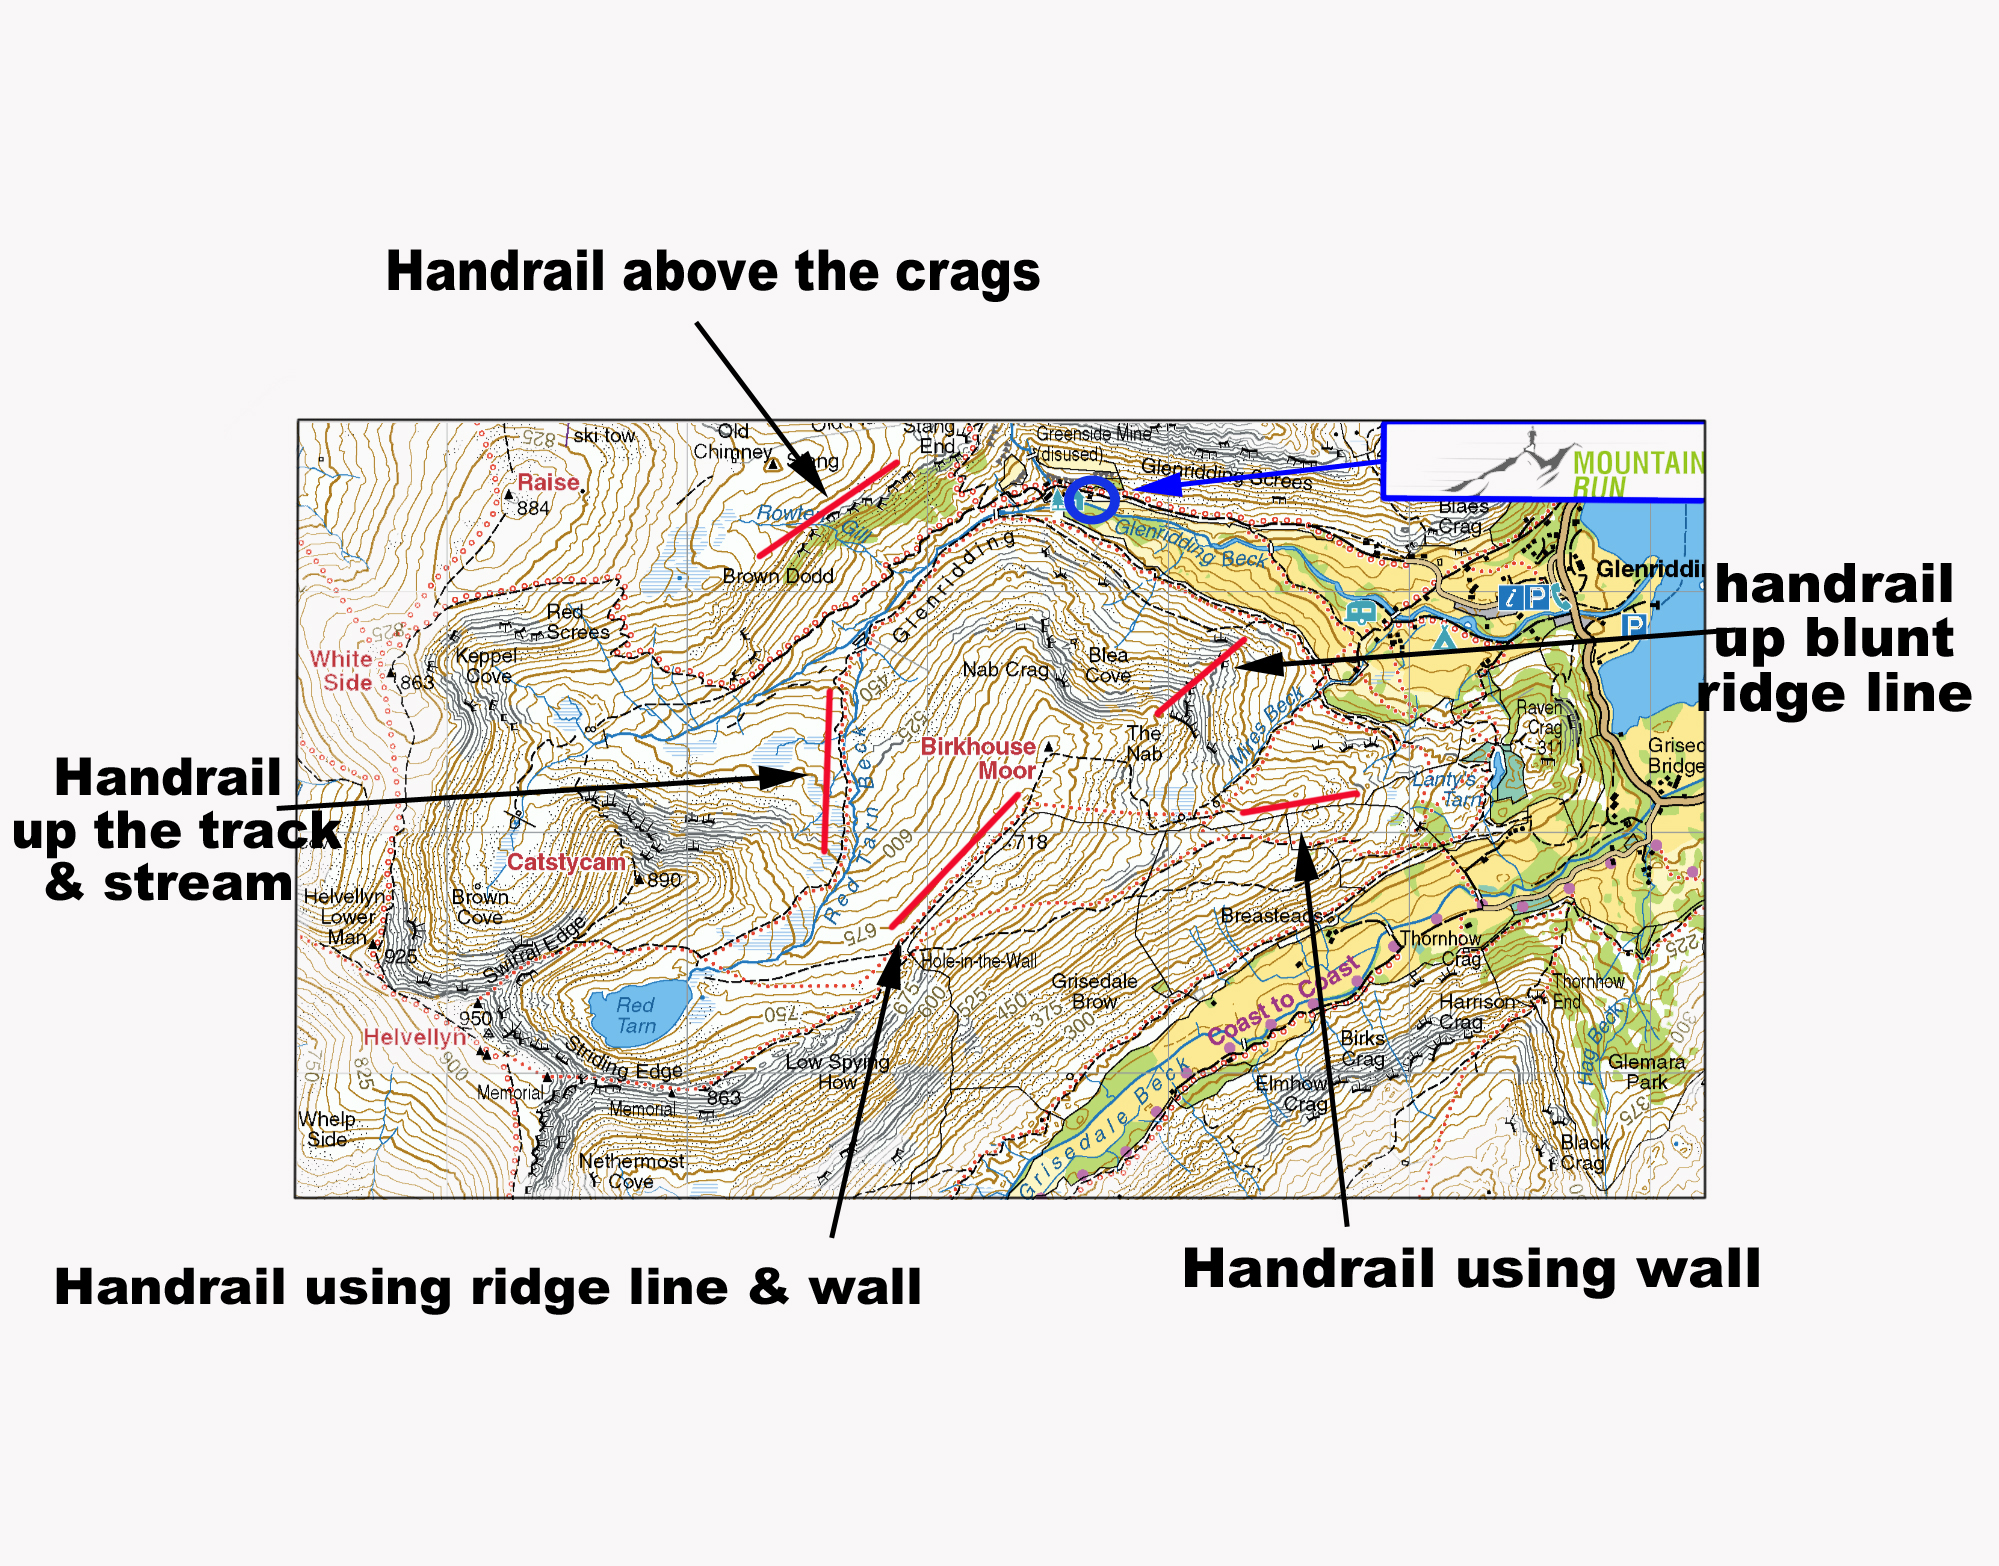
How do you know when to stop? Use the next technique, a catching feature....
7) Catching Features.
A catching feature again is as it sounds, its a feature that catches you. It can be designed to wake the brain up to say your nearly at your destination, next direction change or just as a marker to what is coming next. You can have as many catching features as you like along your chosen course. Don't pick too many though, as it will be hard to remember. Try to limit them as wake up calls, or direction changes, but you can still use them as markers to track your progress.
Plenty of Catching Features in the image below:
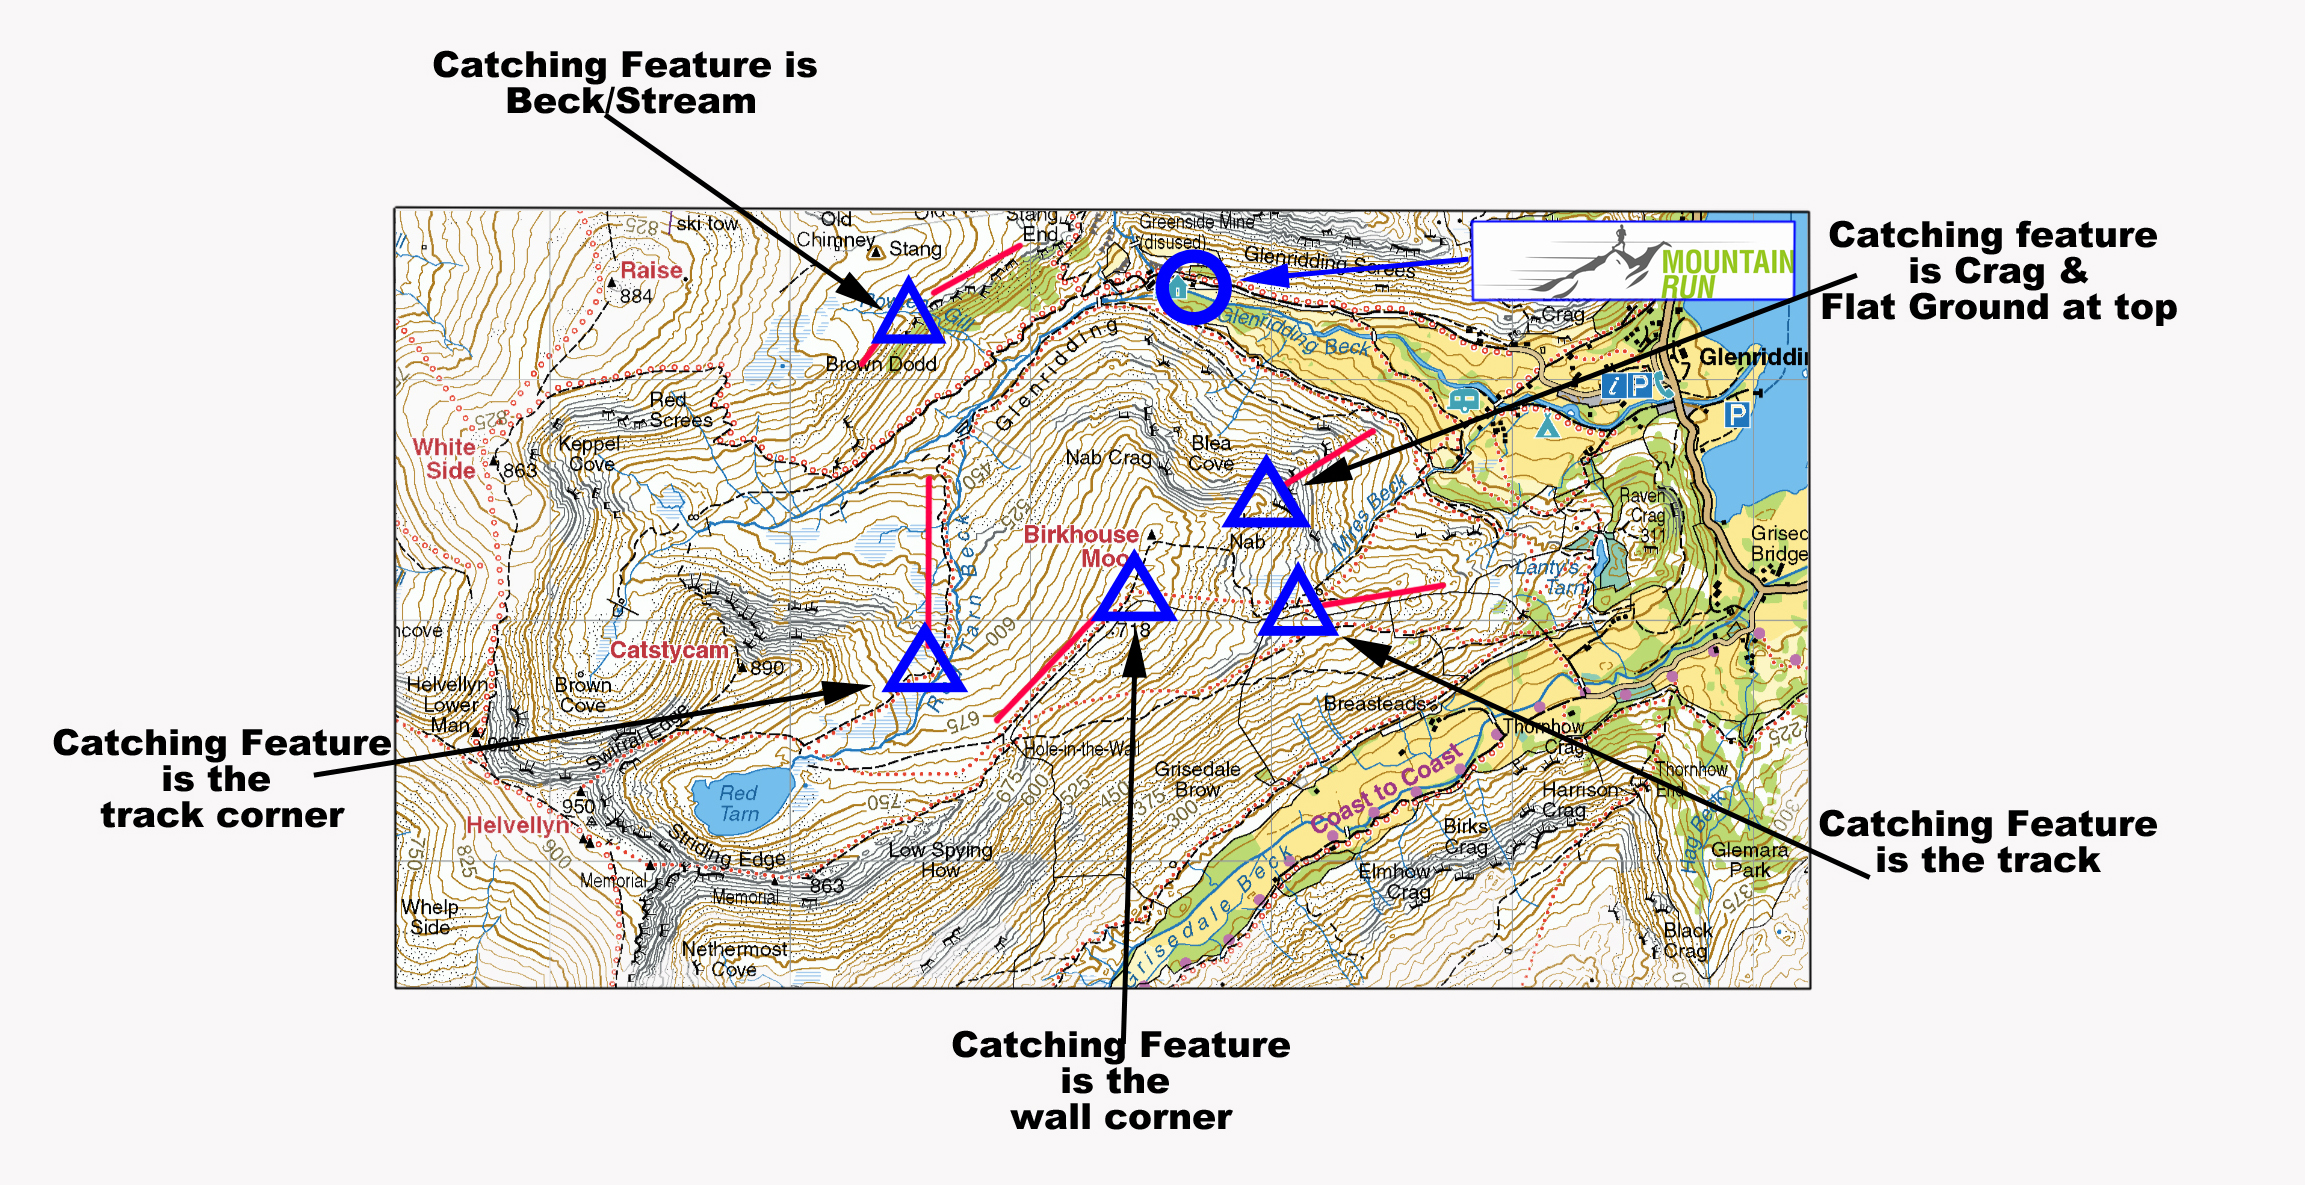
A catching feature might be a wall corner, building, junction in a path or river or a crag that you are moving past. Used in conjunction with thumbing the map & hard rails, you can see that you can really track your progress as you move forwards.
8) Aiming Off.
The last technique in our intermediate navigational skill set. We use aiming off to catch a line feature, that we may then use as our next bearing setter or as a handrail until we reach the next catching feature.
To aim off we use a bearing slightly off to the side of the line feature we are heading for. This can be either left or right, but it need to be obvious, otherwise you might miss it.
Aiming Of below so you don't miss the control, best practice in foul weather!
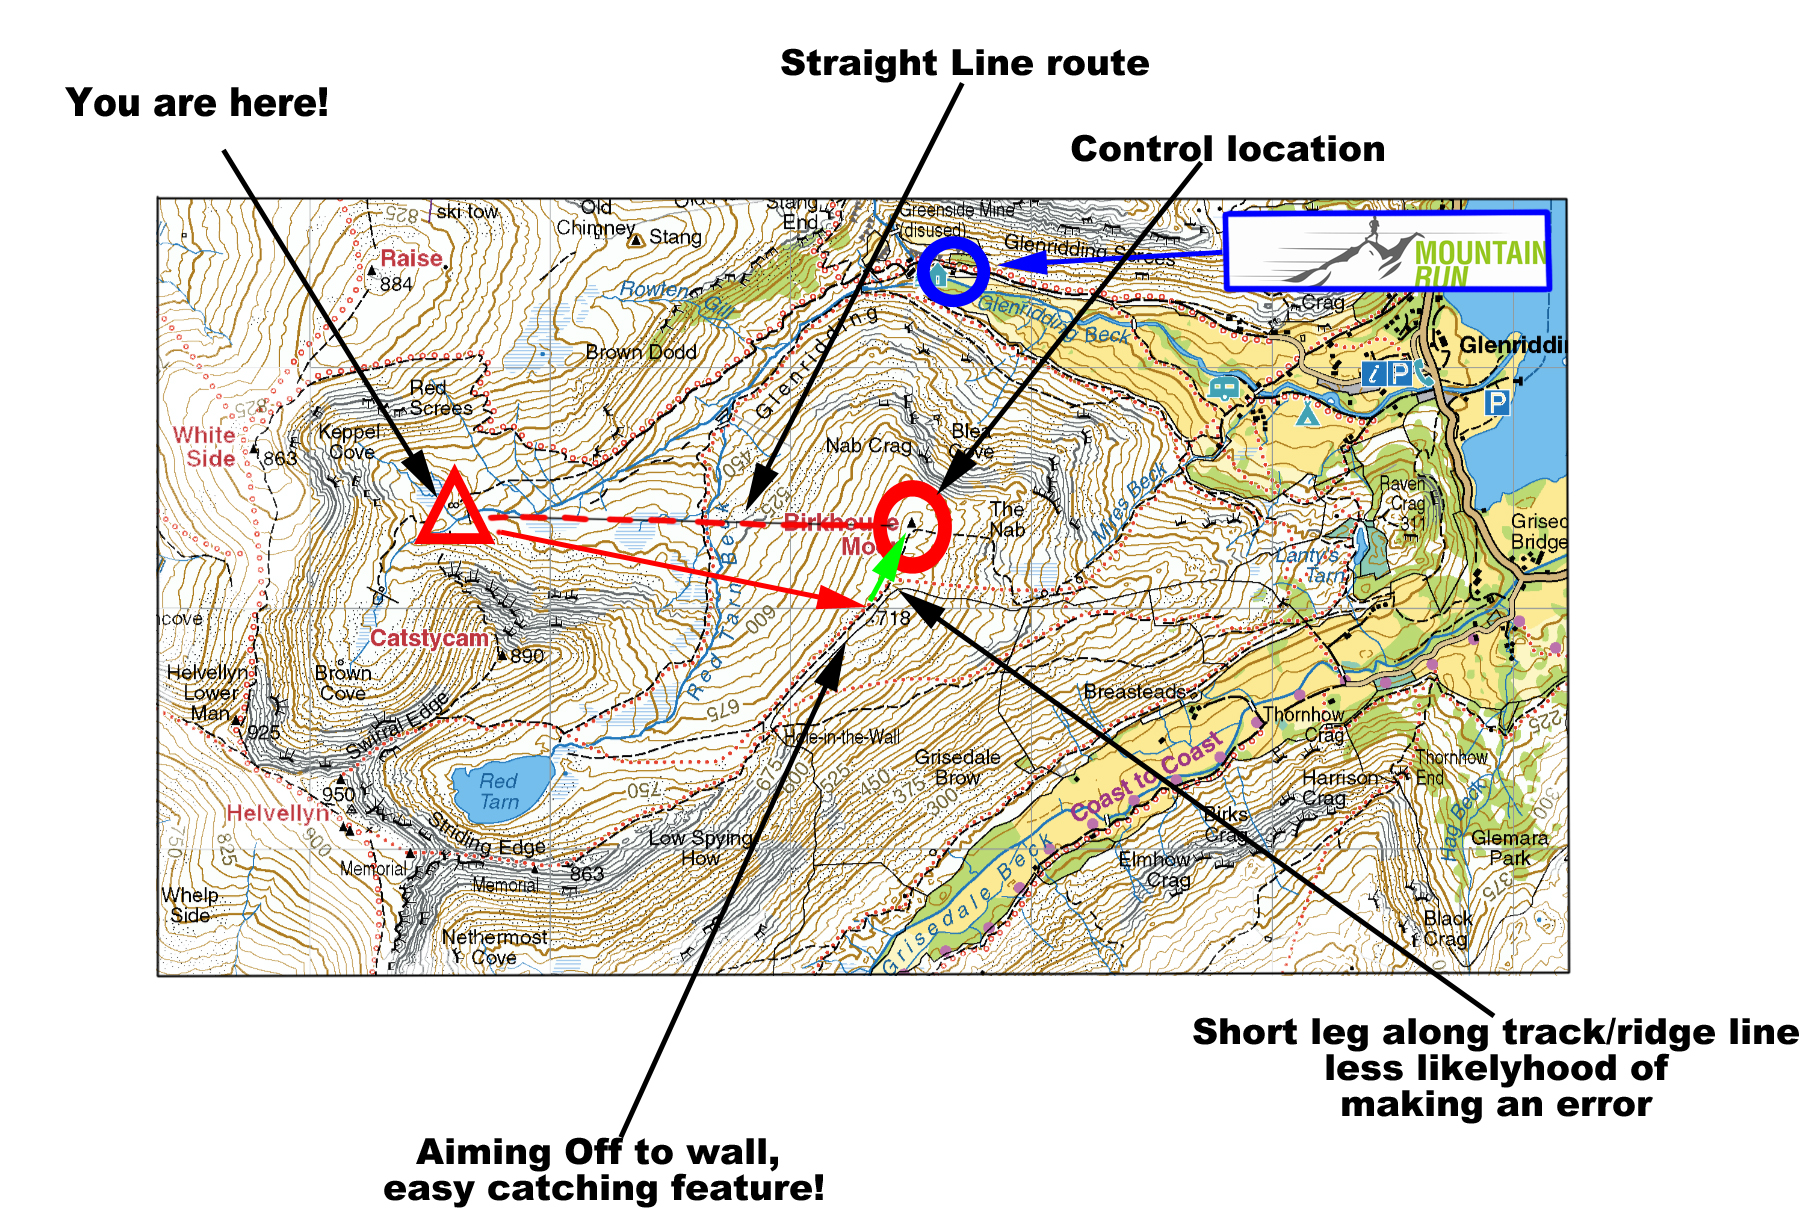
Lets say your travelling across open ground south to north, there is a tarn in front of you running from west to east & you want to catch this feature, but keep moving past it. The weather is in and visibility isn't what you want it to be. You want to pass the tarn to the east, so you need it to be on the western side of you. How will you know you have passed it, if you can't see so well due to mist? The tarn might be 500 m long, west to east. By aiming off, rather than passing the tarn on a bearing and checking it off as you go, you are better aiming off your bearing slightly to the west & hitting the tarn, this then gives you an identifiable feature to break up your leg & confirm you are where you think you are. You can then take your next bearing to the location you want to reach, using the techniques of handrails, catching features & possibly aiming off again.
Get these skills dialled in good weather & you can now be ready to head out in to the open fell in inclement weather. Get them dialled in bad weather & your getting ready to head out at night.
Still not got it?
Book on an UltraTrail Nav Day or a Mountain Marathon Skills Day.
Next we'll be looking at more advanced techniques & how to use your skills in the dark.
Charlie & Chris Baynham-Hughes competed in the inaugural OMM 2014 & came away with a 6th place in the Elite Class
The OMM is one of the hardest Mountain Marathons of the year, Mountain Run held a specific OMM Skills day to bring runners up to scratch on all the skills they need to complete.


