Heading out the door? Read this article on the new Outside+ app available now on iOS devices for members! Download the app.
You’re cruising a broken and blocky ridgeline that leads to the summit when all of a sudden a 20-foot technical section stops you in your tracks. Your partner doesn’t skip a beat and starts to head up, but you’re intimidated by those six or seven moves because they’re surrounded by a 1,000-foot drop on either side. Though you’ve got gear and a harness in your pack, time is of the essence. Thankfully, there’s a fast and efficient way for the leader to use the broken nature of the rock to build a simple anchor and belay a follower—with minimal gear and no harness. Use a “pinch point,” the area of contact between two large rocks that provides 360° of access to thread or tie a sling, as an anchor to save time and keep everyone safe and happy.

ONE
When you come upon the technical section, stop and take out your rope. You won’t need the entire length; just uncoil enough for each person (this works for parties of two or more) to tie in (about six feet per person should be plenty), plus enough distance for the leader to climb the section and get to a good spot for an anchor. Keep the rest in a mountaineer’s coil that the last follower will carry as he climbs.
TWO

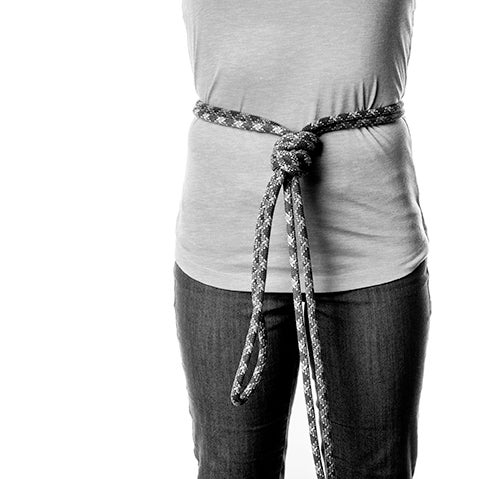
The leader should fold the rope where he’s tying in so it creates a bight that’s about three feet long, and tie an overhand knot here. Place that knot in front of your belly button, and wrap the rest of the bight around your midsection. Run the end of the loop through the existing overhand, and use the tail to tie another overhand around the other strands, snugging this knot up to the first one (right). It should be snug but not restricting. Keep in mind that the leader will have to climb this section unprotected. If he is unsure or sketched out in any way, take the time to put on harnesses. The leader can then carry gear and be belayed normally with a device.
THREE
Once the leader passes the most difficult section, he should locate a solid pinch point. A good pinch point means the rocks are fully contacting each other, so there’s no chance that the sling or webbing could slip through. Plus, none of the rocks should shift or move from the force of a fall. At this point, the follower, who is standing down below, can tie into the rope using the same method of two overhands on a bight.
FOUR
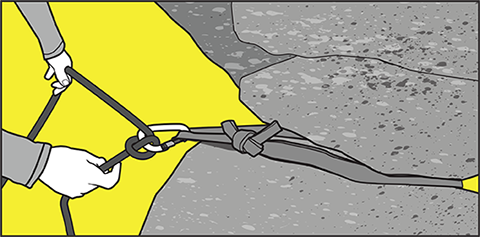
Girth-hitch a wide sling around the pinch point, or use thicker webbing and tie a water knot. Clip a locking biner onto the webbing, pull up all the slack in the rope (there should only be a small amount), and tie a Munter onto the biner. Lock the biner. Your follower is now on belay (see above)! Once he reaches you, set other followers up the same. For another quick belay method check out How to Hip Belay.
Note: This method should only be used for short, low-angled, and relatively easy sections (read: 20 to 25 feet max) where a fall is unlikely, but one climber prefers to be belayed. It’s also an excellent option for protecting a short technical section on the downclimb.