
Compression can be a pretty confusing subject. With so much jargon and literally thousands of different compressors to choose from it's no wonder some less experienced producers get a little stumped from time to time.
One area of compression that appears to remain a mystery to some is that of buss compression. This is one that I'm asked about a lot, so let's take a look at the ins and outs of the process and shed some light on the subject.
Every few weeks, we revisit some of our reader's favorite posts from throughout the history of the site. This tutorial was first published in May of 2009.
Step 1 - What is Buss Compression?
Essentially buss compression is no different to any other compression treatment. The only real discerning factor here is that buss compression refers to the practice of applying a compressor to a whole group of instruments or even the entire mix.
If your not familiar with the term 'buss' don't worry — it's really just jargon for group. Many different manufacturers and DAWs have different names for groups, such as auxiliaries or busses. They all do more or less the same thing and group several instruments together.
A drum group is perhaps one of the best examples of when we would use a buss/group and indeed buss compression. It's very likely that you would insert individual compressors on some of your separate drum tracks,s but even with this processing when combined the drums may lack cohesion.
By routing all your drum tracks to a group or buss within your DAW you are able to adjust the volume of the whole drum track and even apply EQ and other processors to them as one. You should notice your drums take on a more consistent dynamic signature, and you will also enjoy higher perceived volume levels and a natural cohesion of the sounds. This is sometimes referred to as 'audio glue'.

Basic buss routing in Logic Pro
Step 2 - Single Band Buss Compressors
There are a few different types of compressor that are commonly used as buss compressors — single (or full band) and multi-band models.
Some consider a true buss compressor to be a traditional single band compressor of a very high quality or with custom components. Technically, any single band compressor in your plug-in list can be put to work as a buss compressor but some would argue that such a critical task deserves a dedicated processor. Some cheaper tracking compressors may introduce unwanted artifacts and dramatically reduce dynamic range.
There are several companies making dedicated single band buss compressors. These are usually geared towards mastering but are just as useful when used on drum or instrument busses. These plug-ins often emulate hardware or are modeled on famous hardware units. This component modeling often eats a fair amount of CPU overhead and therefore latency induced by these plug-ins can be higher than more straight forward processors.
A great example of a modeled buss compressor is the 'Waves G Master Buss compressor'. This is directly modeled on the compressor in the master section of the famous SSL 4000 G console and is actually endorsed and licensed by SSL themselves. This is super close to the real thing and has to be heard to be believed. Throw one of these on your master buss and the separate elements in your mix should magically become one.

Waves G Master Buss compressor
Universal audio also make some great buss compressors including their own take on the SSL model and another from Neve. They also provide a great buss processor as part of their precision mastering range. The precision mastering compressor has a few really cool functions such as a high pass filter to avoid pumping effects and a wet/dry mix function.

UAD precision buss compressor

UAD Neve 33609 buss compressor
Basic loop dry
Basic loop treated with SSL buss compression
Step 3 - Multi-band Compression
Multi-band compression is arguably not dedicated buss compression but can be used in exactly the same way with great results.
Mastering grade multi band compressors can be indispensable tools for reducing the dynamic range of a group of instruments (or your mix) without coloring the overall sound. They do this by using several compressors, each acting on a specific frequency range. These 'slices' are divided using crossover or bandpass filters and usually fully adjustable.
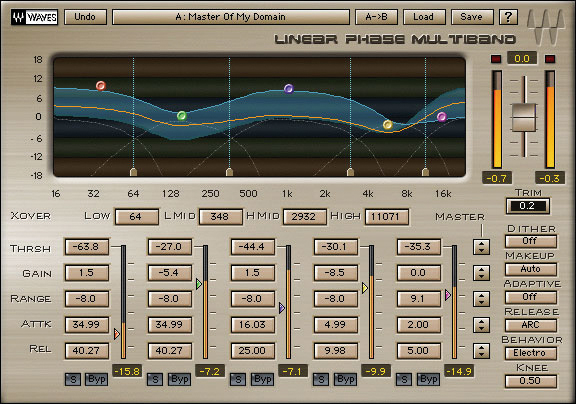
Waves linear multiband
Using this method means you can home in on problem areas of your mix without affecting others. Although you may not get the cohesive effect that single band buss compressors achieve it will certainly marry mix elements together to some degree. Of course if you feel the need you can experiment with a mixture of multi-band and single band bus compression.
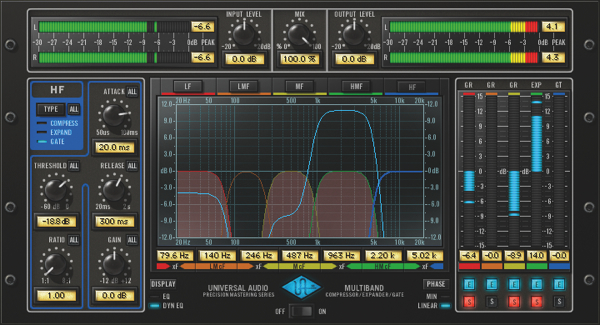
UAD Precision multi-band compressor
Basic loop treated with multi-band compression
Step 4 - Buss Compression in Mastering
Bus compression in mastering is very common and a lot of buss compressors are actually specifically designed for the task. A buss compressor will often be one of the first processors in a mastering engineer's chain and is important in achieving a polished final master.
The mastering buss compressor's main job is to reduce the dynamic range of the mix, taming peaks and therefore raising quieter sounds. This will all result in a louder more defined mix but the whole process should occur transparently and be pleasing to the ear.
It is for these reasons we tend to try and use the highest quality compressors we can here. Low ratios and high attack/release settings are also desirable as they tend to reduce any noticeable artifacts and drastic gain changes. These mastering compressors tend to work at very high resolutions and use advanced algorithms to achieve their sound, so its always advisable to splash out on the best you can afford for this task.
Although basic results are possible with cheaper plug-ins, using a stock compressor bundled with a DAW might not be the wisest move here. Saying that, some DAW manufacturers are making real steps in this area and are starting to supply mastering grade plug-ins as standard.
Step 5 - Parallel Compression
The way in which your buss compressors are routed has a huge impact on the final result. To create loud, high density signals while retaining strict control over the wet/dry mix of the compression effect we can use parallel compression. This is essentially a form of buss compression but requires a little routing to take place.
By making a duplicate of your instrument or master buss, you are able to place your buss compressor on one of these and leave the other 100% dry. The buss compressor can then be used with much more aggressive settings and mixed in to taste. This way the final signal mainly consists of the untreated dry audio and retains most of its original character. This is really great for drums but can be used on pretty much any group of instruments including your masters.

Parallel compression routing in Logic Pro 8
Real drum sound dry
Real drum sound parallel compression
Step 6 - Serial Compression
Another great way of routing your buss compressors is in serial as opposed to parallel. This involves using multiple compressors (perhaps of different kinds) on the same channel or buss. These compressors can be used at different stages in your effects chain and can achieve much more transparent compression than one compressor alone.
Try this on your master buss to catch wayward peaks on your mix and create cohesion. The separate compressors on the chain can be chosen for their specific features or character, giving you a cocktail of your favorite processors.

Mastering project using 3 buss compressors in series


