


Recovery Fitness: Get in Top Shape For Winter Adventures

Now is the time to injury-proof your body—here are 12 essential exercises to prep your body for winter adventures.
                        <div class="articleSlideshow">

                            <div class="articleSlideshowSlide" data-slide="1">
                                <div class="articleSlideshowButtons">
                                    <a  class="articleSlideshowButtonsPrevious" style="display: none;" rel="prev"><span class="icon-circle-left"></span> <span>Previous</span></a>
                                    <a href="/Recovery-Fitness-Get-in-Top-Shape-For-Winter-Adventures/2" class="articleSlideshowButtonsNext" style="" rel="next"><span>Next</span> <span class="icon-circle-right"></span></a>
                                    <div class="clearfix"></div>
                                </div>
                                <h2>Flexibility</h2><h3>Warrior 3</h3>

Why: The whole enchilada—balance, stretch, strength and activation.
How To: From standing, stretch arms overhead, hinge at the hips and bend forward, lifting one leg off the ground. Arms, torso and raised leg should be in line, with toes pointing at the ground. Hinge as far as you can while maintaining straight line. Look at one spot on ground to help with balance. Hold for five breaths. Repeat on the other side.
                            </div>

                            <div class="articleSlideshowSlide" data-slide="2">
                                <div class="articleSlideshowButtons">
                                    <a href="/Recovery-Fitness-Get-in-Top-Shape-For-Winter-Adventures/1" class="articleSlideshowButtonsPrevious" style="" rel="prev"><span class="icon-circle-left"></span> <span>Previous</span></a>
                                    <a href="/Recovery-Fitness-Get-in-Top-Shape-For-Winter-Adventures/3" class="articleSlideshowButtonsNext" style="" rel="next"><span>Next</span> <span class="icon-circle-right"></span></a>
                                    <div class="clearfix"></div>
                                </div>
                                <h2>Flexibility</h2><h3>Prayer Stretch</h3>

Why: Awesome mid-back stretch.
How To: With hands in prayer position, touch elbows together. Slowly raise arms as high as you can, with elbows and palms touching. Hold for five breaths.
                            </div>

                            <div class="articleSlideshowSlide" data-slide="3">
                                <div class="articleSlideshowButtons">
                                    <a href="/Recovery-Fitness-Get-in-Top-Shape-For-Winter-Adventures/2" class="articleSlideshowButtonsPrevious" style="" rel="prev"><span class="icon-circle-left"></span> <span>Previous</span></a>
                                    <a href="/Recovery-Fitness-Get-in-Top-Shape-For-Winter-Adventures/4" class="articleSlideshowButtonsNext" style="" rel="next"><span>Next</span> <span class="icon-circle-right"></span></a>
                                    <div class="clearfix"></div>
                                </div>
                                <h2>Flexibility</h2><h3>Hands Up</h3>

Why: Stretches the mid-back (often tight in paddlers) and is key to body alignment.
How To: With feet about 30 centimetres from a wall, lean back into a partial wall sit. Press lower back and head against the wall and put your arms up like you’re being told to freeze. Touch elbows and wrists to the wall and slowly slide them up the wall as far as you can while keeping the lower back, head, wrists and elbows touching the wall. Hold for five breaths.
                            </div>

                            <div class="articleSlideshowSlide" data-slide="4">
                                <div class="articleSlideshowButtons">
                                    <a href="/Recovery-Fitness-Get-in-Top-Shape-For-Winter-Adventures/3" class="articleSlideshowButtonsPrevious" style="" rel="prev"><span class="icon-circle-left"></span> <span>Previous</span></a>
                                    <a href="/Recovery-Fitness-Get-in-Top-Shape-For-Winter-Adventures/5" class="articleSlideshowButtonsNext" style="" rel="next"><span>Next</span> <span class="icon-circle-right"></span></a>
                                    <div class="clearfix"></div>
                                </div>
                                <h2>Flexibility</h2><h3>Wall Bum</h3>

Why: Releases tension in the hips. Relaxing.
How To: Lie on your back, bum about 25 centimetres from a wall. Rest feet on the wall and hands besides hips. Rest right ankle across left thigh, like you’re crossing your legs. Slide left leg down the wall until shin is parallel to the floor. Slide body back if hips tilt or lift. Hold for several minutes, breathing deeply. Switch legs.
                            </div>

                            <div class="articleSlideshowSlide" data-slide="5">
                                <div class="articleSlideshowButtons">
                                    <a href="/Recovery-Fitness-Get-in-Top-Shape-For-Winter-Adventures/4" class="articleSlideshowButtonsPrevious" style="" rel="prev"><span class="icon-circle-left"></span> <span>Previous</span></a>
                                    <a href="/Recovery-Fitness-Get-in-Top-Shape-For-Winter-Adventures/6" class="articleSlideshowButtonsNext" style="" rel="next"><span>Next</span> <span class="icon-circle-right"></span></a>
                                    <div class="clearfix"></div>
                                </div>
                                <h2>Flexibility</h2><h3>King Arthur</h3>
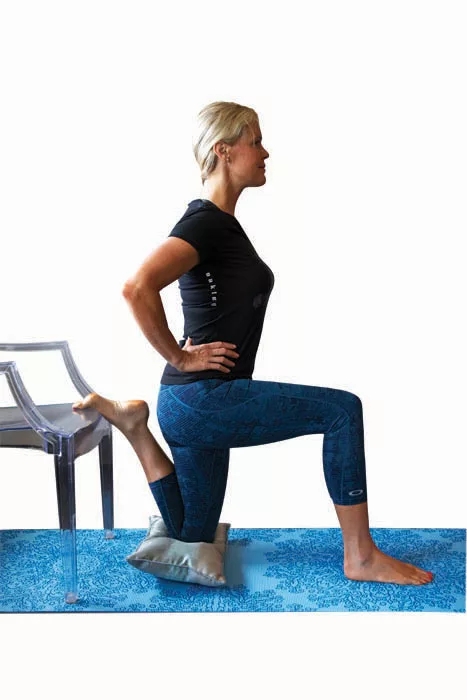
Why: Loosens tight quads and hip flexors. Good for runners and cyclists.
How To: Rest one foot on the edge of a couch or chair. Lower into a lunge, resting the back knee on a cushion on the floor, as close to the couch as possible. Straighten torso. The thigh of the back leg should feel a strong stretch from hip to knee.
                            </div>

                            <div class="articleSlideshowSlide" data-slide="6">
                                <div class="articleSlideshowButtons">
                                    <a href="/Recovery-Fitness-Get-in-Top-Shape-For-Winter-Adventures/5" class="articleSlideshowButtonsPrevious" style="" rel="prev"><span class="icon-circle-left"></span> <span>Previous</span></a>
                                    <a href="/Recovery-Fitness-Get-in-Top-Shape-For-Winter-Adventures/7" class="articleSlideshowButtonsNext" style="" rel="next"><span>Next</span> <span class="icon-circle-right"></span></a>
                                    <div class="clearfix"></div>
                                </div>
                                <h2>Strength</h2><h3>Chin-Ups</h3>

Why: Strengthens latissimus dorsi, pulling back muscles that extend from the pelvis to the neck. Important for posture, core strength and neck and back health.
How To: Grab an overhead bar, hands shoulder-width apart. Pull up to chin height, squeezing shoulder blades together. Build-up to chin-ups with assist-bands under your legs, or jump up to chin height and lower slowly. Try for 10.
                            </div>

                            <div class="articleSlideshowSlide" data-slide="7">
                                <div class="articleSlideshowButtons">
                                    <a href="/Recovery-Fitness-Get-in-Top-Shape-For-Winter-Adventures/6" class="articleSlideshowButtonsPrevious" style="" rel="prev"><span class="icon-circle-left"></span> <span>Previous</span></a>
                                    <a href="/Recovery-Fitness-Get-in-Top-Shape-For-Winter-Adventures/8" class="articleSlideshowButtonsNext" style="" rel="next"><span>Next</span> <span class="icon-circle-right"></span></a>
                                    <div class="clearfix"></div>
                                </div>
                                <h2>Strength</h2><h3>Shoulder Press</h3>

Why: Reinforces and strengthens the shoulder joint.
How To: With a dumbbell in each hand, lift arms so hands are in line with shoulders. Push weights overhead until arms are straight. Pause and lower. Aim for two sets of 10. Alternatively, use a rubber exercise band, anchored under your feet, an end in each hand.
                            </div>

                            <div class="articleSlideshowSlide" data-slide="8">
                                <div class="articleSlideshowButtons">
                                    <a href="/Recovery-Fitness-Get-in-Top-Shape-For-Winter-Adventures/7" class="articleSlideshowButtonsPrevious" style="" rel="prev"><span class="icon-circle-left"></span> <span>Previous</span></a>
                                    <a href="/Recovery-Fitness-Get-in-Top-Shape-For-Winter-Adventures/9" class="articleSlideshowButtonsNext" style="" rel="next"><span>Next</span> <span class="icon-circle-right"></span></a>
                                    <div class="clearfix"></div>
                                </div>
                                <h2>Strength</h2><h3>Box Jumps</h3>

Why: Builds eccentric strength, the braking muscles needed for slowing down and changing direction. Important for knee resilience.
How To: Stand in front of a box, small wall or stairs, squat and then jump up and onto the box. Pause. Reverse the motion back down to the ground, absorb the impact by dropping into a deep squat and immediately pop back up onto the box. Don’t pause on the ground and make sure knees don’t collapse inwards. Try two sets of 10, increasing the speed or box height if this is too easy.
                            </div>

                            <div class="articleSlideshowSlide" data-slide="9">
                                <div class="articleSlideshowButtons">
                                    <a href="/Recovery-Fitness-Get-in-Top-Shape-For-Winter-Adventures/8" class="articleSlideshowButtonsPrevious" style="" rel="prev"><span class="icon-circle-left"></span> <span>Previous</span></a>
                                    <a href="/Recovery-Fitness-Get-in-Top-Shape-For-Winter-Adventures/10" class="articleSlideshowButtonsNext" style="" rel="next"><span>Next</span> <span class="icon-circle-right"></span></a>
                                    <div class="clearfix"></div>
                                </div>
                                <h2>Strength</h2><h3>The Savage</h3>
Why: Strengthens glutes and abductors. Good for anyone who struggles with IT band pain.
How To: Stand sideways against a wall or counter with inside leg gently pressing against the surface. Keeping the body centred and hips even, lift the inside foot. The glutes and abductors have to work hard to keep you from sliding down. Hold until you can’t maintain form, then switch sides.
                            </div>

                            <div class="articleSlideshowSlide" data-slide="10">
                                <div class="articleSlideshowButtons">
                                    <a href="/Recovery-Fitness-Get-in-Top-Shape-For-Winter-Adventures/9" class="articleSlideshowButtonsPrevious" style="" rel="prev"><span class="icon-circle-left"></span> <span>Previous</span></a>
                                    <a href="/Recovery-Fitness-Get-in-Top-Shape-For-Winter-Adventures/11" class="articleSlideshowButtonsNext" style="" rel="next"><span>Next</span> <span class="icon-circle-right"></span></a>
                                    <div class="clearfix"></div>
                                </div>
                                <h2>Strength</h2><h3>Lateral Running</h3>

Why: A sneaky way to add groin and hip abductor strength, common weak areas in runners and cyclists.
How To: Mid-run or on its own, stand sideways to the direction of travel and shuffle sideways. Keep feet in line and perpendicular to the direction of motion. It will feel awkward. Switch sides or directions. Do two 200-metre sections, per side.
                            </div>

                            <div class="articleSlideshowSlide" data-slide="11">
                                <div class="articleSlideshowButtons">
                                    <a href="/Recovery-Fitness-Get-in-Top-Shape-For-Winter-Adventures/10" class="articleSlideshowButtonsPrevious" style="" rel="prev"><span class="icon-circle-left"></span> <span>Previous</span></a>
                                    <a href="/Recovery-Fitness-Get-in-Top-Shape-For-Winter-Adventures/12" class="articleSlideshowButtonsNext" style="" rel="next"><span>Next</span> <span class="icon-circle-right"></span></a>
                                    <div class="clearfix"></div>
                                </div>
                                <h2>Balance</h2><h3>Horseshoe</h3>

Why: Builds strength and speeds response in the tiny muscles that stabilize the hip, knee and ankle.
How To: Place five markers in a semi-circle around you: one at each side, one directly in front of you and two in between. Stand on one leg and touch each of the points, bending at the hips and rising to standing between each touch. Touch all five in both directions, switch arms and then repeat, standing on the other leg.
                            </div>

                            <div class="articleSlideshowSlide" data-slide="12">
                                <div class="articleSlideshowButtons">
                                    <a href="/Recovery-Fitness-Get-in-Top-Shape-For-Winter-Adventures/11" class="articleSlideshowButtonsPrevious" style="" rel="prev"><span class="icon-circle-left"></span> <span>Previous</span></a>
                                    <a  class="articleSlideshowButtonsNext" style="display: none;" rel="next"><span>Next</span> <span class="icon-circle-right"></span></a>
                                    <div class="clearfix"></div>
                                </div>
                                <h2>Balance</h2><h3>SLEC</h3>

Why: Good recovery and prevention of knee and ankle sprains and strains.
How To: Acronym for, “stand on one leg with eyes closed.” Do it where you won’t fall into anything. Aim for 30 seconds total time per leg. Make it harder by moving your head from side to side while eyes are closed.
                            </div>

                        </div>


