OBS 101
OBS (Open Broadcast Software) is a free tool that we recommend using in tandem with other video design softwares in order to record and broadcast your work. It can be downloaded for free at: https://obsproject.com
OBS (Open Broadcast Software) is a funnel for video streams. It allows the user to take multiple video feeds (or images), put them all together, and then record or broadcast the content through a single, unified video feed.
OBS allows you to prerecord video, adding background images, text, and additional platforms (Zoom calls, webcam feeds, CdnStudio etc) and livestream to YouTube, Vimeo and Facebook live.
This page will walk you through basic tools for streaming, recording, and accessing your videos.
OBS Basic Tools for Streaming

SOURCES (bottom left): A source is a single stream of video or audio processed by your computer. Examples of sources include: internet browser windows, webcam feeds, movie files or even easy to edit text. Next week we’ll be releasing a full list and description of sources. If you want to read more about sources, click HERE.
SCENES (bottom left): A scene is your canvas for arranging and organizing various sources and/or text and images in order to create your desired custom video stream. It can be as simple or as complex as you want it to be. If you want to create a video with a few different “looks”, select the “+” on the bottom left and name it. If you are recording/streaming one “look” no need to add others. Some examples of when other looks would be helpful include title cards, credits, “blackouts”, etc.
AUDIO MIXER: This allows you to monitor your audio inputs and control the volume output to your stream/recording. OBS automatically defaults to using your computer’s built in microphone. If you are using an external microphone you will need to add it as a source in the same way you would a video source.
SCENE TRANSITIONS: Scene Transitions are an optional feature in OBS where you can freely switch between SCENES by fading, cutting or sliding between them over a user amount of time.
CONTROLS: This is where you will find options to stream and record your work. Streaming and recording are self-explanatory and studio mode allows you to make edits to your stream (adding text and video) while you’re streaming.
Getting Started
STEP ONE: Download OBS here: https://obsproject.com. This a free platform. If you have the means, consider donating to the open source developers.
STEP TWO: Before you connect OBS to your streaming service of your choice, you’ll want to ensure you have the correct settings. Edit your settings by selecting SETTINGS under CONTROL in the bottom right corner.
Recommended Settings
If you’re not sure about what settings will best work for your stream on YouTube, Twitch, or Facebook, visit their website for help guides. Below we will share some recommended settings for basic streams and if we ignore a specific function it may be too advanced to cover in this beginners guide.
Before you get started, it’s a good idea to do an upload/download speed test to ensure your internet can handle the stream. You can read about upload speeds here.
Once you’ve selected SETTINGS under CONTROL in the bottom right corner, a display box will pop up with tabs along the left side, including:
STEP ONE: GENERAL: here you can change the colour of the OBS interface and your preferred language. If you’re streaming and you want to automatically save your stream as a recording, under output select “automatically record when streaming”. If your computer has trouble with processing, we don’t recommend checking this box. As the action of recording is heavy on your CPU, you may experience difficulties, abnormalities or at worst crashes if your computer does not have sufficient specifications or memory space.
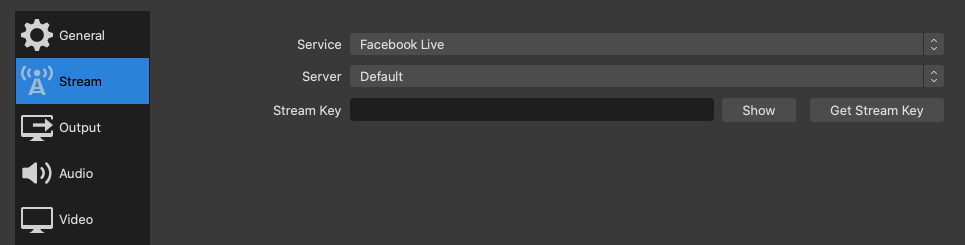
STEP TWO: STREAM: under “stream type”, select “streaming services” and it will bring up a list of services that integrate with OBS (twitch, youtube, periscope, fb, etc). It’s best to come back to this section when you’re ready to stream. Under “server”, you can leave it on auto or select a server that’s closer to your physical location. “Stream key” is where you will eventually paste the key for the service you’re using. More on this later.
STEP THREE: OUTPUT: If you’re streaming, you may want to increase the “video bitrate” to 3000 or 3500 but don’t make it too high for people to have issues streaming your content. The “recording path” allows you to select where you want the videos to be saved on your computer and the file format.
STEP FOUR: VIDEO: allows you to adjust resolution. It’s best to set the base camera resolution to the size of your display and the output resolution to either 1920 x 1080 (preferred) or if you’re on a lower powered system, you can change this to 1080 x 720. 60 FPS is best or you can try reducing to 30 FPS
STEP FIVE: HOTKEYS: you can assign keyboard shortcuts.
Audio
OBS has the capacity to record audio from your desktop, a microphone, and through additional sources.
STEP ONE: Go to the mixer tab along the bottom.
STEP TWO: Beside “desktop audio”, select the settings gear and select “properties” from the drop down menu. Select “default”. This will record/stream audio from your desktop. If you are running sound through something on your desktop, this function should pick up that audio in your stream.
STEP THREE: Underneath “desktop audio” you’ll see “mic/aux”, select the settings icon, then properties. Here you can select the microphone you’d like to use.
Recording with OBS
STEP ONE: Once you’re ready to record your work, preset your cues by going back to the first scene you have established. Ensure the audio is picking up whatever microphone you are using (laptop microphone, external USB microphone, etc.).
STEP TWO: In CONTROLS (bottom right) click START RECORDING.
STEP THREE: On a Mac, the video will be saved in your MOVIES folder as an MKV file. If you can’t find your videos, select FILE > SHOW RECORDINGS. If you have VLC Media Player, you can play an MKV file. If not, select FILE > REMUX RECORDINGS.
Streaming with OBS
STEP ONE: Once you are ready to stream, under CONTROLS select START STREAMING. Because we have not yet setup the URL and Stream Key, we will be prompted to open settings to enter the URL and Stream Key in the ‘stream’ tab.
STEP TWO: Along the left side of the screen select STREAM and select which service/platform you are using.
STEP THREE: After you’ve selected your service, select GET STREAM KEY and it will walk you through accessing a stream key from whatever service you are using.
Studio Mode
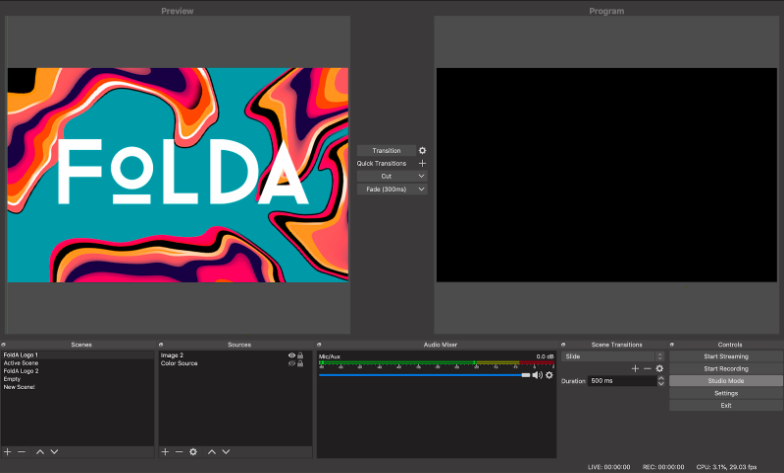
Studio Mode is a helpful way to view your broadcast or recording while it is happening. It allows you to view not only what you are currently broadcasting, but it also gives you a second “preview” view where you can set up your next scene before a transition. Load the scene by clicking on it, select the transition you want to use, and then press “transition” when you’re ready for your move.