~ * ~
This article is written by Peg Rounds
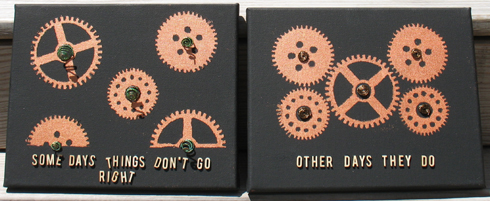
There are some days that everyone has things that just don’t go right. I know I sure do, but I sometimes need to make it a point to stop and think that every day isn’t like those days. I decided to create these inspirational canvases so that I can see them and remember that there will be good days and not so good days, too. These are really fun to make and can be done with any inspirational reminder that you may need so be sure to make some of your own and place them where you can see!
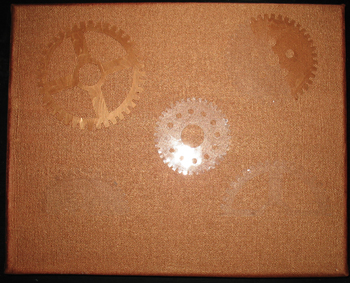
Begin by painting the canvas with a base coat. This will be the paint color that shows through. Allow it to completely dry.
Next, die cut a piece of acetate with a die cut machine to create the stencil pieces that you will be placing on the canvas. Spray each piece with Easy Tack by Krylon so that they can be easily removed. Place them in position on the canvas.
Dab paint, using a second color of paint, into the open areas of the stencils so that the paint gets into the smaller areas.
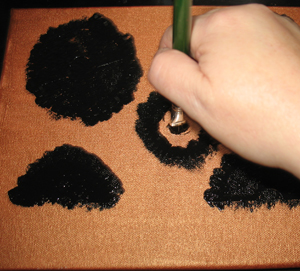
Now, paint straight brush strokes across the entire canvas from top to bottom to cover it.
Allow the paint to dry and carefully lift upward on the edges of the stencils to remove them.
Lay those aside and begin the work on the spiral pieces that will be the inside springs.
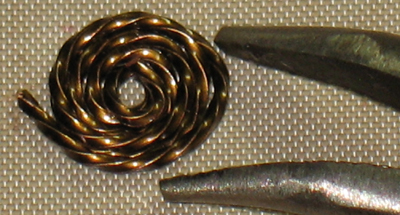
Start with a piece of jewelry wire. The length will depend on how large you will want the spiral,
Curl one end of the wire using a pair of pliers,
![]()
Continue to wrap the wire until you have all of it wrapped into the spiral. As you work each new wrap should lay beside and against the last one.
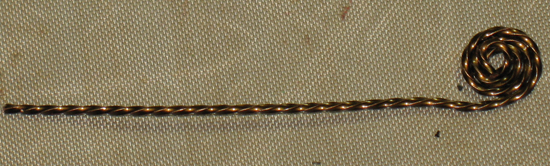
Take the pliers and grasp the center of the wire and lightly pull it up and outward to create the pieces that have sprung.
Age the coils by applying a patina to them.
Allow them to dry slightly and sand them with a fine sand paper to shine them up a little.
Create the second canvas in the same way, but when creating the coils do not pull the centers outward or patina them.
Finish both of the canvases by adding the inspirational message using wooden letters and attach everything with glue.
~*~*~*~*~*~*~*~*~*~*~*~*~*~*~*~*~*~*~*~*~*~*~*~*~
Peg Rounds has been seriously creating many types of art since 2007. Her focus has become mixed media, card making and jewelry making. She is often found on social media sites pegscraftingcorner where she enjoys sharing all that she has created.
~*~*~*~*~*~*~*~*~*~*~*~*~*~*~*~*~*~*~*~*~*~*~*~*~
.
.


Great article, Peg. Love the quote and the idea of an inspiration journal. TFS
Hi! I really like your canvases/art and this project, but I’m a little confused about the stencil shapes and colors of paint?
Obviously, I understand to use cogwheel diecuts, but not sure where I’d find the pattern or design. Secondly, I understand the “basecoat” must be a copper color? But what I’m confused about is the part where after dabbing paint over stencils, you say to brush paint straight brush strokes across … well, are you talking about using the same basecoat color or something else?
It probably seems I’m not a creative person who probably has no business being here or attempting mixed media, or that I have no imagination, but I’m just confused.
Thank you so much for the project and your time 🙂
Why isn’t the finished project shown so the viewer/reader knows what the process will look like? It’s rather confusing the show only part of the process.
Good point, Buff. I will contact Peg and see if we can get a finished picture. Regards, Michelle