This article is written by Elaine Brady Smith
Welcome back to the Encaustic Basics Series!!! This is Part II, on how to make it easy and economical to get started with encaustic painting. If you missed Part I, click here. In this article we will talk about how to prepare your substrates, fusing, and adding color to your work. So let’s get started!
Preparing Substrates
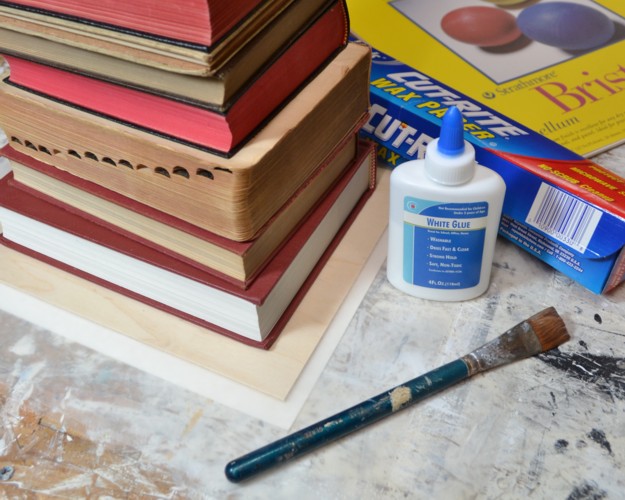
Encaustic wax will adhere to a variety of surfaces. It is important that the surface is absorbent and porous or it will eventually crack and flake off. So glass, plastic, smooth metals, and any surfaces painted with acrylic paint are not suitable for encaustic. I will be using ¼” birch plywood for the demo pieces in this article that I purchased from Dick Blick.
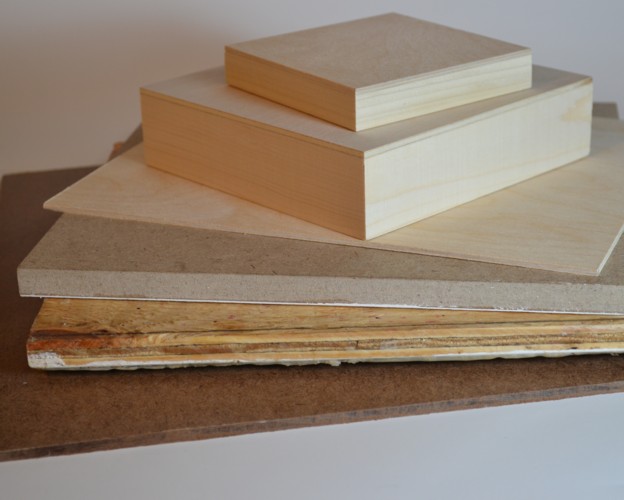
If you are doing 2 dimensional works, some good choices for substrates are: Birch Plywood, Regular Plywood, Unfinished Pine, Un-tempered Masonite, MDF, and Cradled Panels. When choosing your substrate, make sure that it has not been previously treated with any oils or chemicals. Once you decide what type of work you want to do, spend some time researching what substrate will best suit your needs.
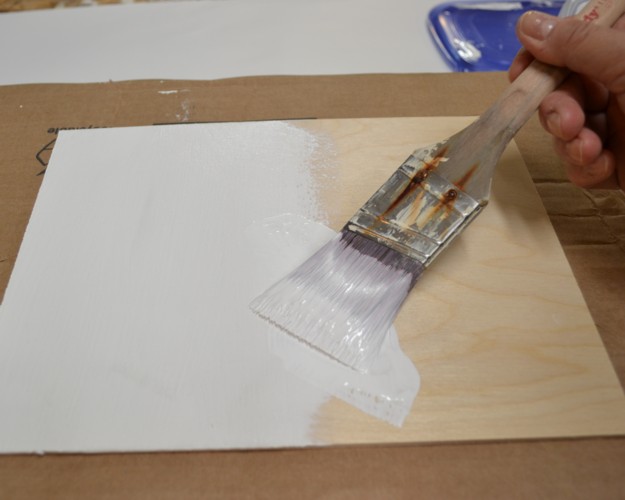
To prepare your substrate, encaustic medium or plain beeswax can be applied directly to most unfinished wood. If you are doing a painting, preparing the surface with a ground of encaustic gesso will enhance and give brighter color results. R & F Encaustic Gesso is my go-to product for surface preparation for an encaustic painting. It is easy to apply and gives me a solid white background. It is important to know that regular gesso made for acrylic and oil painting does not work with encaustic painting. Encaustic gesso has a “higher proportion of solid to binder, making it highly absorbent” R&F Paints.
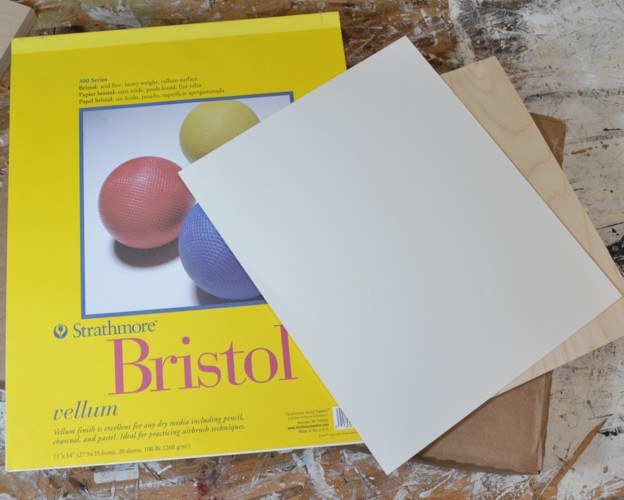
If I plan to do a collage piece that will eventually be covered with paper, I don’t bother with the gesso, I just work on the raw wood. Also, as an alternative to encaustic gesso, you can glue any type of absorbent paper to your surface to serve as a ground. Bristol paper is a good choice for a white, smooth, consistent surface.
Steps for gluing paper to your board:
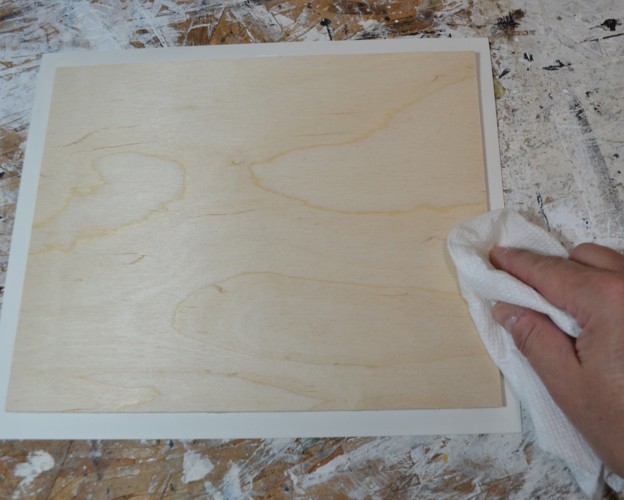
- Lightly sand your board and wipe away any dust particles.
- Cut your paper slightly larger than the size of the board.
- Brush an even layer of glue on to the board and on to the back side of the paper.
- Lay the glue side of the paper onto the board and brayer down to make even contact, smoothing out any air pockets.
- Place the board upside down on a sheet of wax paper and wipe away excess glue with a damp paper towel.
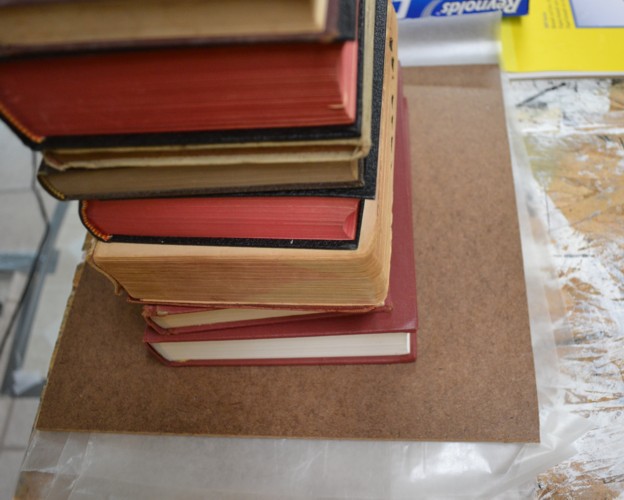
- Weight the board with a heavy object. I have inserted a thin piece of Masonite board (shown in photo above) between my boards and the books…my heavy object, to evenly distribute the weight.
- Allow to dry overnight.
- Trim excess paper from the edges with an x-Acto knife or single edged razor blade.
- Sand the sides of the board to remove dried glue.
In the photos above I have used 100lb Bristol Vellum Paper and white glue. You can also use gel medium or PVA as your glue, just make sure that your paper is evenly covered with glue and that none gets on the surface of your paper.
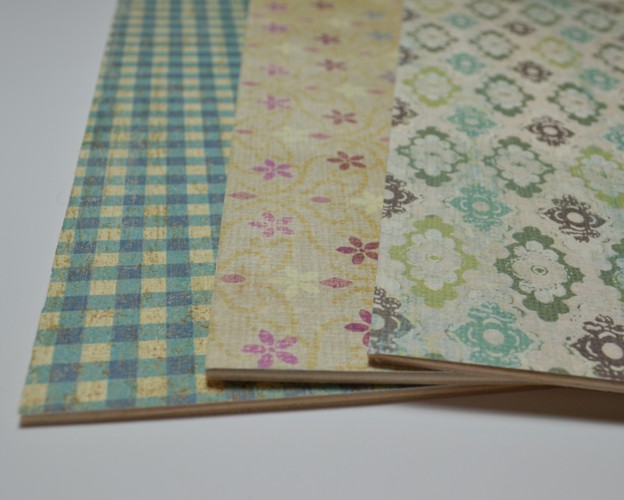
If you’d like a patterned background, you can glue collage paper directly to your board. This is a good way to add heavier papers that might be difficult to attach with wax. Shown above are boards that I have prepared with heavy weight scrapbooking paper. This is also an excellent way to incorporate drawings or artwork as background to your piece. Just make sure they have not been painted with any acrylic paint.
Note that the paper will absorb whatever glue you use, so be mindful that glue might seep through your paper if it is too thin or between cracks of adjoining pieces. If it is a lighter weight paper, don’t bother with glue; just attach it to the board with wax.
Another note about using paper with encaustic is that the wax will make many papers transparent or darker, so it is best to test before you start! We’ll talk more about adding collage paper to encaustic work next month in Part III of this series.
Fearless Fusing!!!
You should begin your painting with a primer layer of wax on your substrate regardless of what type of ground you chose. The layers of wax cool very quickly as you add them and will remain individual layers, one on top of the previous one until you fuse them together. It is necessary to fuse each and every layer to make it one with the previous layer. This may seem tedious at first, but after a while, you will begin to enjoy the Zen-like practice of fusing.
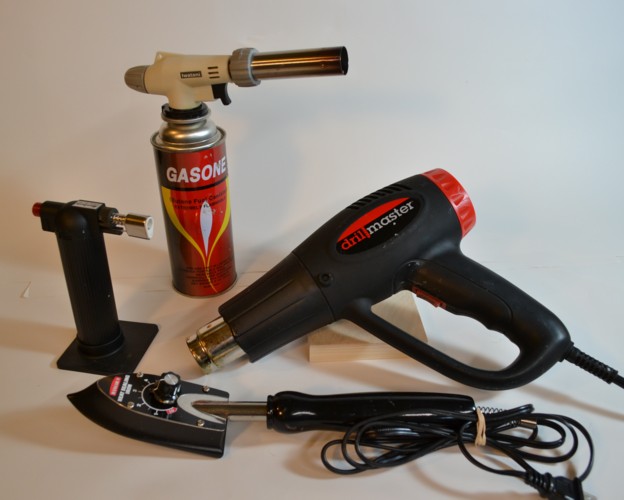
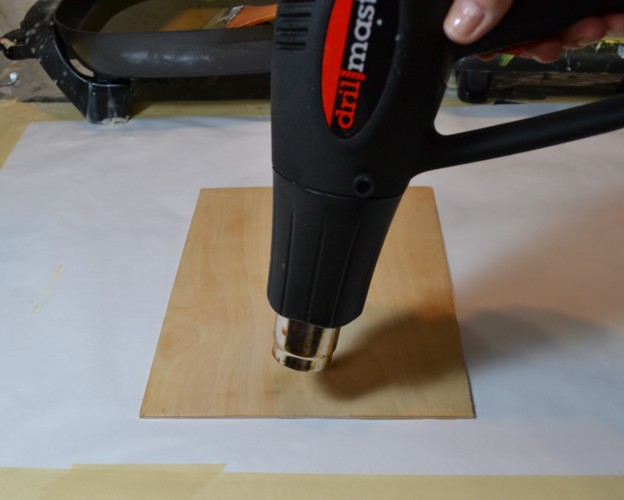
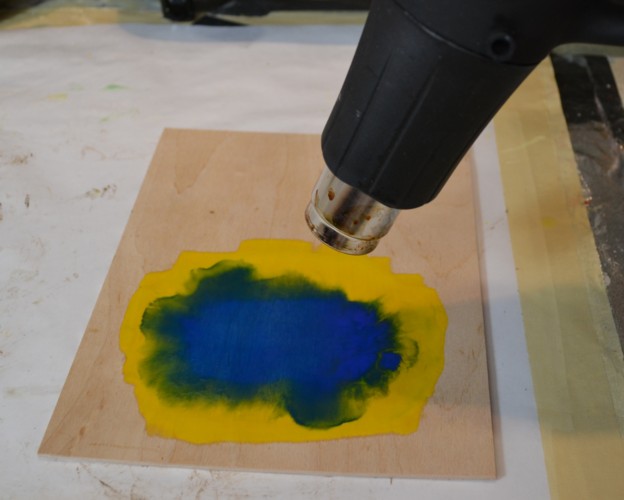
Fusing is the process of adding a heat source to the surface so the wax melts enough to bond with the layer beneath. It is possible to fuse very large areas with a heat gun or acetylene torch, and it is possible to fuse very small areas with a small butane torch or mini quilt iron. As you practice with different heat sources, you will begin to know which heat source you prefer and which to use for various techniques. In the photo above, I am showing the heat sources I use most often. I generally prefer a heat gun because of the amount of collage paper I use in my work. I don’t want any of it to catch on fire!
Steps for adding primer layers and fusing with a heat gun:
- Melt encaustic medium or plain beeswax directly on your heated palette or in a clean tin can.
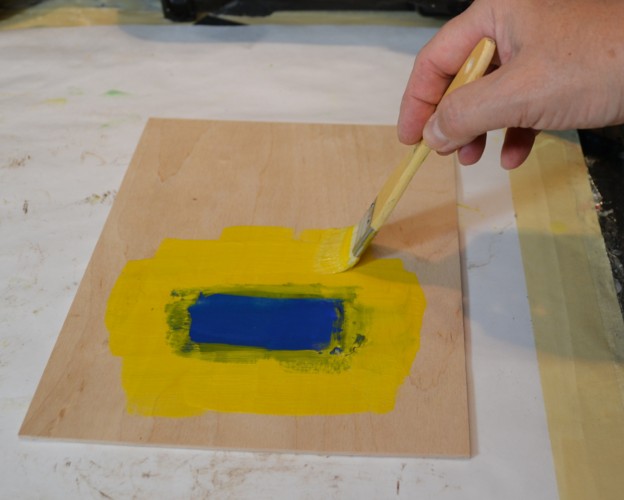
- With a natural bristle brush, dip into the medium and paint an even layer onto your board. This should also be done on top of a collage paper ground. 2-3 layers are sufficient as primer for a painting. You will get the feel for how many layers are needed, depending on what techniques you plan to use next.
- Point the heat gun 4-6 inches away and perpendicular to the surface (depending on the air flow of your heat gun). Move it slowly across the surface until you see a slight shine on the wax. When you see the shine, move the gun nozzle on to the next area.
- Be careful not to heat too long in one spot, as this will cause the wax to spread and create bare spots on your surface. I recommend using your heat gun on the lowest setting until you get used to the process.
- When the shine disappears and the wax is dull again, your piece is cool enough to brush on another layer of wax and fuse again.
- Fusing takes practice, so don’t become discouraged if your first attempt isn’t perfect. And don’t be afraid to try all the types of heat sources, so you know what you will like! I know many artists who love the big acetylene torch!
And Finally – Adding Color!!!
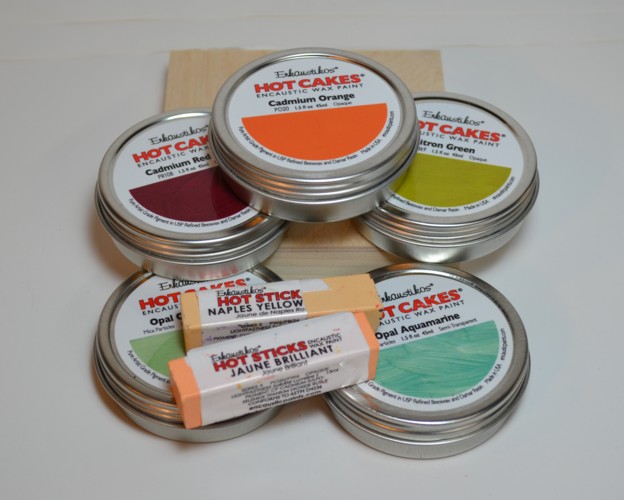
Adding color to your work is the beginning of the real fun! In addition to adding color with collage papers, encaustic paints are available in readymade cakes. I recommend Enkaustikos brand pigment cakes, as they are affordable, good quality encaustic paints with a large variety of colors.
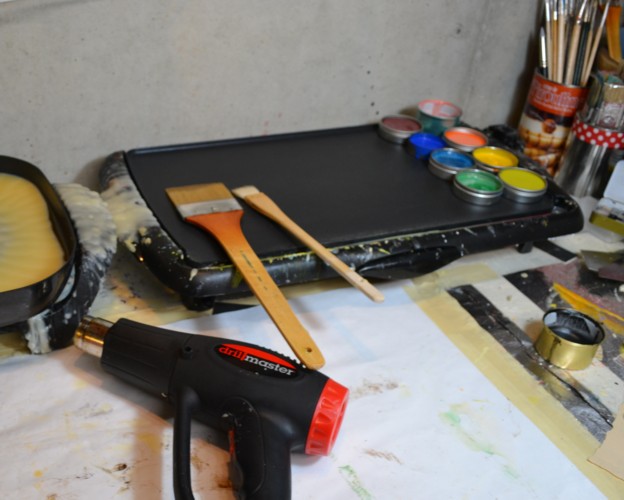
You can heat the pigment cakes in a tin on your palette, or if you only need a small amount of paint or want to mix colors together, melt the paint right on the palette. The pigment colors can also be thinned with encaustic medium to make glazes.
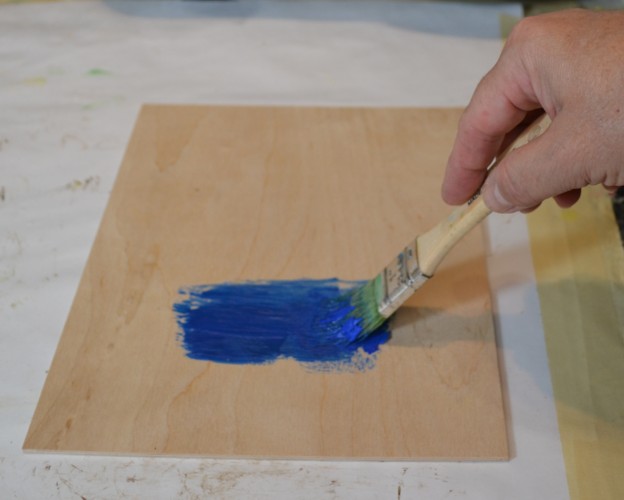
Use a natural bristle brush to apply the color to your piece. Once you use a brush for a particular color, it is best to dedicate the brush to that color, as it is difficult to completely clean wax from brushes.
Steps for adding encaustic paint to your work:
- Brush on the melted encaustic paint with a flat natural bristle brush.
- Fuse the paint to the surface.
- Add more of the same color or add another color to the surface.
- Fuse this layer to the previous layer.
You will notice as you fuse multiple colors, you will be able to use the heat gun to move the wax around to blend them and create new colors. This is the fun and unpredictable nature of encaustic painting.
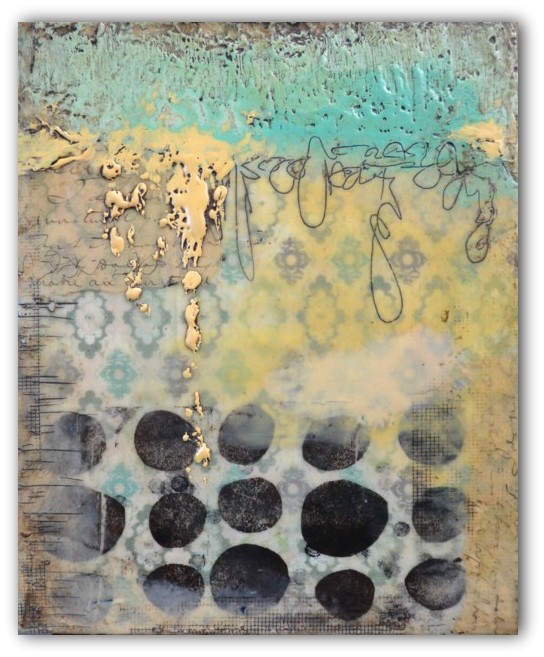
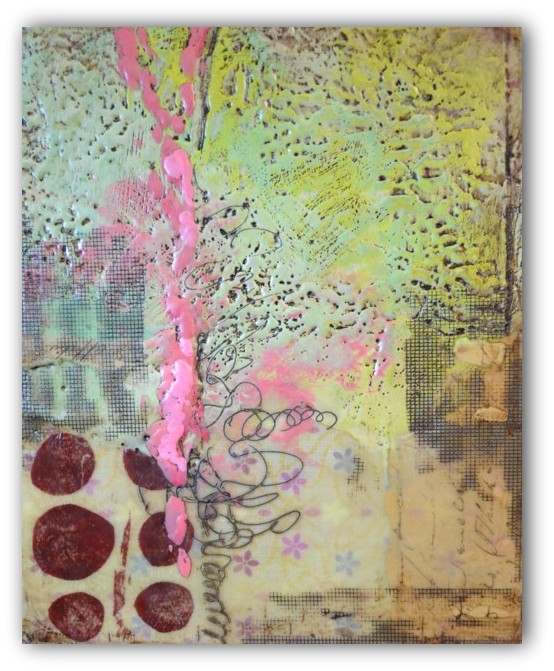
Here are the three boards I started earlier with scrapbooking paper. They may or may not be finished. I never really know until I look at them for a while! I’ve added more collage paper, encaustic paint, and an incised line technique. Let me know what you think.

So I have given you a lot of information, but these instructions are by no means the whole ball of wax (no pun intended!). There are many more techniques to discuss, but you can see that getting started is very simple. It is not beyond your reach to learn encaustic painting. I will keep sharing information here and on my blog www.elainebradysmith.com about encaustic painting and some of my other favorite mixed media techniques. Next month in Part III of the Encaustic Basics series, we will discuss adding collage and embedding objects to your work. So until then, go play and have fun with encaustic painting!!!
~*~*~*~*~*~*~*~*~*~*~*~*~*~*~*~*~*~*~*~*~*~*~*~*~
Elaine Brady Smith loves creating encaustic and mixed media art. Key ingredients in her work are vintage papers and hand printed collage papers made with repetitive marks, simplistic shapes, and transparent layers. She also enjoys other art mediums, such as art journaling, oil painting, and colored pencil drawing. Among her other interests are writing, teaching and spending time with her family. Find more on her website: elainebradysmith.com and on Facebook: Elaine Brady Smith Art
~*~*~*~*~*~*~*~*~*~*~*~*~*~*~*~*~*~*~*~*~*~*~*~*~
.
.


Love your idea of using paper instead of encaustic gesso! I’ve used beeswax as a collage medium but have never tried the encaustic paints. Love your paintings! Thanks for sharing!
Thanks for sharing. I’m just about to embark on my encaustic journey. I will be combining encaustic with my mixed media art.
I have painted images with encaustic wax onto the encaustic surface, like Yuppo paper with a small encaustic iron, that is part of the set. Now I want to glue some images onto it which are regular paper. Nothing sticks! Help!
Hi Dotti Burton,
When working with encaustic, your surface must be absorbent and porous. A surface like Yuppo is a synthetic material and the encaustic wax will eventually flake off. I would recommend using a surface that is made for encaustic work, or use a raw wood surface, or prep a surface with paper or encaustic Gesso. As for adding photos with glue…not sure what you are using, but once you have worked a surface with encaustic medium or encaustic paint, the only thing you can use to add additional materials is more encaustic medium or encaustic paint.
Elaine
What would happen if I used the ordinary white wax instead of beeswax….The beeswax is so expensive. Thank you for your time
Can you use crayola crayons for color with the beeswax or must you use the hot cakes of color. Thanks for all the help.
Hi Dawan and Carolyn, Thank you for your questions. Using other types of wax instead of beeswax could be dangerous. Paraffin wax is a petroleum based wax and would not be suitable for use in encaustic art. It is also brittle when cooled, so it would not hold up long term. Wax crayons offer the same problems. They are petroleum based and emit dangerous fumes when melted.
Hi. I am new to encaustics and have been looking at different YouTube videos trying to pick up information. Only one video claimed you have to put a ‘finishing coat’ on your piece. He suggested a transparent spray coating. Since the videos on YouTube are usually incomplete and/or lack good information, I wondered if I do need a final coat of something. It seems no one really talks about any ‘ finishing ‘ or your work. Your lessons have been the most complete I have read or watched. Thank you. Susan
Hi Susan,
If you are using a true encaustic medium, which is a ratio of pure beeswax to Damarion resin, or if you are working with professionally manufactured encaustic mediums and pigment cakes; then no, it is not necessary to add any type of final coat to your encaustic work. If your piece does not contain a lot of texture, it can be buffed with a soft cloth to produce a nice shine that will make the piece look finished. The wax layers, as long as fused properly, will last a long time. I hope this helps. Please email me with any further questions. Elainebradysmith@comcast.net.
Thanks for your questions,
Elaine
Is it possible to use cement as a substrate?
I was wondering how you applied the gold. Is it gold leaf or are you using encaustic gold pigment?
I have been intrigued by Encaustic ,hence I had to have a go ! I used gesso on illustration board which I would use for acrylics which,as well as Gouache ,are my usual medium .
However I mixed acrylics,Put down some colour & then put a selection of wax colours on the craft iron ,swiped it across ,I was amazed at the result !
It has wonderful texture,plus a shine ,I am wondering if it will drop off in time?
I am wondering the same as beryl – I used acrylics as a base and built layers which I love, will they drop off? Is there a way to test this before I sell them?